Safely Clone Dell XPS SSD to Larger SSD | 2 Simple Ways
Quick Navigation:
- The Case: Dell XPS 15 SSD Upgrade
- Why Perform Dell XPS SSD Upgrade?
- Dell XPS Compatible SSD
- Best Dell Hard Drive Cloning Software
- Dell XPS Clone SSD to Larger SSD without Reinstalling
- Dell XPS 13/15 SSD Upgrade with Disk Clone
- Clone Dell XPS SSD With Backup and Restore
- Boot from the Cloned SSD
- Brief Summary
The Case: Dell XPS 15 SSD Upgrade
You can clone your 1TB SSD to a 2TB NVMe PCIe 4.0 M.2 2280 SSD, but first, ensure the new drive is compatible with your Dell XPS 7590. You'll need to purchase a M.2 NVMe SSD adapter if your laptop doesn't have a M.2 slot. To clone the drive, use a cloning software like Acronis or EaseUS, and follow the manufacturer's instructions. This will preserve your data and operating system. It's recommended to shut down your laptop, disconnect the power cord, and ground yourself before making any internal changes.
When upgrading the SSD on your Dell XPS laptop, you can clone the existing SSD to a larger one using software like Acronis True Image or EaseUS Todo PCTrans. This process involves creating an exact copy of the original SSD, including all operating system, programs, and data, onto the new SSD.
Why Perform Dell XPS SSD Upgrade?
Dell XPS computers, such as XPS 13, XPS 15, and others, often come with a 128GB or 256GB SSD. Cloning the SSD to another SSD is a viable option for several reasons. This process allows users to upgrade their storage capacity, transfer data to a new drive, or create a backup of their existing system. Additionally, cloning the SSD can help preserve the existing configuration and settings of the computer, making it a convenient option for those who want to maintain their current setup. Furthermore, cloning the SSD can also be a useful step in preparing for a hardware upgrade or replacement, as it allows users to transfer their data and settings to a new device. Overall, cloning the SSD to another SSD is a practical solution for Dell XPS users who want to upgrade or maintain their computer's storage capacity.
- Better Performance: The Dell XPS computer may become slow over time due to low disk space on the system drive, making it necessary to upgrade to a larger SSD for improved performance.
- Replace the failing Dell XPS SSD with a new one: If you receive a message from Microsoft Windows saying "Windows detected a hard drive problem. Backup your files immediately to prevent information loss", you should immediately back up or clone your Dell XPS SSD to a larger SSD to prevent information loss.
Dell XPS Compatible SSD
The Dell XPS 13 and 15 laptops use M.2 PCIe NVMe Solid State Drives, which have a 22mm by 80mm form factor and use the PCIe standard. This means they are compatible with M.2 2280 SSDs that meet these specifications.
|
Dell XPS 13 compatible SSD |
Dell XPS 15 compatible SSD |
|
The Samsung 970 EVO and Crucial MX500 are high-performance M.2 Type 2280 internal solid-state drives (SSDs) designed for computers and laptops. They provide fast storage and improved system responsiveness, making them suitable for applications that require high-speed data access, such as gaming, video editing, and other resource-intensive tasks. |
Samsung 970 EVO, Samsung 970 PRO, etc. |
Or consult your computer manufacturer for the compatible SSD.
Best Dell Hard Drive Cloning Software
To clone your Dell XPS SSD to a larger one, ensure you have a compatible M.2 type 2280 SSD. Prepare the new SSD and ensure it is recognized by your computer. Then, download and install a cloning software such as Acronis or EaseUS, and follow the software's instructions to clone your existing SSD to the new one.
Many SSD drives are configured with exclusive hard drive cloning software to clone HDD to SSD drive.
- Samsung Data Migration Software for Samsung SSD drive.
- Transcend SSD Scope for Transcend SSD drive.
- Intel® Data Migration Software to clone data to Intel SSD.
Dell does not provide exclusive SSD cloning software, but a third-party software, Qiling Disk Master Professional, can be a suitable alternative for Windows data migration.
- It is friendly and flexible to use.
- This software enables safe cloning of an SSD to another SSD, eliminating the need for a full system reinstall, and also allows for selective cloning of just the operating system.
- It is feature-It also supports system backup, disk backup, partition backup, and file sync, etc.
- This software is fully compatible with all versions of Windows, from XP to 11.
Dell XPS Clone SSD to Larger SSD without Reinstalling
To clone the Dell XPS SSD to another SSD using Qiling Disk Master, you can either clone the entire disk or clone the operating system and data separately. First, connect the new M.2 SSD to your computer and ensure it can be detected. Then, you can select the source disk (the original Dell XPS SSD) and the target disk (the new M.
- Disk Clone.
- Disk Backup and restore.
Let me explain to you with details.
Dell XPS 13/15 SSD Upgrade with Disk Clone
If you're using a Dell XPS desktop with multiple hard drive slots, you can try using the Disk Clone feature to clone your existing SSD to a larger SSD, allowing you to upgrade your storage capacity without losing any data.
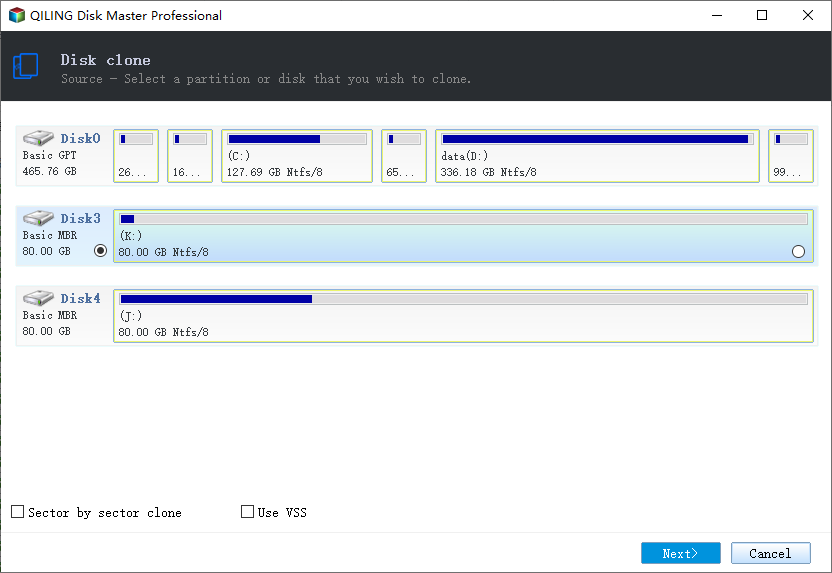
1. Execute the Qiling Disk Master. Select Clone -> Disk Clone on the main window.
2. Select the Dell XPS M.2 SSD as the source disk to clone, and then click Next.
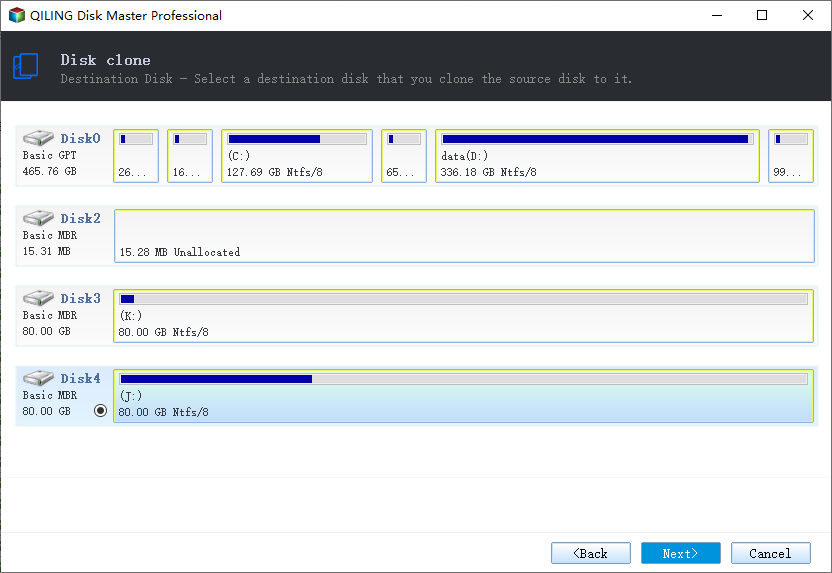
3. Choose the larger M.2 SSD as the destination disk to store all data from the Dell XPS 13/15 laptop.
▶Tip: Please backup important files before cloning to a larger M.2 SSD, as the original drive will be overwritten or deleted during the process.
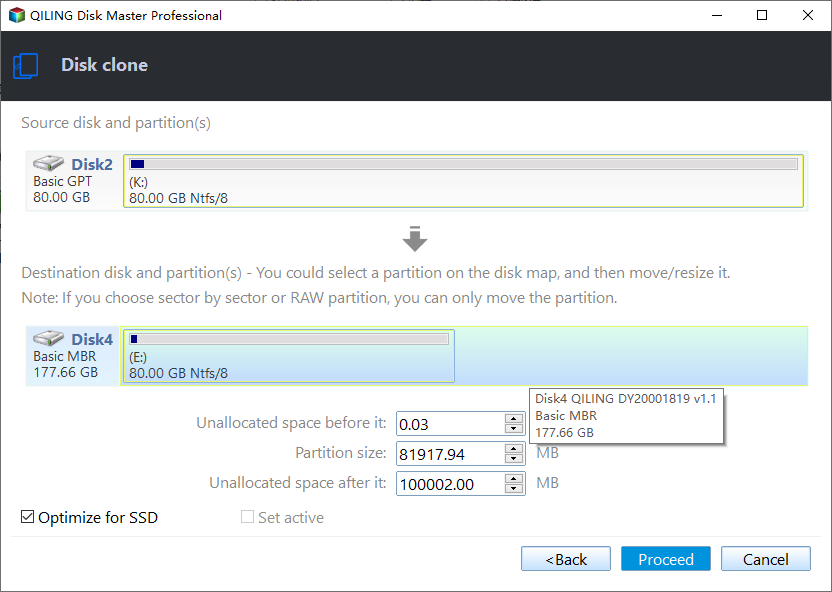
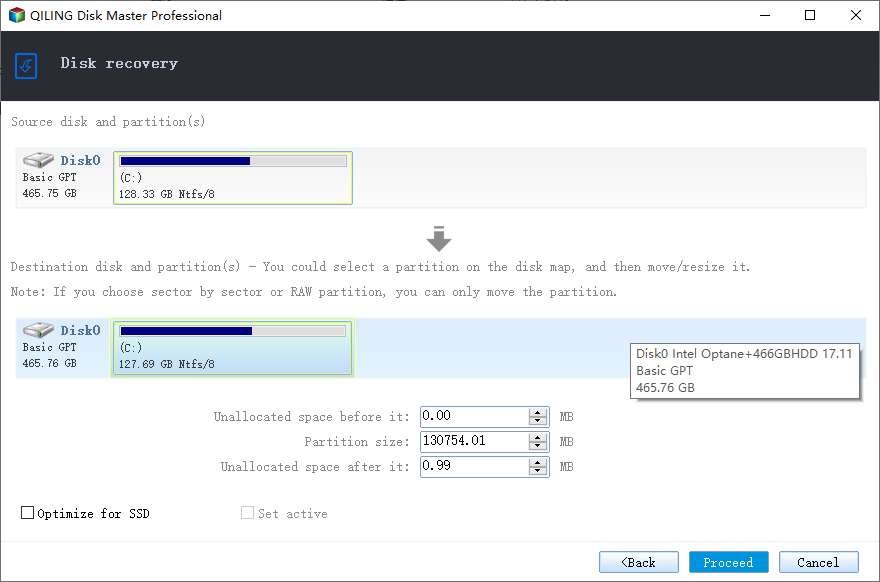
4. To optimize the writing and reading speed for larger M.2 SSD drives, enable the SSD Alignment feature, which automatically adjusts the drive's performance for improved speed and efficiency.
5. To safely clone your Dell XPS's SSD to another SSD, click the "Proceed" button after initiating the cloning process. This ensures a smooth and error-free transfer of your operating system, programs, and data to the new SSD.
▶Tips:
When cloning a Dell XPS 13/15 SSD to a larger SSD, select the "Edit Partitions" option to adjust the partitions and use the full storage space available on the larger M.2 SSD.
✍Edit PartitionsCloning all sectors on the Dell XPS 13 or 15 SSD drive, regardless of whether they're used or not, can take a significant amount of time, as this option, called Sector by Sector Clone, clones every sector, even those that are not in use.
✍This software supports various cloning operations, including cloning Windows 10 to a new hard drive, cloning a hard drive to a Samsung SSD, cloning a hard drive to a WD SSD, and copying data from one SSD to another.
The time it takes to clone depends on the data capacity of the source disk. Take a break, grab a cup of coffee, and come back to it. If you clone a smaller SSD to a larger one without using the Edit Partitions option, you'll end up with unallocated space, which you can then use to create a new partition or merge with an existing one, such as C drive.
Clone Dell XPS SSD With Backup and Restore
To upgrade the SSD on a Dell XPS laptop, back up the existing data to an external hard drive or USB drive, then restore it to a larger M.2 SSD drive, taking advantage of the available bay.
Backup Dell XPS Original SSD
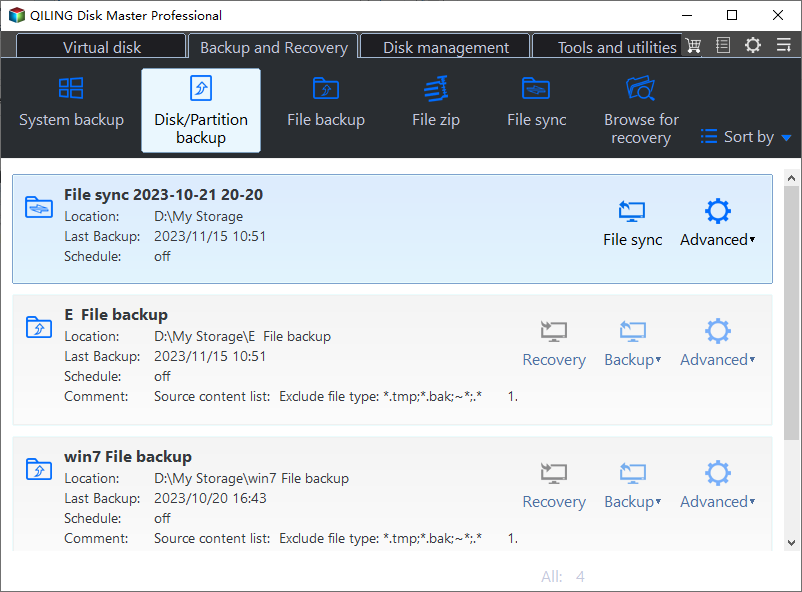
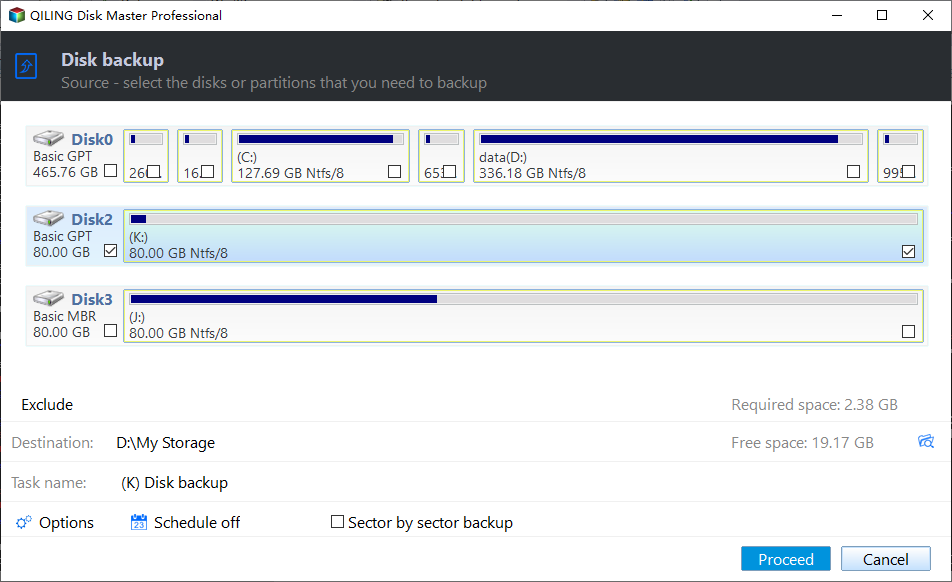
1. Install and run Qiling Disk Master. In the main window, click Backup -> Disk Backup.
2. Click Disk to select the Dell XPS SSD as the source disk for the backup. If desired, input a task name.
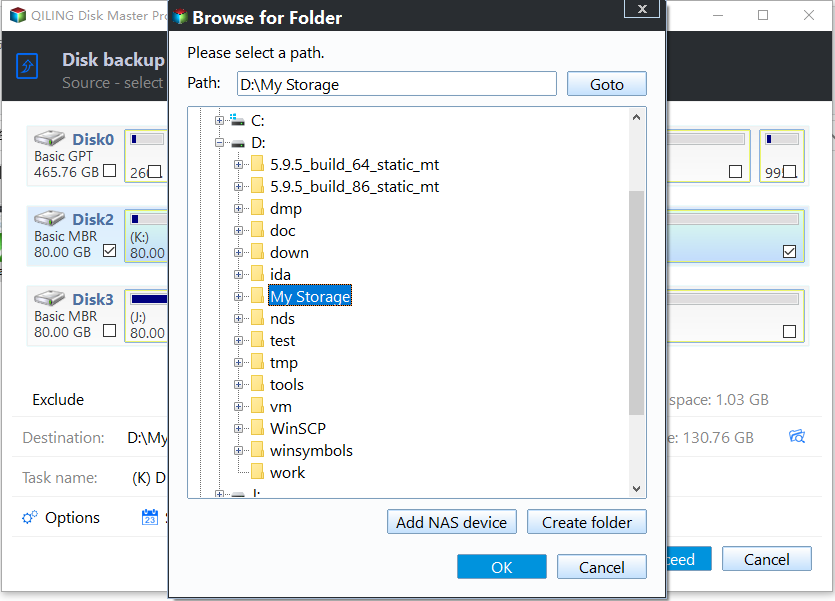
3. Select a destination, such as an external hard drive, to save the SSD backup image file, which can also be saved to a USB drive, network share, NAS device, or other external storage options.
4. Then hit Proceed to backup Dell XPS SSD.
Restore Backup Image to Larger SSD
To restore a disk image to a larger SSD, create a bootable media with Qiling Disk Master, unplug the original small SSD, plug the larger SSD, connect the bootable media and external hard drive with the image file, and boot from it. Qiling Disk Master will run in WinPE environment, allowing the automatic restoration of the disk image to the larger SSD drive.
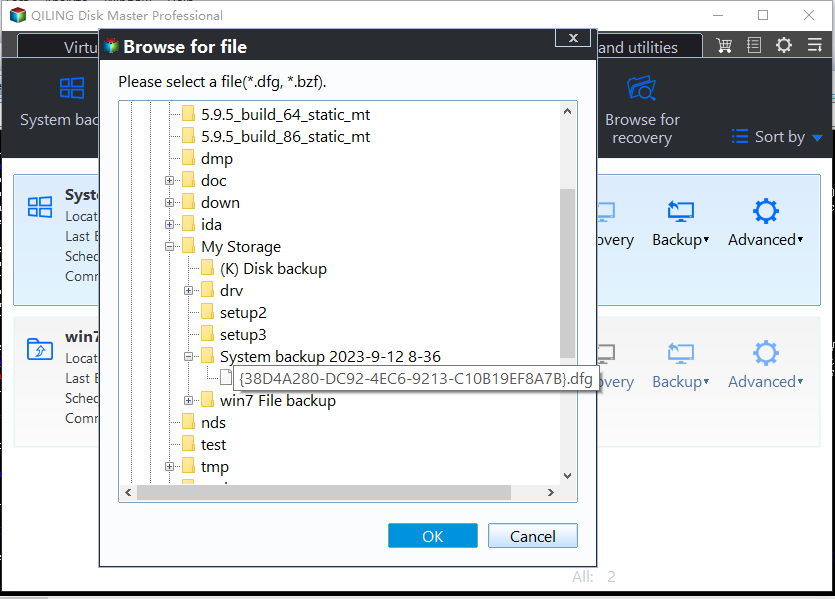
1. On the main console, click Restore -> Select Task or Select Image File to locate the Disk Backup image.
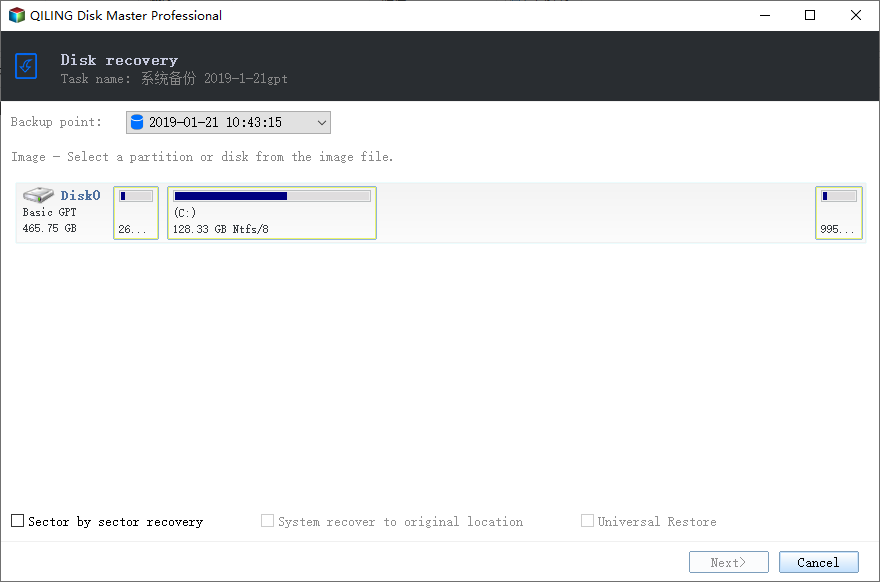
2. Select a backup time point to restore. Then hit Next>>.
3. In the Image Information window, select Restore this entire disk for Dell XPS SSD, and then choose Next.
▶To restore the specialized partition, you can click on the Restore a partition in this disk option. This will allow you to recover the partition to its original state.
4. In the Disk Restore interface, select the larger M.2 SSD drive as the destination disk to save the data from the disk image file, then click Next, and confirm by clicking Yes to proceed.
5. On the Operation Summary window, preview the operation of restoring, tick SSD Alignment, and then hit Proceed.
With the help of Qiling Disk Master, the Dell XPS SSD replacement was successfully completed.
Boot from the Cloned SSD
When you're done with the cloning process, change the boot order to prioritize the cloned SSD. Qiling Disk Master ensures that the cloned SSD is bootable. If you encounter issues with the cloned SSD not booting or receiving a "Winload.efi missing after clone" error, you can find solutions by following the provided link.
Brief Summary
It's highly recommended to clone Dell XPS SSD to SSD using the disk clone feature for a safe and easy transfer of the operating system to a new SSD, especially for those who are not familiar with the backup and restore process.
For those running Windows Server 2003, 2008, 2012, 2016, 2019 (including R2), etc., Qiling Disk Master Server is a good option. It offers features like disk cloning, backup, and restore, as well as additional practical features such as a command line utility, scheduled backups, and automatic deletion of old backup images.
Related Articles
- How to Clone Dell Laptop Hard Drive to SSD with Secure Boot
- Step-by-Step Guide for Dell XPS 8910 SSD Upgrade
- Top Two Ways to Clone Dell Laptop Hard Drive
- Clone 500GB HDD to 250GB SSD with Secure Boot

