Full Guide to Clone HDD to Crucial SSD and Boot Successfully
Quick Navigation:
- About Crucial SSD install kit
- Best Crucial SSD clone software for Windows 11/10/8/7
- How to clone a hard drive to Crucial SSD
- Summary
About Crucial SSD install kit
If you want to clone HDD to Crucial SSD, you may think of buying the Crucial SSD install kit, which seems to include everything you need for cloning a hard drive to an SSD. The SSD install kit is available in the Crucial official site, and you can buy it for 24.99 dollars. The kit includes data transfer software, a USB-to-SATA cable, a 3.5-inch adapter bracket, few mounting screws, and standard SATA cable.
However, this may not be good enough. The included data transfer software is old, and it is not compatible with GPT formatted hard drives. If you want to install your Crucial SSD in a desktop, you still need a SATA power cable besides what is included in the install kit. Is there such data transfer software that fully supports GPT disks when cloning hard drive to Crucial SSD? Just keep reading.
Best Crucial SSD clone software for Windows 11/10/8/7
Talking about specialized cloning software, Qiling Disk Master Professional tops the list. You can benefit a lot from its following features:
- It allows you to clone large hard drive to smaller SSD or clone smaller SSD to larger SSD with ease.
- You can make the clone while Windows is running. No bootable medium is needed to boot your computer in order to use the cloning software.
- If your computer is suffering from boot error, you can use it to create a bootable USB disk or CD/DVD to perform the clone without loading Windows.
How to clone a hard drive to Crucial SSD
To clone HDD to SSD Crucial, there are only a few steps needed.
1. Connect your Crucial SSD to your desktop with SATA cable. Or use SATA-to-USB cable to connect the SSD to your laptop externally.
2. Download and run the best cloning software - Qiling Disk Master.
3. After the program loads successfully, click on "Tools and utilities" and select “Disk Clone”.

✿ Note: If you want to clone only OS, you can select “System Clone”.
4. Select the hard drive as source disk and Crucial SSD as destination disk successively.

5. Tick "SSD Alignment" to accelerate the reading and writing speed of the destination SSD. Click the "Proceed" to start the cloning process.
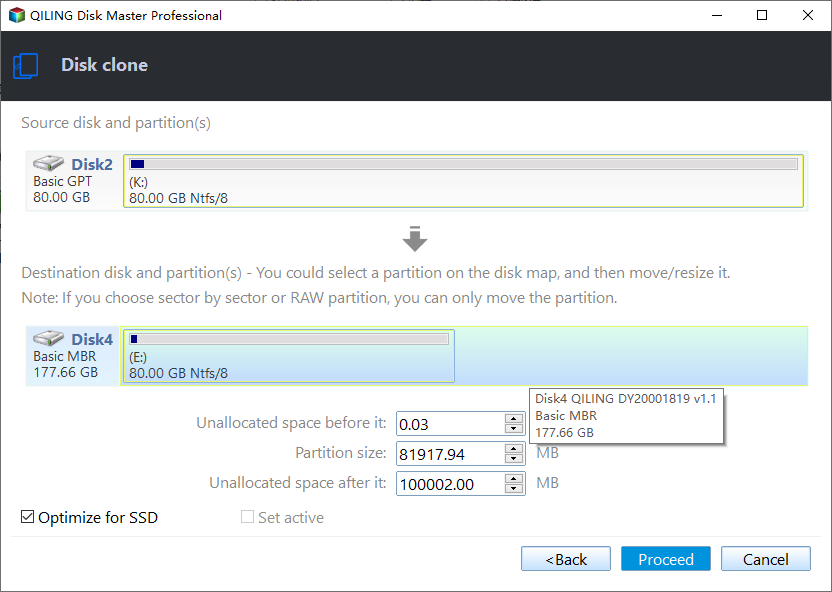
Also, you can use Sector by sector clone to copy all sectors including blank ones or Edit Partitions to adjust the partition size on the destination disk. And the latter one is more practical, since it resolves two potential issues during the cloning process.
#1: The cloned drive not showing full capacity.
By default, all the cloning software keeps the old partition layout on the destination disk unless you change the partition size while cloning. To prevent this from the beginning, you can click Edit Partitions and choose:
👉 Add unused space to all partitions: It will reallocate the unallocated space to each partition of the target disk, appropriate for the disk size.
👉 Manually adjust partition size: It allows you to extend unallocated space to any partition on the destination disk as you want.
#2: The cloned drive not bootable after cloning.
One of the biggest reasons is the destination and source disk have different partition styles and you don't convert them to the same before cloning. In this situation, you can simply check Convert the destination disk from MBR to GPT or vice versa, depending on the disk partition styles of them.
Summary
When the clone is in process, you can still use the computer to do your work. When the clone is done, you can boot your computer and change the SSD as first boot device to boot from the new cloned SSD.
Qiling Disk Master also provides backup and restore functions, so you can also backup the hard drive and restore to the SSD when you want to upgrade to SSD rather than clone HDD to Crucial SSD. Go for it and have a try.
Related Articles
- Best Free Crucial SSD Clone Software for Crucial SSD Clone
Acronis True Image for Crucial is a free Crucial SSD clone software, but it is always not working. To clone all series of Crucial SSDs or other branded SSDs, Qiling Disk Master will be a better choice. - Migrate OS to Crucial SSD via Free Qiling Disk Master
Want to migrate OS to Crucial SSD for free quickly and safely? This post will save you from installation CD and all the complicated operation. - Step-by-Step Guide for Dell XPS 8910 SSD Upgrade
This tutorial presents how to perform Dell XPS 8910 SSD upgrade step by step and provides the best disk cloning software to help you. - How to Solve Hard Disk Error 301 Efficiently? (4+1 Fixes)
Have you encountered hard disk 301 error in your HP computer? Find quick fixes to the error from this page.