How to Clone SATA SSD to M.2 NVMe [Step-by-Step Guide]
SATA vs. NVMe, Which One is Better?
Many users want to clone SATA to NVMe because NVMe SSDs offer faster data transfer rates and lower latency compared to traditional SATA SSDs, making them ideal for applications that require high-speed data access, such as gaming, video editing, and other resource-intensive tasks.
SATA SATA (Serial Advanced Technology Attachment) is an interface that connects solid-state drives, hard disk drives, and optical drives, significantly improving upon its predecessor PATA. Under ideal conditions, SATA's read speed can reach up to 600 MB/S.
NVMe NVMe is a new standard host controller interface that uses the PCI Express bus to connect SSDs, allowing them to reach speeds of up to 3500MB/S, which is 6x faster than SATA SSDs, but also more expensive.
If you prioritize high read and write speeds and have a sufficient budget, NVMe SSDs are a suitable option. However, the challenge lies in migrating all data and the operating system from SATA to NVMe, which can be a complex process.
Case: Can I Clone SATA SSD to NVMe SSD?
You can clone your Windows 10 and files from the Crucial SATA SSD to the new NVMe SSD, and then wipe the source SATA SSD. This process is called "refreshing" your system. To do this, you'll need a cloning software like Acronis True Image, EaseUS Todo Backup, or Macrium Reflect.
You can clone a SATA SSD or HDD to an NVMe drive, but first, you need to ensure your system supports NVMe. Most NVMe SSDs use the M.2 form factor, but not all M.2 slots support NVMe, so check your motherboard's manual to confirm which type of M.2 drives it supports.
💬If your motherboard has an M.2 slot that supports NVMe and your computer supports UEFI boot mode, you can use disk clone software to clone a SATA drive to an M.2 NVMe SSD directly, keeping the SATA drive as a secondary storage device.
Some NVMe SSDs in add-NVMe SSDs can also be installed in a card form, which can be directly inserted into a PCIe expansion slot on a motherboard, often referred to as "NVMe SSD add-in cards" or "NVMe PCIe expansion cards."
To prepare for this, you will need to [insert information or tasks to prepare]. I will elaborate on this in the next section.
What to Do Before Cloning SATA to NVMe
As stated, NVMe-To clone a SATA drive to an NVMe drive, you'll need to enable the M.2 slot (or PCIe expansion slot in some cases) and boot in UEFI mode. Additionally, you'll need to prepare the following:
Download and install disk clone software
A NVMe SSD will not boot in legacy mode, so if your source SATA drive is formatted with MBR, you'll need to convert the partition style to GPT in advance to avoid cloning issues.
To simplify the process and improve the success rate, I would recommend Qiling Disk Master Professional here.
◾ EaseUS Todo PCTodo PCTodo PCTodo PC offers a Disk Clone feature that can clone a system disk from GPT to GPT or MBR to GPT without conversion, allowing users to clone Windows 10 from SATA to NVMe using System Clone. This feature enables users to clone their system disk with ease, making it a convenient option for upgrading their storage drive.
◾ The software runs in an intelligent clone mode by default, copying only used sectors, which allows for cloning a larger HDD to a smaller SSD or cloning an SSD to a larger one. Additionally, it can perform automatic SSD alignment on the target NVMe SSD, accelerating its reading and writing speed.
This program works on all editions of Windows 11, 10, 8.1/8, 7, Vista, and XP. Download it to have a shot at solving your issue.
The Clone features in Free Trial are only for demonstration purposes and must be upgraded to the full version to complete any operation.
Connect NVMe SSD into the NVMe M.2 slot correctly
Motherboards with Intel z97 and AMD FX 990 chipsets, as well as some notebooks, support both SATA and PCIe M.2 SSDs.
Check your system specifications and user manual to see if the NVMe SSD is compatible. If compatible, ensure it's connected to the correct slot, otherwise it may not appear in BIOS.
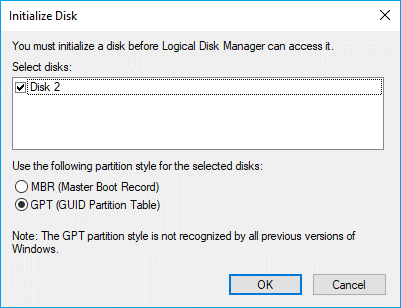
If the NVMe SSD is brand new, you may be asked to initialize it when you install it. To do this, select the partition style as GPT (GUID Partition Table) and click OK. This will prepare the drive for use.
Get enough space to run disk cloning
Cloning a hard drive from one to another requires the target drive to have enough space to hold all the existing data on the source disk, which can affect the success of the cloning process. To avoid issues with the cloned drive not booting due to insufficient space, it's recommended to follow certain steps.
- Check disk space To check both SATA and NVMe drive, type `diskmgmt.msc` in the search box and press Enter to open the Disk Management window. This will display all available disks, including their capacity, partition style, file system, and more.
- Free up space Delete unnecessary files and apps, then run a disk cleanup to clear temporary files on your SATA drive.
Related tips: check partition style (MBR/GPT)
1. Check if the target NVMe is partitioned as GPT. If not, partition it as GPT to support UEFI.
- To open the disk management window, press the Windows key + R to open the Run window, then type "diskmgmt.msc" and press OK. This will open the disk management window where you can view and manage your computer's disks, including formatting or deleting disks.
- To check the partition style of a disk, select the disk, go to "Properties" > "Volume" > "Partition style" to see if it's MBR (Master Boot Record) or GPT (GUID Partition Table).
How to Clone SATA to NVMe Step by Step
To clone a SATA drive to an NVMe drive, use disk cloning software to migrate all data and OS directly. The process is the same for cloning SATA SSDs and SATA HDDs. Follow these steps: [insert steps here].
📑Before cloning a SATA drive to an NVMe SSD, back up any important data from the NVMe SSD to an external hard drive or other device, as the cloning process will overwrite everything on the target drive.
Step 1. Set up disk cloning via the tool you installed
Launch the cloning software, go to the Clone tab and choose Disk Clone.
If you only want to clone Windows 10 to an NVMe SSD, you can also use the System Clone feature.
Step 2. Specify the SATA drive and the NVMe drive respectively
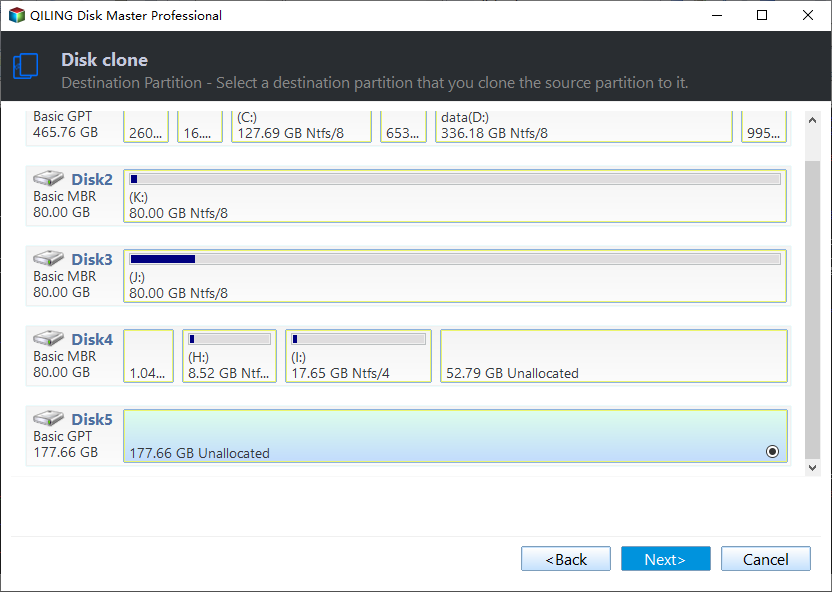
Select the SATA hard drive or SSD as the source disk, then select the NVMe SSD as the destination disk, and click Next to continue.
Step 3. Overview the operation and Proceed
Enable SSD Alignment to enhance the NVMe SSD's performance, then click Proceed to execute the operation.
💬You can also use the following features:
👉 Sector By Sector Clone: Clone all sectors, including blank and logically bad sectors, when cloning a SATA SSD to a larger NVMe SSD, which may take longer.
👉To adjust the partition size of the destination disk, you can edit the partitions to resize the disk space as needed. This involves modifying the partition table to allocate more or less space for the operating system, applications, or data.
- The command to resize partitions without actually resizing them is not available. However, you can use the `resize2fs` command to resize the file system without resizing the partition.
- The command to add unused space to all partitions on a target disk is `parted /dev/sdb mkpartfs -s`. This command utilizes the parted utility to reallocate the unallocated space to each partition of the target disk, specified as `/dev/sdb`.
- Manually adjusting partition size allows users to extend unallocated space to any partition, giving them full control over disk space allocation.
- The option to convert the destination disk allows you to change the partition style of the target disk to match the source disk, or leave it unchanged. This can be useful if you want to ensure the target disk has the same partition style as the source disk. (Note: This response is a rewritten version of the original text in a single paragraph, as requested.)
Step 4. Boot from the cloned NVMe
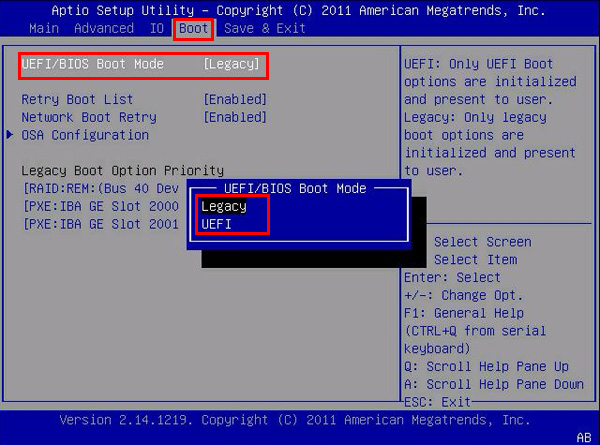
To resolve the issue, simply restart the computer and enter the BIOS settings by pressing a specific key (e.g. F2, F8, F12, Del, etc.). Ensure that the boot mode is set to UEFI boot mode.
If it's Legacy mode, you may need to convert the cloned NVMe SSD to UEFI mode to ensure it boots properly. Otherwise, you might encounter issues with the cloned drive.
To keep your SATA SSD/HDD as a data storage device, you need to set the NVMe SSD as the first boot option in the UEFI menu. You can then use the Disk Wipe tool to wipe the SATA drive as desired.
Qiling Disk Master supports cloning NVMe to SATA by connecting the SATA drive correctly and selecting the source and target disks accordingly.
Troubleshooting: Windows Won't Boot from the Cloned NVMe
If you've cloned a SATA drive to an M.2 NVMe and are experiencing issues with booting, there are several potential reasons for this problem. You can try troubleshooting by checking the BIOS settings to ensure the M.2 NVMe is recognized and set as the primary boot device, verifying the cloned drive is properly configured and not causing conflicts with other drives, and checking for any firmware updates for the M.
1. Ensure the cloning process goes smoothly:
Ensure the cloning process finished without errors, as errors could have caused an incomplete or corrupted OS copy.
2. Check boot order in BIOS/UEFI Settings:
To set your motherboard's BIOS/UEFI firmware to boot from the NVMe drive, access your BIOS/UEFI settings during startup by pressing a key like F2, Del, or F12, and check the boot order to ensure the NVMe drive is listed as the primary boot device.
3. Check the boot mode (UEFI vs. Legacy):
To ensure the cloned system works properly, check if your motherboard is set to use UEFI or Legacy boot mode, as NVMe drives often work best with UEFI. Then, ensure that the cloned system matches the boot mode your motherboard is set to use, specifically using Legacy BIOS for Master Boot Record (MBR) and UEFI for GUID Partition Table (GPT).
4. Make sure the required drivers are installed:
If you're using an NVMe drive, you may need to install specific drivers to get it working properly with your operating system. These drivers can usually be found on the website of your motherboard manufacturer.
If a cloned SSD won't boot, it's likely due to a mismatch between the cloned SSD's boot sector and the original SSD's boot sector, or the cloned SSD's UEFI settings not being properly updated. To resolve this issue, you can try updating the cloned SSD's UEFI settings to match the original SSD's settings, or using a tool like Clonezilla to clone the SSD while preserving the boot sector.
Cloning SATA to NVMe FAQ
- Is M.2 and NVMe the same?
M.2 and NVMe are not the same thing, but they are related. M.2 is a type of storage form factor, while NVMe is a storage interface that allows for faster data transfer. In other words, M.
- What is the difference between PCIe 3.0 and 4.0 NVMe performance?
The PCIe 4.0 interface offers twice the speed of PCIe 3.0, operating at 2GB/s per lane, allowing for a maximum sustained read/write speed of up to 5,000MBps, compared to 3,500MBps for PCIe 3.0.
- What happens if you use a PCIe 4.0 NVMe SSD in a PCIe 3.0 M.2 motherboard slot?
You can install a PCIe 4.0 NVMe SSD in a PCIe 3.0 M.2 slot, but the drive's performance will be capped at PCIe 3.0 speeds.
- Can a SATA M.2 go to an NVMe slot?
NVMe M.2 SSDs and SATA SSDs use different interfaces, making them incompatible with one another.
In some cases, a single M.2 slot can support both SATA and PCIe drives, allowing you to configure it to PCIe mode or Auto mode in the BIOS.
Summary
Qiling Disk Master is a great helper for cloning SATA to NVMe SSD, allowing for faster reading and writing speed. With its powerful disk cloning feature, you can easily transfer data and operating system between disks with different sizes and partition styles.
This software provides complete data protection and disaster recovery solutions, enabling users to schedule automatic backups, as well as perform �ncremental and differential backups to save only changed files.incremental and differential backups to save only changed files.
Related Articles
- How to Clone NVMe to NVMe SSD in Windows (2 Ways)?
- Quick Way to Clone SATA Hard Drive to SSD in Windows 10/8/7
- How to Migrate Windows 10 to M.2 SSD without Reinstalling?
- 5 Steps to Clone M.2 PCIe (NVMe) SSD in Windows 10, 8, 7


