How to Replace Hard Drive with Samsung EVO 850 SSD | Steps
Quick Navigation:
- Samsung 850 EVO SSD Review
- 2 Cases to Replace Hard Drive with Samsung EVO 850 SSD
- Preparations for Replacing HDD with Samsung EVO SSD
- How to Change Hard Drive with Samsung EVO SSD
- Step 1. Connect and Prepare the Samsung EVO SSD
- Step 2. Clone Hard Drive to Samsung 850 EVO (OS and Data Migration)
- Step 3. Boot from the cloned Samsung SSD
- Step 4. Check if the Clone is Successful
- Conclusion
Samsung 850 EVO SSD Review
Samsung 850 EVO is one of the most popular SSDs among PC users all around the world since the day it released. It's part of the 850 series of SSDs and is known for its reliable performance and durability.
Samsung 850 EVO SSD is powered by Samsung’s unmatched V-NAND technology just as 840 EVO and 750 EVO. As for the computing performance, it utilizes TurboWrite technology for sequential write speeds of up to 520 MB/s and sequential read speeds of up to 540 MB/s. The capacity of Samsung 850 EVO SSD is available from 120 GB to 4 TB. Among which, the 850 500 GB, 250 GB and 1 TB are most popular.
No wonder many users will want to replace old hard drive with Samsung EVO 850 SSD. And the easiest way to do it without losing data or reinstalling Windows is disk cloning. I will illustrate the solution in the following article.

2 Cases to Replace Hard Drive with Samsung EVO 850 SSD
| 💻Upgrade a failing hard drive to Samsung EVO 850 SSD | Most hard drives have only a couple of year’s lifespan. It may also be damaged by physical attack, natural disaster, virus and so on. When the old hard drive is about to die, you will want to move everything from it onto the new Samsung EVO 850 SSD. |
| 🚀Use Samsung EVO 850 as boot drive and keep HDD for storage | As covered before, Samsung 850 EVO has so many merits. Using it as boot drive will be a good choice to boost startup and write & read speed. Therefore, you can move Windows OS to the SSD and use the old hard drive as a secondary storage device. |
Whichever case you are in, a handy cloning tool is essential to help you handle the OS and data migration during the hard drive replacement. With it, you can clone entire hard drive to Samsung EVO 850 SSD or migrate only OS to it.
💬Surely, Samsung 850 EVO has some disadvantages as well. With so many high technologies, the price of this SSD is relatively higher than other SSDs. Besides, it has only 5 years warranty, which is shorter than normal warranty period: 10 years. Therefore, you may also need to clone Samsung 850 EVO to another SSD someday.
Preparations for Replacing HDD with Samsung EVO SSD
Upgrading your computer's hard drive to a Samsung EVO SSD can greatly improve its performance and responsiveness. Here's a general guide on how to do it:
What you need for hard drive replacement:
- The target Samsung EVO SSD
- Screwdrivers (usually Phillips-head)
- SATA to USB cable or enclosure (for data migration, if needed)
- Cloning software (e.g., Samsung Data Migration, Qiling Disk Master)
Except for the tools required to physically replace hard drive, data migration software is quite useful if you don’t want to reinstall the OS. Many SSDs come with a data migration tool, so does Samsung 850 EVO SSD. This utility is called Samsung Data Migration (SDM). This utility is easy to use, and you just need three steps to complete the migration. Detailed steps are illustrated in clone HDD to Samsung SSD.
Nevertheless, according to the feedback, this utility may get stuck at 99% at the verify stage, and sometimes at the boot screen with no picture there. If you’re unlucky and facing such situations, you can try another Samsung SSD 850 EVO data migration software - Qiling Disk Master Professional.
▪ It works on Windows 11/10/8/7/Vista/XP and allows for data migration between all branded HDDs & SSDs.
▪ It supports System Clone to move only operating system to Samsung SSD, and Disk Clone to clone the entire hard drive with everything on it.
▪ It enables you to clone hard drive to smaller Samsung SSD as well as larger one without interrupting since it supports intelligent clone, sector-by-sector clone, and hot clone. You can also edit the partition size and allocate unused space to make full use of the target drive.
▪ You can use the SSD alignment option to improve the read & write speed of the target SSD, and prolong its life span. If needed, you can also create bootable media to clone hard drive without loading Windows.
Simply download it to have a try:
How to Change Hard Drive with Samsung EVO SSD
Replacing a hard drive with a involves a few steps. Here's a general outline of the steps you would need to follow to replace your hard drive with a Samsung EVO SSD without losing data.
Step 1. Connect and Prepare the Samsung EVO SSD
Install the Samsung EVO 850 SSD to your computer and make sure it can be detected by Windows. Normally you can directly install the new SSD alongside the old hard drive. If there's only one slot on your laptop, you may need a SATA to USB cable or SSD enclosure to connect it.
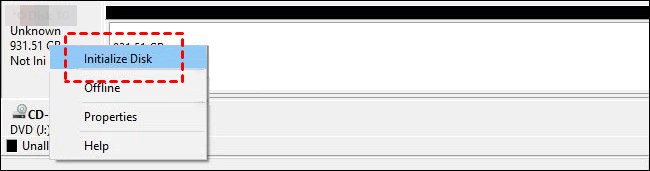
If the SSD is connected yet not detected, you may need to initialize it first. Usually when you first insert the disk you will be prompted to initialize it, or you can launch Disk Management, right-click on the disk that reads "Not Initialized" and select "Initialize Disk".
As for the choice of the partition style, it is best to make it the same as the source disk, or you can choose according to your specific needs. For example, if you want to install Windows 11, you can choose GPT for better support. Just make sure the partition style is compatible with the boot bode (MBR for Legacy BIOS/GPT for UEFI).
📑Tips:
- If you are not sure about the partition style of your disk, please right-click the disk you want to clone in Disk Management, choose "Properties" - "Volumes" and check the "Partition style".
- If you've installed OS on that SSD before, then there's a small chance that residual registry information etc. may affect your booting from the cloned SSD. So if you want to eliminate any disadvantages, you may consider wiping disk first.
Step 2. Clone Hard Drive to Samsung 850 EVO (OS and Data Migration)
Install and run the cloning software and follow the instructions below to clone your existing drive to the SSD.
✍Note: The cloning process will overwrite everything on the target SSD, so if you've stored some important data on it, you can go to “Backup” tab first to create a backup of your files.
1. At the main console, click Clone > Disk Clone. If you want to migrate only OS to the target Samsung SSD, choose System Clone instead.

2. Select the current hard drive as the source disk.

3. Select the Samsung EVO SSD as the target disk.

4. Check SSD Alignment box and click Proceed. If you want to clone every sector of old hard drive, please tick Sector by sector clone.

5. Wait patiently and click Finish when the cloning process is done.
📑Tips:
👉You can edit partition sizes on Samsung SSD before cloning with the Edit Partitions option.
- Copy without resizing partitions: It will not resize the partition size.
- Add unused space to all partitions: Reallocate the unallocated space to each partition of the target disk.
- Manually adjust partition size: Extend unallocated space to any partition on the target disk as you want.
- Convert the destination disk from MBR to GPT: It allows you to convert the partition style (MBR/GPT) of the target disk if it is different from the source disk.
👉 Cloning hard drive to Samsung SSD via USB cable in laptop is risky because the cloning process might be failed due to cable connection factor or the like. Thus, it is advised to do backup and restore in laptop to complete the replacing. You can learn more with screenshots in Samsung laptop SSD upgrade.
Step 3. Boot from the cloned Samsung SSD
To boot from the cloned Samsung EVO 850 SSD, you can either physically replace the HDD with SSD, or keep 2 drives installed (if there's extra drive slot) and change boot order in BIOS/UEFI settings to make the system boot from the cloned SSD.
Nevertheless, the suggestion is to remove the old hard drive and boot with only the new SSD installed. This can verify if the cloning is completed successful.
- Shut down your computer and disconnect all cables.
- Open your computer case using the appropriate screwdrivers.
- Locate the existing hard drive. It's usually mounted in a drive bay.
- Carefully disconnect the cables (data and power) from the existing hard drive.
- Remove any screws holding the hard drive in place.
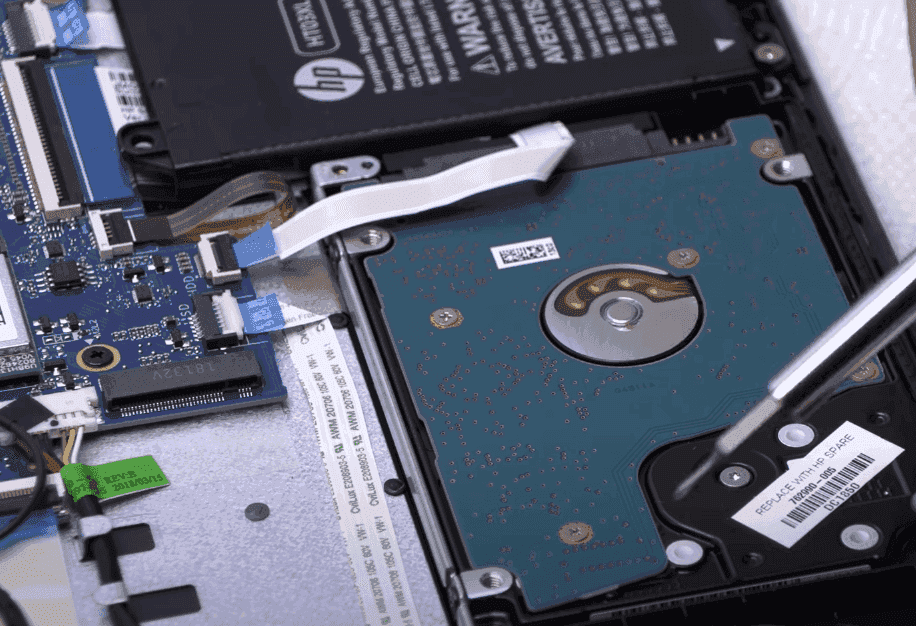
- Slide out or remove the old hard drive.
- Slide in or connect the new Samsung EVO SSD in the same place.
- Secure the SSD in place using screws and reconnect the cables.
- Close your computer case and reconnect all cables.
- Power on your computer.
Step 4. Check if the Clone is Successful
If your computer boot properly with only the new SSD Samsung EVO 850 SSD, then the cloning is successful, and you decide what to do with the old hard drive.
You can connect it back to the computer if you want to use it for storage, but you need to make sure the boot order in BIOS or UEFI settings is correct - the cloned SSD should be in the first place.

If you want to erase the operating system and other data on the old hard drive to free up more space, you can also use the Disk Wipe tool in Qiling Disk Master.
💬If the system won't boot from the cloned SSD, you can refer to: Cloned SSD won't boot
Conclusion
This article introduces how to replace hard drive with Samsung EVO 850 SSD step by step. If you want to do it without losing data or reinstalling Windows, you can use professional cloning software such as Qiling Disk Master.
Besides regular data and OS migration, it also helps you clone hard drive with bad sectors, and the Create Bootable Media feature in Tools enables you to backup hard drive without booting Windows. Download it now to find more.
Related Articles
- Samsung Data Migration MBR to GPT Cloning (2 Ways Included)
- Free Samsung Migration Software for Windows 10/8/7
- Best M.2 NVMe SSD Duplicator for Windows
- How to Migrate OS to Smaller SSD Securely | Step by Step