How to Upgrade SSD in Surface Pro X (Complete Guide)
Is Surface Pro X SSD Upgradeable?
The Surface Pro X's SSD is upgradeable, as it's not soldered to the motherboard, but rather hidden behind the kickstand. However, it's an M.2 2230 SSD, which is smaller than most M.2 SSDs, making it harder to find a compatible replacement.
Microsoft recommends that the SSD be replaced by a trained technician, but if you still want to do it yourself, you'll need a Torx screwdriver and will have to reinstall Windows on the new SSD.
Why Upgrade Surface Pro X SSD?
Here are two main reasons why you need to upgrade Surface Pro X SSD: The first reason is that running out of space can cause problems with the performance of your Surface Pro X. The second reason is that upgrading the SSD can improve the overall performance of your device, making it run faster and smoother.
- Get More Capacity. If you want more space on your Surface Pro X, consider purchasing a 1TB or 500GB SSD from Amazon or eBay, which can be a great option if you need more storage.
- Improve SSD performance. The default SSD in Surface Pro X has low-to-mid-range performance, but upgrading to a faster SSD can improve sequential read and write speeds to over 500MB/s.
What Do You Need?
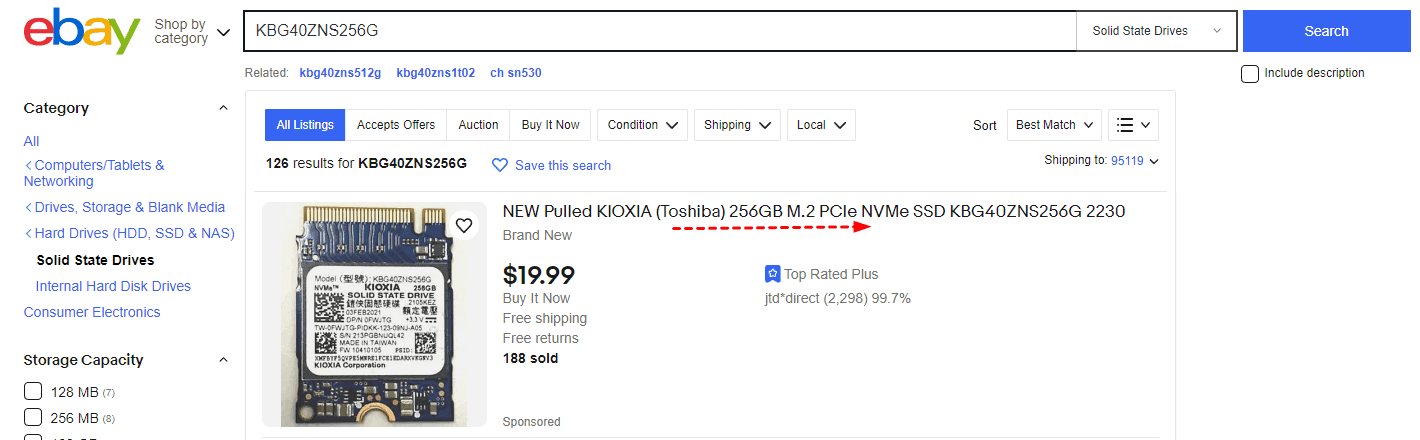
An M.2 2230 PCIe SSD. If you're having trouble finding a suitable SSD, consider the Toshiba/Kioxia BG4 M.2 2230 PCIe SSD, which is a smaller but reliable option.
To purchase a Toshiba SSD, you'll need to go through business channels such as Dell or eBay. The key is to use the specific product SKU to search for the desired version of the SSD. This will ensure you get the exact model you're looking for.
- The 256GB SSD for Surface Pro X, model KBG40ZNS256G, is currently priced at around $19.99.
- The Surface Pro X 512GB SSD, model KBG40ZNS512G, is currently priced at approximately $50.3.
- The price of the KBG40ZNS1T02 1TB SSD for Surface Pro X is approximately $145.
Tools for Surface Pro X SSD removal and installationThis kit includes a 3IP (Torx-Plus) driver, an anti-static wrist strap with 1M Ohm resistance, a soft ESD safe mat, a microfiber or lint-free cloth, and a SIM eject tool or an equivalent 0.58 mm / 0.023 in diameter paperclip.
Powerful SSD clone software for Windows 11, 10, 8, 7, XP or Vista - Qiling Disk Master Professional.
Upgrade SSD in Surface Pro X with Everything
Before changing the SSD in your Surface Pro X, it's essential to move the Windows installation to another SSD, allowing you to boot directly from the new one. To achieve this, you'll need the powerful SSD clone software - Qiling Disk Master Professional.
- The software provides a "Disk Clone" feature to clone an SSD to a larger one, making it bootable, and a "System Clone" feature to clone the operating system only.
- It helps to make full of SSD disk space and convert disk type (MBR or GPT).
- It can enhance SSD disk performance using 4k technology.
- The software supports cloning all brands of M.2 2230 SSD disks, including Kioxia, Toshiba, and WD, among others.
Download Qiling Disk Master Professional, a powerful SSD clone software.
Step 1. Open Qiling Disk Master Professional, and click Tools and utilities> Disk Clone.

Note: The Professional version of Qiling Disk Master supports cloning system disks (MBR/GPT) and data disks in Windows 11, 10, 8, 7, XP, and Vista, as well as Qiling Disk Master Server for server users.
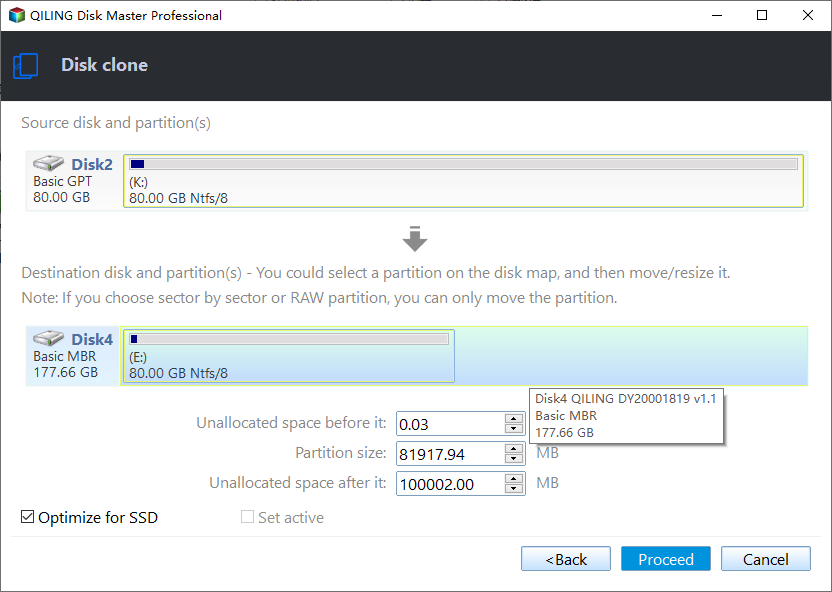
Step 2. Choose the Surface Pro X default SSD as the source disk and click Next.

Step 3. Choose the new SSD (eg: Toshiba/Kioxia BG4 M.2 2230 PCIe SSD) as the destination disk. Then, click Next.

Step 4. To optimize your Surface Pro X for an SSD, check the "Optimize for SSD" box and click "Proceed" to clone your existing SSD to a larger one. To avoid any unallocated space, click "Edit Partitions" and choose either "Add unused space to all space" or "Adjust partition size manually".
Notes:
- Edit Partitions: This feature supports the conversion of the destination disk from MBR to GPT or vice versa, allowing for the cloning of GPT disks to MBR and MBR disks to GPT without boot issues.
- Sector By Sector Clone: This cloning mode clones all sectors of an SSD disk, which can be time-consuming and require more space on the target disk.
Steps to Surface Pro X SSD Swap and Boot
To upgrade the SSD in your Surface Pro X, prepare by making necessary backups and then open the device to replace the original SSD with a new one, allowing the Surface to boot from the new SSD.
Prepare for Surface Pro X SSD SSD replacement
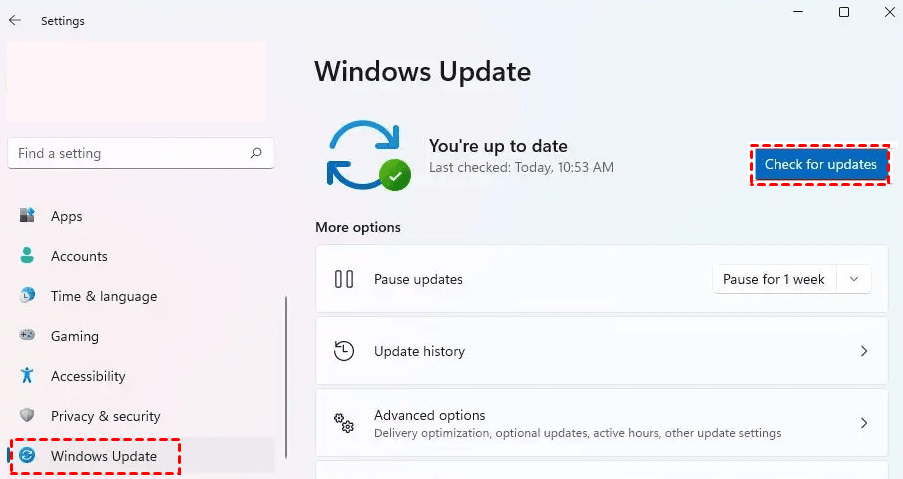
- Install the latest updates. To update your Windows, go to Start and select Settings, then choose Update & Security, and select Check for updates. From there, select all the available updates to install.
- Unlock BitLocker encryption. To disable BitLocker on Windows 11, go to Settings, type BitLocker, and select Manage BitLocker. Then, click Turn Off BitLocker. For more information, see the article on disabling Windows 11 BitLocker.
- Backup BitLocker recovery key. If you're unable to unencrypt your SSD during a swap, you'll need to know the recovery key to access the drive. This key is required to decrypt the SSD and restore access to your data.
Replace Surface Pro X SSD step by step
Step 1. To safely prepare your device for repair, power it off completely and disconnect it from the power supply. Ensure the work surface is clear and covered with a soft, ESD-safe mat and a microfiber or lint-free cloth to prevent static electricity damage.
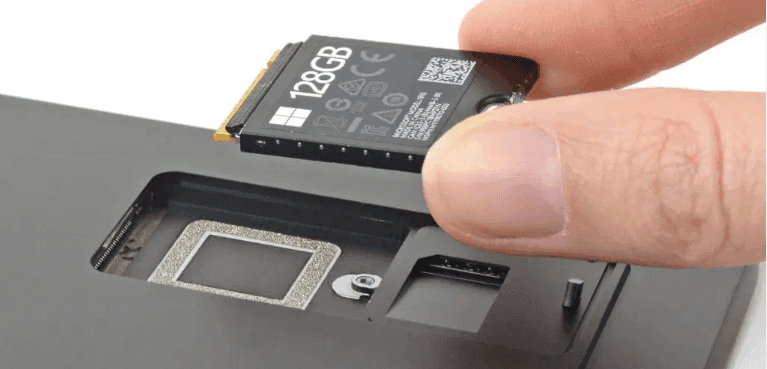
Step 2. Put Surface Pro X back. Remove the plate-hidden SSD and SIM(if there is) using SIM eject tool.
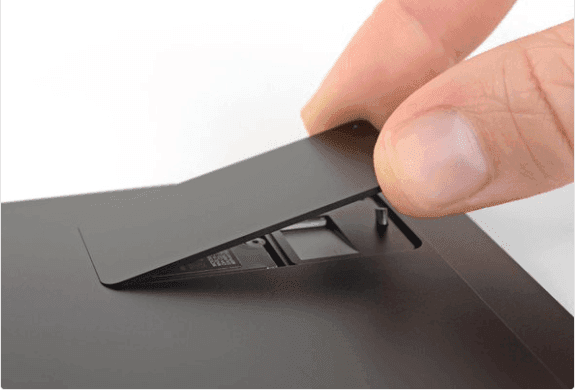
Step 3. To remove the SSD, first remove the screws securing it using a 3IP (Torx-Plus) driver. Then, carefully lift the SSD upwards to a 15-degree angle, and grab the sides of the SSD case to pull it out. Be cautious when handling the SSD to avoid damaging it.

Step 4. Install the new SSD using the opposite steps.
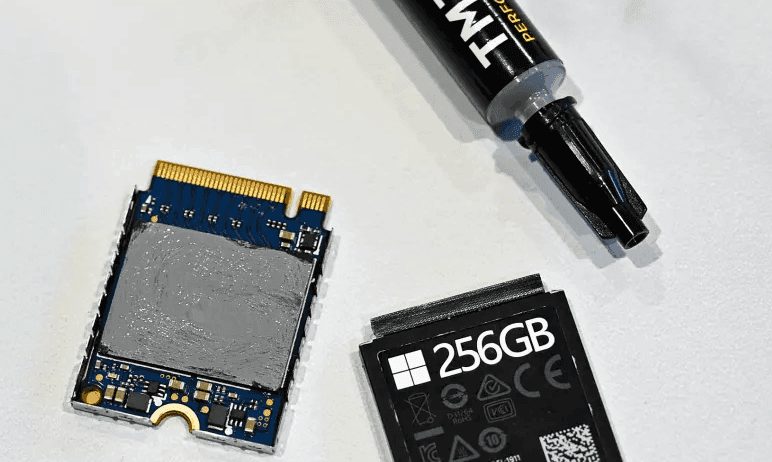
To use the default SSD enclosure, carefully separate it from each side and remove the old SSD and old thermal paste.
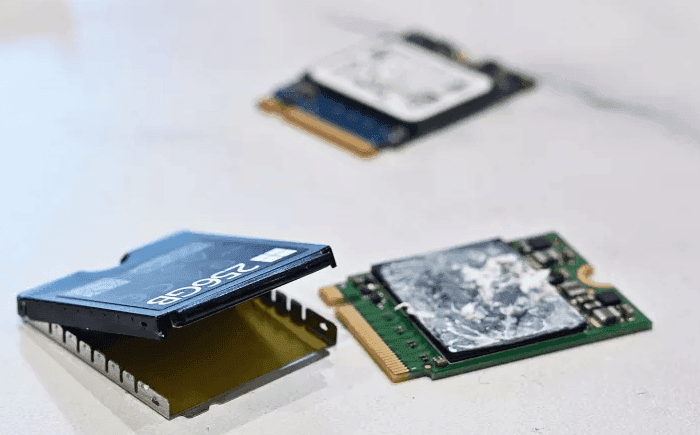
To deal with the new SSD, remove the label, add a tiny drop of thermal paste to the top, and smooth around the entire black area.
Step 5. 1. Plug in the power cord and connect the device to the internet via a wired connection. 2. Turn on the device and it may perform a firmware update during the initial startup process.
Step 6. To start your device, enter the recovery key if your SSD is still encrypted, then connect your keyboard and sign in with your account.
More FAQs about Surface Pro X SSD Replacement
✍ Can you perform a Surface Pro X RAM upgrade?
Microsoft states that the Surface Pro X's RAM is not user-replaceable.
✍ Does the Surface Pro X have an SSD slot?
The Surface Pro X features 2 USB-C ports, an eSIM and a SIM card slot for LTE connectivity, a removable SSD, and a Surface Connect port for charging.
✍ Is Surface Pro 9 upgradeable?
The Surface Pro 9 is upgradeable, requiring a compatible SSD, screwdrivers, and a powerful SSD cloning software to transfer the operating system and files, allowing users to remove the default SSD and install a new one.
Summary
You can easily upgrade the SSD in a Surface Pro X by replacing it with a new SSD, as long as you find a compatible M.2 2230 SSD and use a powerful SSD cloning software like Qiling Disk Master Professional.
This software efficiently manages disk space and secure boot issues by providing features like Edit Partition, which enables automatic or manual resizing to fit on a new SSD, resulting in no unallocated space after cloning.
Related Articles
- How to Transfer All Data from One Surface Pro to Another
Got a new Surface Pro and want to transfer from one Surface Pro to another? Scroll down to find the best PC transfer tool and a stepwise guide. - Microsoft Surface Data Eraser - Free Tool to Wipe Data
If you are new to Microsoft Surface Data Eraser, please continue to read this article, I'll introduce you to this tool and how to use it step by step. Try Qiling Disk Master if it is not working. - Easy | Migrate Windows 11/10 to M.2 SSD without Reinstalling
M.2 SSD becomes more and more popular due to its amazing speed and mini size. If you want to transfer Windows 10/11 from HDD/SSD to M.2 SSD, you can't miss this article. - Full Guide | HP Omen 15-ce0xx RAM and SSD Upgrade
This article shares HP Omen 15-ce0xx RAM upgrade tutorial and offers a guide to upgrading your SSD for better performance.