How to Fix 0x80240fff Windows 10 Update Error
Many unexpected reasons may be responsible for the 0x80240fff Windows update error message. These include firewall malfunctioning, corruption issues with files system, internet connection issues; damaged Windows update services, or outdated system. If you also use Windows 10 build 10240, you may also experience this error message. No doubt, it may be annoying to see this error message but it can be fixed with a couple of tricks. Read on to learn how to resolve a 0x80240fff Windows update fix.
- Quick Navigation
- Part 1: 3 Ways to Fix 0x80240fff Windows 10 Update Error
- Bonus Tip: Always Back Up Important Files before Windows 10 Update
3 Ways to Fix 0x80240fff Windows 10 Update Error
Although it can be frustrating to have to deal with 0x80240fff Windows 10 pro fix issue, the great thing is that you can fix it by following a couple of methods. In this part, we will look at three different methods that you can use to resolve this issue.
Method #1: Pause Windows 10 Update
In the case that a new update for Windows 10 is causing the 0x80240fff Windows update fix error, you can pause the updates. Pausing the updates will resolve the error and you can continue with the updates when Microsoft releases the patch for it. Here are the detailed steps below:
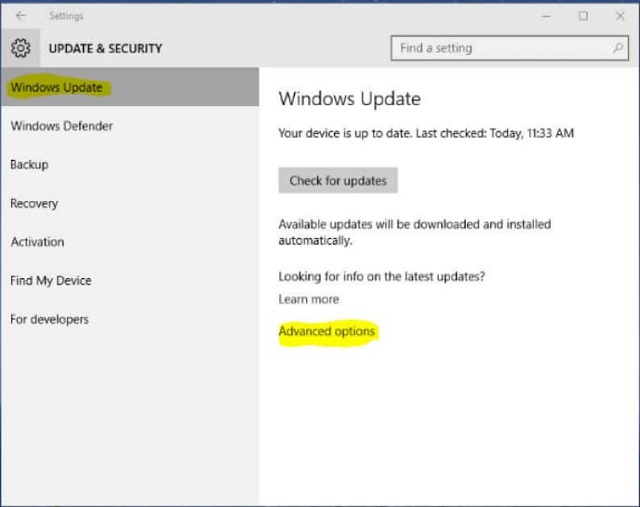
- Open the Settings by clicking Windows Key + I on the keyboard.
- Check the options and select 'Update and Security'.
- Navigate to the right pane and click the 'Advanced Options' link.
- Check the 'Pause Updates' section and select the 'Select Date' drop-down arrow.
- Choose your preferred date for the update from the list. You can stop the Windows update as long as a month. For some operating systems, you can defer the updates for more than a month. However, if your PC uses Windows 10 Home operating systems, you will be unable to defer the upgrade beyond one month.

Method #2: Download and Install the Latest Windows 10 with Media Creation Tool
If your PC uses an older version of Windows 10 Home, it may be impossible to use the 'Pause Updates' option on the Setting application. However, you don't have to fret about it because you can explore another method to resolve the 0X80240fff Windows Update fix error message. You can upgrade the operating system by downloading the latest version of the ISO.
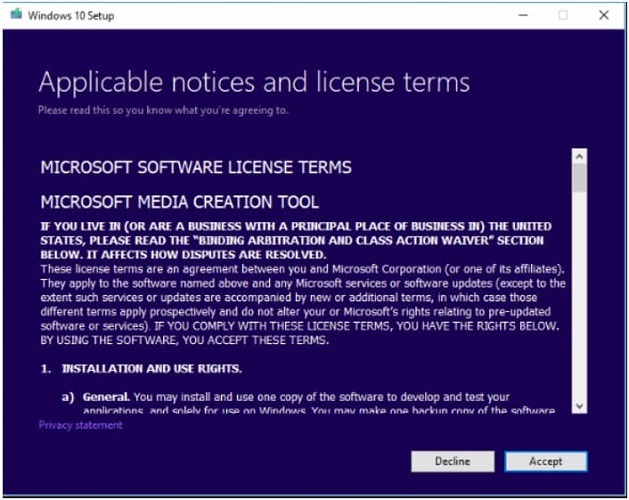
- Go to the official website of Microsoft and download the Media Creation Tool.
- Run the software using the administrator account on your PC.
- Follow the prompts and select 'Accept' on the License Terms page.
- Select 'Upgrade this PC now' on the next page and click 'Next'. This will launch the Media Creation Tool to start the download of the Windows 10 latest version.
- Remember to select 'Keep personal files and apps' when prompted to prevent important data from getting deleted.
- When you have saved the files and closed all open apps, click the 'Install' button. You should note that the download and installation process may take some minutes to complete. Don't turn off your computer until the installation is complete.

Method #3: Use Windows Troubleshooter to Fix 0x80240fff Windows Update Error
You can use the built-in troubleshooter on your PC to resolve the 0x80240fff Windows 10 pro fix issue. This will help to repair the components of Windows updates and enable you to install it without any issues. To run Windows troubleshooter, follow the steps below:
- Go to the taskbar and click the Windows icon
- Locate the Settings app and launch it by clicking the gear icon.
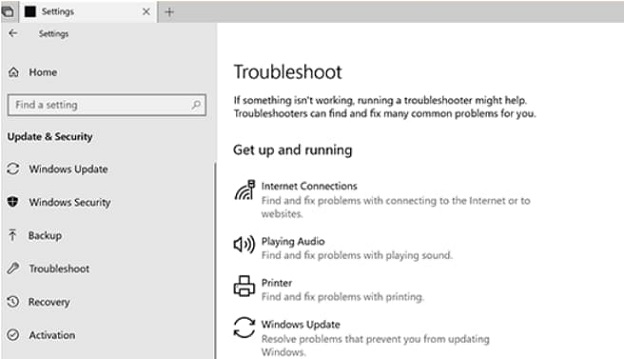
- When the Settings window comes up, select 'Update and Security' from the menu list.
- Navigate to the left-pane menu and click 'Troubleshoot'.
- Go to the right-pane menu and click 'Windows Update'
- Click the 'Run the Troubleshooter' button. Allow the troubleshooter to resolve the 0x80240fff Windows update issues on its own. If it recommends other actions, follow them to completely fix the issue.

With any of these three methods, you can resolve the 0x80240fff Windows 10 pro fix issues. However, to prevent data loss while updating your Windows system, you should back up your files, folders, drives, and system. Qiling Disk Master software is the most recommended tool to use.
Bonus Tip: Always Back Up Important Files before Windows 10 Update
When updating Windows 10, anything can happen. The update might develop update issues or the Windows 10 may fail to install. If this happens, it may result in data loss. Therefore, we recommend that you backup important business files, personal data, sensitive data, and other relevant tools before you update your system. This will prevent any unexpected issues that may arise due to system update failure. When you want to back up your data, the most recommended tool for the job is the Qiling Disk Master.
Qiling Disk Master software is designed for the optimal protection of your files, data, disks, partitions, and your complete operating system. With this tool, you can easily and quickly restore all data in the event of a system disaster. It is a complete, fast, and reliable tool with automatic backup options that make it more efficient and easier to backup everything on your PC, including hard drive, partition, files, system, and external drives. Download the software to have a try.
How to backup Important Files, Folders, and Hard Drive in Windows 10
The software has in-built navigation that makes backing up of data, drive, and system possible with easy steps. It is easy to schedule backup time and select specific backup functions. You can also easily restore the data whenever you want. Below are the simple steps to completely backup the data on your PC using Qiling Disk Master software:
- Click on a backup mode from the options available. You can choose 'Drive Backup', 'System Backup', or 'File Backup' to backup files on Windows 10 and other OS.
- Select the file, system, or driver that you want to backup. When you are done, click the 'Start' button. This may take some seconds.
- After the backup process, you can view the windows and choose the option that you want. You can click the 'Recovery' button if you want to recover lost or deleted files. You can also change the backup settings or edit the backup.

Related Articles
- How to Upgrade to Windows 11 from Windows 7/10
- How to Fix 0x80240fff Windows 10 Update Error
- 7 Ways to Fix Windows 10 Keeps Freezing Up Randomly
- Fix Win 10 PC Won't Shut Down: ShutDown Computer via CMD
- How to Fix 'Error 0xc1900101' on Windows 11 Installation Assistant
- [Fix] Convert External Drive to APFS Failed/Greyed Out/Not Available
- How to Fix a Windows 11 Installation Error 0x8007007f
- [Solved] Recycle Bin Not Showing Deleted Items