How to Fix Disk is Unknown, Not Initialized, Unallocated in Windows 11/10/7
Quick Navigation:
- Solution 1: Initialize Disk
- Solution 2: Recover Data from the Unknown Disk and Format the Disk
- Solution 3: Check Disk Connection
- Solution 4: Update Device Driver
If you encounter an unallocated disk in Windows 11, Windows 10, or Windows 7, don't worry! This issue can be resolved by following some simple steps.
Are you experiencing the 'Disk 1 Unknown, Not Initialized, Unallocated' issue in Windows 10, Windows 7, or other versions? Don't worry, this problem can be resolved with the right steps.
Solution 1: Initialize Disk
When your external hard drive is not initializing and shows unallocated, the best approach is to initialize the disk. This is a straightforward method to resolve the 'Windows 11 external disk not initialized' issue. If your external hard drive is new, this procedure also works perfectly for initializing it. To accomplish this, follow the steps below:
Right-click on 'My Computer' and navigate to 'Manage' so you can run the Disk Management.
When you are in the Disk Management menu, right-click on the hard drive, and then click 'Initialize Disk'.

A dialog box will pop up. Here, select the disks that you want to initialize and select GPT or MBR partition style. This will run the initialization process.
When this is complete, you can easily recover your important data from the disk. Depending on your requirements, you can recover the data from the disk alone or recover the partitions as well as the files in them.
Solution 2: Recover Data from the Unknown Disk and Format the Disk
This solution can be used when the disk is not initialized and does not show unallocated. When using this solution, you should back up the important files that you have on the external hard drive. It is also recommended that you use Deep Data Recovery for the recovery of data. This is because it's a great and effective tool that can completely recover data when you receive disk 1 unknown not initialized incorrect function error message.
If you're experiencing a hard disk that won't initialize, it can be frustrating to recover your data. However, there are steps you can take to recover your data. Here's a step-by-step guide to help you recover data from a non-initialized hard disk:
Step 1. Download and install Deep Data Recovery.
Step 2. To start the data recovery process, select a specific location to scan for the lost data. This can be a specified location, partition, or even the whole hard disk. The Deep Data Recovery software can scan specified drives, external storage devices, and the entire hard disk to find the lost data.

Step 3. Preview and recover all lost files that have been found. Check the upper area of the window to see the displayed result. Preview the files to be sure that you have all the lost data that you want to recover. Click 'Recover' to save the found files on your computer. You can also use the Deep Scan mode if you want to make a more extensive search.

4. After completing the disk recovery process, you can format the disk to return it to its default setting. Formatting the disk will erase all data on the disk, so make sure to back up any important files before proceeding.
Solution 3: Check Disk Connection
When the disk is not initializing and not showing any capacity, it's essential to troubleshoot the disk connection to resolve the issue. Here are the steps to follow:
Connect your external hard disk to another USB port, such as the one in the rear part of your PC. Using the original cable to connect the hard drive to the computer.
Connect the external hard drive with another cable.
Connect the external hard drive to another PC. If disk connection is the issue, this should fix it and you should be able to access your disk again.
Solution 4: Update Device Driver
If your external hard disk is not initializing, it's possible that the device driver needs an update. Here's how you can update the device driver to resolve the issue:
Open 'This PC' and right-click on it. Select the 'Properties' menu.
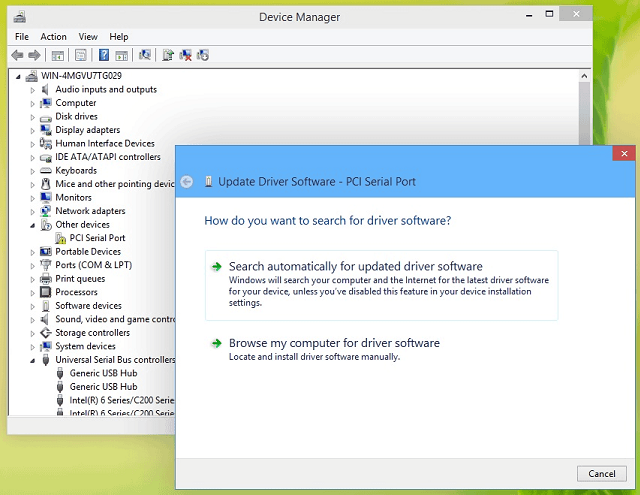
Click on the 'Device Manager' menu and expand the 'Disk Drives'. You will find the problematic disk. Here, right-click on the disk and choose 'Update Driver'.
Click the 'automatically search for driver software online' option.

The update process will start when the driver software has been found. Wait for it to update and reboot your computer system.
Connect the external hard drive to the computer and check whether or not the drive shows up. If this is the issue, it should resolve the issue.
If you are experiencing Windows 7 disk 1 unknown not initialized unallocated error message, the solutions provided above should resolve the issue. Follow the steps above to resolve your issue without any practical experience. Remember, you should back up your data before you resolve any issue to avoid data loss. When it comes to data recovery, Qiling data recovery software is the best choice to consider.
Related Articles
- How to Fix USB Drives not showing up in Windows 10
- How to Repair Corrupted/Damaged MP4 Video Files
- How to Fix an Undetected External Hard Drive
- [Solved] USB/External Hard Drive Folder Access Denied
- How to Fix a Corrupted Hard Drive
- How to Recover Data after Diskpart Clean