Fix Win 10/11 PC Won't Shut Down: ShutDown Computer via CMD
If your Windows 10 PC won't shut down after clicking the shutdown feature from the Menu bar, it's likely due to an issue with the operating system or a specific application. To resolve this, you can try restarting the system in safe mode, disabling any recently installed software, or running a system file checker to identify and fix corrupted system files.
- Quick Navigation
- Part 1. Reason for Why Windows 10/11 Computer Won't Shut Down
- Part 2. How to Fix Win 11/10 PC Won't Shut Down
- Part 3: How to Fix "Windows 10 computer won't stay shut down?"
Part 1. Reason for Why Windows 10/11 Computer Won't Shut Down
If your system restarts when you click on the "Shut Down" button, it's likely due to the "Hybrid Shutdown Feature" or "Fast Startup" feature, which was introduced in Windows 8 and still active in Windows 10. This feature hibernates the kernel session, reducing startup and shutdown time, but can cause the system to restart instead of shutting down completely.
Part 2. How to Fix Win 11/10 PC Won't Shut Down
If your Windows 10 computer won't shut down, try one of the following fixes. You can restart the Windows Update service, run the System File Checker, disable any recently installed drivers, or turn off the "fast startup" feature. These methods ensure that the computer shuts down entirely without hibernating the kernel session.
Method 1: Disable Fast Startup Option
Windows 10's failure to shut down is a long-standing issue that dates back to Windows 8. Despite user complaints, the problem persisted, but Microsoft did provide an option to disable the feature in Windows 10, unlike previous versions.
The steps to disable the Fast Startup feature are:
1. Go to the search bar beside the "Next" menu, type "Power", and select "Power & Sleep settings" from the results.
2. From the settings window, move down to "Additional power settings", click on it, and from the left pane, select "Choose what power buttons do?".
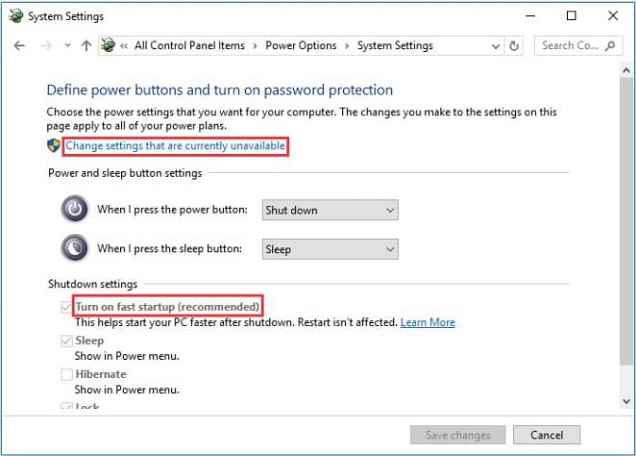
3. Click on "Click settings that are currently unavailable" to enable the option to change the required settings.
4. To disable fast startup, go to the Start menu, click on "Control Panel," and select "Power Options." From there, click on "Choose what the power buttons do" on the left side, then click on "Change settings that are currently unavailable." Scroll down to the "Shutdown settings" section and uncheck the box next to "Turn on fast startup (recommended).

If you're having trouble fixing the issue by adjusting the settings, consider using an alternative method to resolve the problem. This can help reduce the increased time spent on starting and shutting down the computer.
Method 2: Shutdown PC via Command Prompt
To shut down your computer via the command prompt, you can type "shutdown /s" and press enter. This will initiate a shutdown of the system. If you want to specify a time to shut down, you can use the "/t" option followed by the number of seconds you want the system to wait before shutting down. For example, "shutdown /s /t 30" will shut down the system 30 seconds from now.
1. To open the Command Prompt in Windows, type "cmd" in the search bar and press Enter. This will open a new window where you can type commands to interact with your computer.
2. To open Command Prompt as an administrator, select the "Command Prompt" search result and right-click on it to choose the "Run as Administrator" option.
3. To shut down the system without hibernation, input the command "shutdown /s /f /t 0" in the command prompt window.
The system will shut down completely, without allowing any kernel sessions to hibernate, which may lead to a shutdown error if not properly closed. This ensures a complete and proper system shutdown.
Method 3: Run Windows Troubleshooter
It's not possible to shut down a computer during an update, and even in Windows 10, this option can behave erratically, making it frustrating for those who need to shut down the system quickly. In such cases, the troubleshooter can be helpful, and the steps to use it are available.
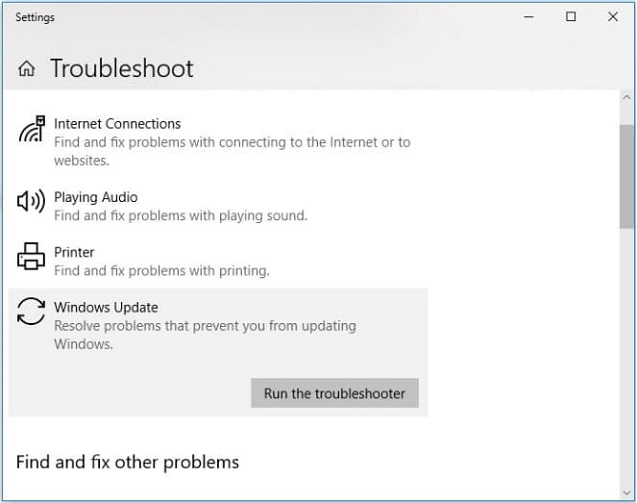
1. To troubleshoot your computer, enter "Troubleshoot" in the search bar and click the "Troubleshoot settings" from the search results.
2. From the "Get up and running" option, select "Windows Update".
3. Now, click the "Run the troubleshooter" button.

The update will allow Windows to check for the problem and fix it.
Method 4: Force Shutdown
If Windows 10 won't shut down, try force shutting down the computer by pressing and holding the power key, then wait a few hours before restarting it to see if the issue persists.
Part 3: How to Fix "Windows 10 computer won't stay shut down?"
You're likely experiencing issues due to system processes not functioning correctly after an update. This can happen when the update process takes longer than expected, causing shutdown problems. If you're encountering this issue for the first time, try restarting after a few hours. If the problem persists, try booting in safe mode and disable the automatic restart option.
1. If your system is on, restart it and press F8 repeatedly before the Windows logo appears on the screen.
2. When the system recognizes the F8 key, it will take you to the boot menu, where you must choose the "Safe Mode" option.
3. To start the computer in Safe Mode, select the option. Once booted, navigate to the search bar and enter "sysdm.cpl" to access system properties.
4. A new window will appear on the screen, where you will choose the "Advanced" option and then navigate to the "Settings" feature under the "Startup and Recovery" feature.
5. Now, uncheck the box near the "Automatically Restart" option.
6. Click "Ok" and restart your computer.
The system is shutting down properly. The issue has been resolved.
You can try each of the methods described to see which one works best for you. The command prompt to shutdown PC is often the most helpful solution, but other methods may also be effective depending on the specific reason behind the issue.
Never forget to back up your important data on your computer, especially when you're experiencing issues. Using built-in backup features can be a hassle, but you can make it easier by utilizing Qiling Dback to schedule the backup of crucial files, folders, and even your entire hard drive.
If you don't back up important data, you can still try Deep Data Recovery to retrieve it if it's lost due to accidentally shutting down your computer.
Related Articles
- How to Fix Windows 10 Update Error Code 0x80070002
- How to Fix Photo App Not Working in Windows 10
- How to Fix IRQL_Not_Less_OR_EQUAL Error in Windows 11
- How to Fix Black Screen of Death HP Laptop/Computer
- 7 Ways to Fix Windows 10 Keeps Freezing Up Randomly
- [Solved] Deleted File Not Showing in Recycle Bin
- 9 Ways for How to Fix Windows 10 Preparing Automatic Repair Loop