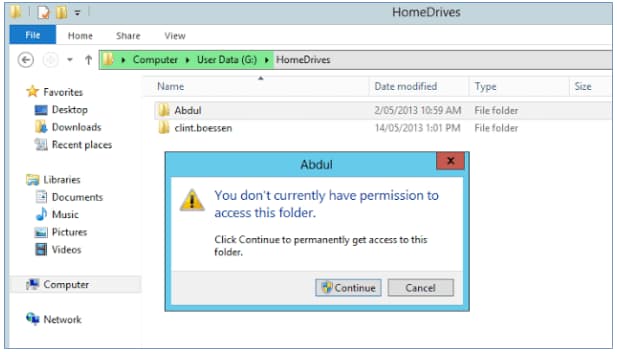
Fix 'You Don't Currently Have Permission to Access This Folder in Windows'
Quick Navigation:
- What does it mean when it says "you don't have permission to access this folder"?
- Fix #1. Regain Ownership of the Folder
- Fix #2. Give Permissions to All Users
- Fix #3. Cancel the "Read-only" Option for the Folder
- Fix #4. Using Command Prompt to Fix It
- Fix #5. Rescue Files Trapped in the Inaccessible Folder
If you're experiencing the issue of not having permission to access a folder in Windows 10, 8.1, or 7, there are solutions you can try to fix it. If these solutions don't work, you can recover files from the inaccessible folder using Deep Data Recovery to at least prevent data loss.
To fix "You don't currently have permission to access this folder" in Windows 10, take ownership of the folder by right-clicking on it, selecting Properties, going to the Security tab, clicking on Edit, then adding your username, and assigning it full control. Alternatively, you can take ownership through the Command Prompt using the `icacls` command. If you're trying to save a file to the folder, you can try saving it to a different location and then moving it to the restricted folder. If you're still having issues, check the folder's permissions and ensure that the user account you're using has the necessary permissions to access and write to the folder.
If you're experiencing issues accessing a folder on your Windows 10 system after upgrading from Windows 7, where you're denied permission to access the folder, you can try resolving the issue by taking ownership of the folder. To do this, right-click on the folder, select 'Properties', then click on the 'Security' tab. From there, click on 'Edit' and then 'Add'. Type in your username and click 'OK'.

What does it mean when it says "you don't have permission to access this folder"?
When you see the "you don't have permission to access this folder" warning, it's likely that you've lost ownership of the folder. This issue often occurs after upgrading to Windows 10, possibly due to changes taking place during the upgrade process. To resolve the problem, simply reassign the ownership of the folder, which should fix the issue.
Fix #1. Regain Ownership of the Folder
The first step is to regain ownership of the folder, which doesn't necessarily mean you don't own it, but rather something changed during the Windows 7 to Windows 10 upgrade. You'll need to fix this issue.
1. Right-click on the inaccessible folder and select Properties.
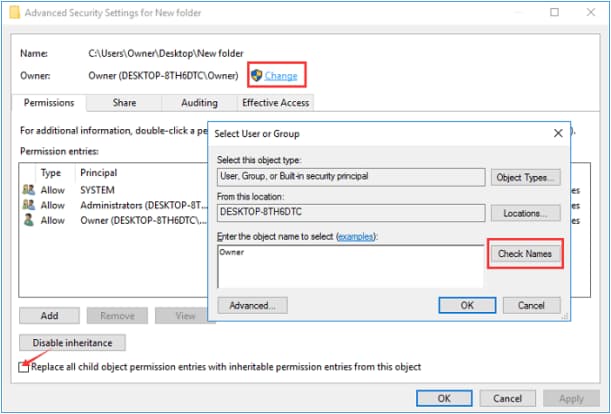
2. In the Security tab, click on the group or username area, click Advanced, and then click Change.
3. To add a user, type in the administrator account name, click "Check Names", and then apply it by clicking "OK". You can also click "Find Now" to get a list of accounts, and then select your account from the list.
4. To replace the owner of sub-containers and objects, select the option "Replace owner on sub containers and objects" and click "OK".

Fix #2. Give Permissions to All Users
To avoid the "you don't currently have permission to access this folder" error, you can give permission to everyone by following these steps. This will allow all users to access the folder without any issues. By granting permission, you're essentially removing any restrictions that were previously in place, making the folder accessible to anyone who needs it.
1. Right-click on the inaccessible folder and click Properties.
2. Click the Edit button in the Security tab.
3. To add everyone to a distribution list, select "Add" and type in "everyone". Click "Check Names" and then "OK".
4. To give everyone full control over a folder in Windows, you can follow these steps: Select the folder and go to its properties by right-clicking on it. In the properties window, go to the Security tab and click on Edit. In the new window, select Everyone and then tick the checkbox for Full Control.
Fix #3. Cancel the "Read-only" Option for the Folder
You can try checking if you have permission to access the folder by right-clicking on it and selecting "Properties" to see if your account has the necessary permissions. If you're still having trouble, you can try restarting your computer or checking for any software updates. However, it's worth noting that these steps might not necessarily resolve the issue, but they're worth a try.
1. Right-click on the inaccessible folder and select Properties.
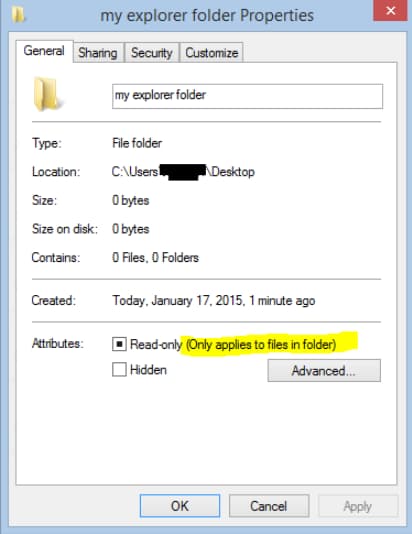
2. In the pop-up window, deselect the Read-Only option.
3. Click OK and Apply the change.
4. I've found that this solution works every time when I'm unable to edit Word, Excel, or PowerPoint files, which is why it comes to mind when I encounter the issue of not having permission to access a folder.

Fix #4. Using Command Prompt to Fix It
If you have more than one folder of "you don't currently have permission to access this folder" to fix, I suggest you try the command line to take ownership of the Windows root folder by following the steps below.
1. Press the Windows and R keys on the keyboard.
2. To view your user account in cmd, type "net user" in the search box and press Enter. This will display a list of user accounts on your computer, including your own. If your account is listed, you can proceed. If not, you'll need to log in to your computer with an administrator account to view your user account details.
To take ownership of a folder or drive, type the command "takeown /F" followed by the full path of the folder or drive, and then the options "/A" to give ownership to the current user, "/R" to give ownership recursively, and "/D Y" to apply the changes to the current directory and all subdirectories. For example, if you want to take ownership of a folder located at "C:\Users\Username\Documents\My Folder", you would type "takeown /F C:\Users\Username\Documents\My Folder /A /R /D Y" and press Enter. This will give you full control over the folder and all its contents.
4. Restart your computer. That's it.
Fix #5. Rescue Files Trapped in the Inaccessible Folder
If all the above-If the mentioned methods don't work, the last resort is recovering files from the inaccessible folder. You can try Deep Data Recovery to recover files from a specific drive and folder in Windows 11/10/8.1/7. To do this, follow these steps.
To recover files from the "you don't currently have permission to access this folder" error, download a free data recovery software for Windows 10, Windows 8, or Windows 7, and follow the on-screen instructions to scan and recover your files.
1. Launch the Deep Data Recovery. Select the file types in the first window, choosing the default option with all supported file types selected to prevent ignoring file types. Click "Start".
2. Select the drive where the inaccessible folder is located, and click "Scan" to recover deleted files. If the folder is on desktop, favorites, my documents, my images, etc, select drive C. Otherwise, select the corresponding drive.
3. After the scanning process is complete, you can view the results and preview the files. To recover the target files, select them and click the "Recover" button to save them to a new folder on your computer.

The Quick Scan is a less powerful scan that can be upgraded to a Deep Scan on the result page, which will likely find more files to recover.
Related Articles
- [Solved] Photos Cannot Open in Windows 11/10
- Fix Recycle Bin Corrupted in Windows 8/7/10
- [Solved] Windows 10 Do not Show Hidden Files and Folders
- How to Fix the Sony PlayStation 4 (PS4) Error Code
- [Solved] USB/External Hard Drive Folder Access Denied
- [Solved] Files Missing from My Documents Folder in Windows