How to Open Disk Management in Windows 11, 10, 8, 7, XP or Vista [4 Ways]?
What is Disk Management?
Disk Management is a Microsoft Windows utility that was first introduced in Windows XP and replaced the fdisk command. It allows users to view and manage hard disks and their associated partitions, enabling tasks such as initializing disks, creating volumes, and formatting volumes as FAT32 or NTFS file systems. Since its introduction, the tool has undergone updates, with new features added in Windows 7 and later versions.
▪ Extend and shrink volumes: To free up space for another volume, you can shrink an existing one, which will create unallocated space that can be used to create or extend another volume. This process allows you to reclaim space from an existing volume and use it for a new or expanded volume.
▪ Simpler partition creation: You can choose to create a basic, spanned, or striped partition directly.
▪ Convert disk: If you add more than 4 partitions to a basic disk, it will prompt you to convert the disk to dynamic or GPT style.
How to: open Disk Management in Windows 11, 10, 8, 7, XP, or Vista
Here are several ways to open Disk Management in Windows PC systems. Disk Management is not a program that can be found in the Windows start menu or on the desktop, but it can be accessed through other means. To open Disk Management, you can search for it in the Windows search bar, type "diskmgmt.
Way 1. Through Computer Management
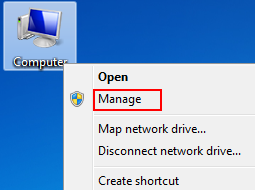
Step 1. Right-click Computer →Manage.
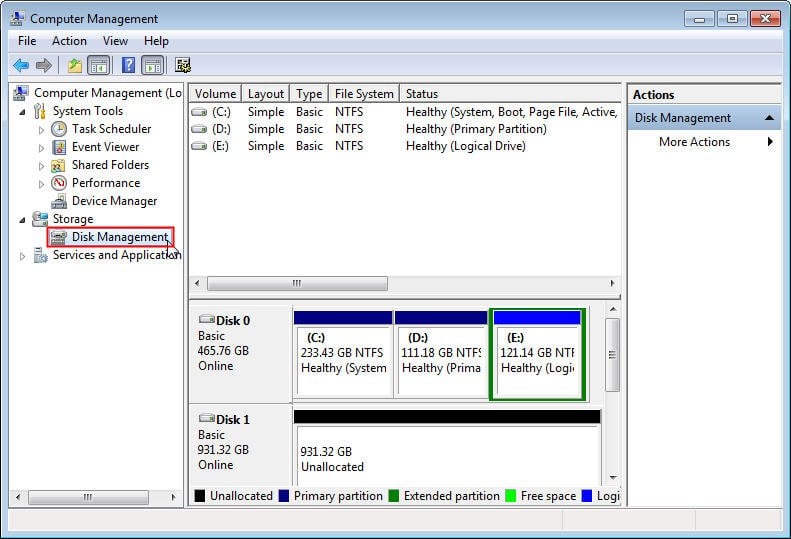
Step 2. Choose Disk Management on the left.
Way 2. Via Run
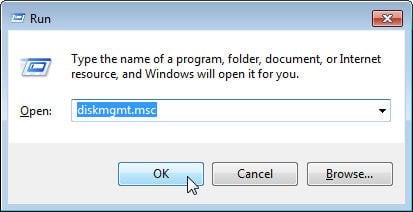
Step 1: Press Windows+ R.
Step 2: Type diskmgmt.msc → OK.
Way 3. By Command Prompt
Step 1. To open the Command Prompt, click the Start menu, type "cmd" in the search box, and then press Enter.
Step 2. Type diskmgmt → Enter.
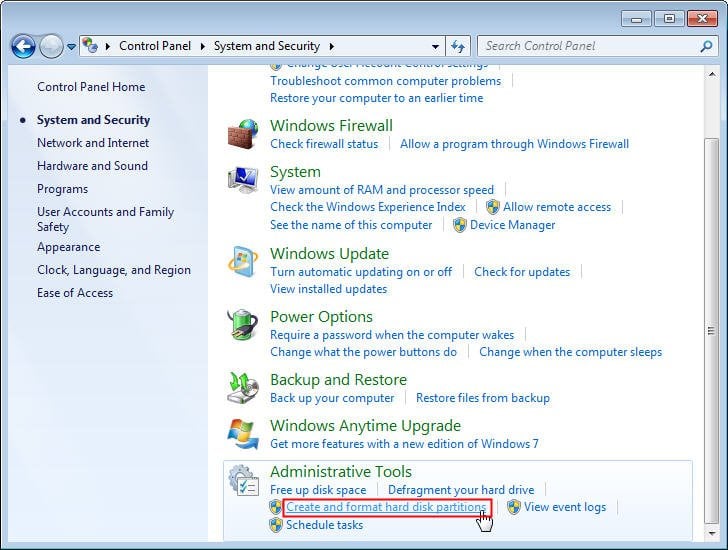
Way 4. From Control Panel
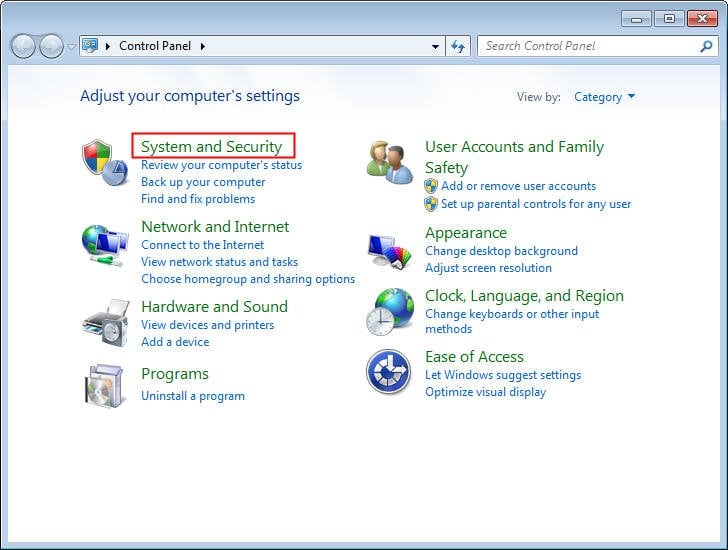
Step 1. Click Start menu → Control Panel.
Step 2. Select System and Security.
Note: The "System and Security" section is only found in Windows 10/8/7, whereas in Windows Vista it's called "System and Maintenance" and in Windows XP it's referred to as "Performance and Maintenance".
Step 3. Under Administrative Tools, click the option as shown below. That's it!
To access the Disk Management tool on Windows, you can either type "Disk Management" in the search bar, click on the Start button and select "Computer Management" from the menu, or right-click the Start button and choose "Disk Management" option. This will open the Disk Management tool, where you can view and manage your disk drives, including formatting and deleting them. Alternatively, if you're using Windows 10 or Windows 8, you can right-click the Start button and select the "Disk Management" option directly.
A better disk management tool
In Windows Disk Management, users may find the "Extend Volume" and "Shrink Volume" options greyed out due to limitations. When trying to increase a partition's size, only unallocated space next to it on the right side can be used, whereas shrinking a volume creates unallocated space behind it, requiring deletion of adjacent partitions. Furthermore, shrinking a volume is restricted by unmovable files, making it seem like a more powerful disk management tool is needed.
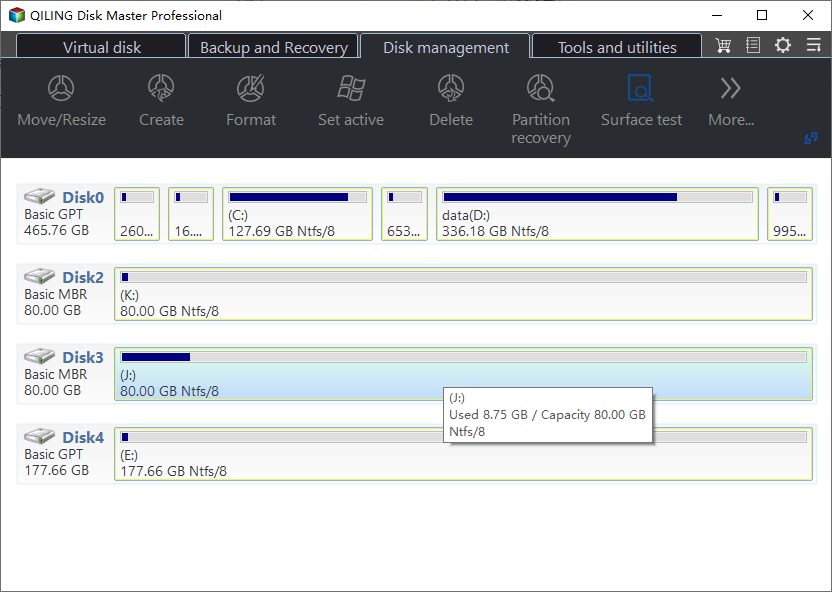
Qiling Disk Master Standard is a free disk partition management software that allows users to easily control and manage hard disks and partitions with its powerful functions.
With its concise main interface, it's easy to view the status of every partition. The software provides various utilities, such as resizing common or encrypted partitions, merging partitions, and more, which overcome the limitations of Windows' built-in Disk Management. Most operations can be completed with just a few clicks, ensuring no data loss. You can download it for free to try it out!
Related Articles
- Benchmark Helps You Know SSD Performance Clearly
This post explains what SSD benchmark is and introduce three SSD benchmark tools as well as benchmark measruement rules to help you know your SSD's performance. - Professional Software to Partition Hard drive in Windows 7/8/10/11
This tutorial will introduce you the professional partitioning software to help you Partition/Create/Delete/Format/Resize hard drive before installing Windows. - [Quickly Solved] Cannot Delete Partition in Windows 11, 10, 8, 7
Cannot delete partition in Windows 10? Refer to the post for realizing how to remove the partition that cannot be deleted, like recovery partition, system partition. - 2 Free Ways to Create Partition Windows 10 without Losing Data
How to create partition Windows 10? You'll learn 2 ways to get it done when there're not enough partitions on your disk.
