DiskPart: Create Primary or Extended Partition for Windows 11/10/8/7
Why need to create partition?
Creating a partition on your Windows computer is a straightforward process that can be done using the built-in Disk Management tool. Here's a step-by-step guide on how to create a partition:
How do I create a new partition using DiskPart?
DiskPart is a disk partition management command line tool that is built-in all Windows versions, such as Windows11, Windows 10, Windows 8, Windows 7. You can use DiskPart to create primary/logical/extended partitions on GPT and MBR disks in your computer. Using the command-line can totally replace the Windows interface. DiskPart provides three types of create partition, so it has three different commands.
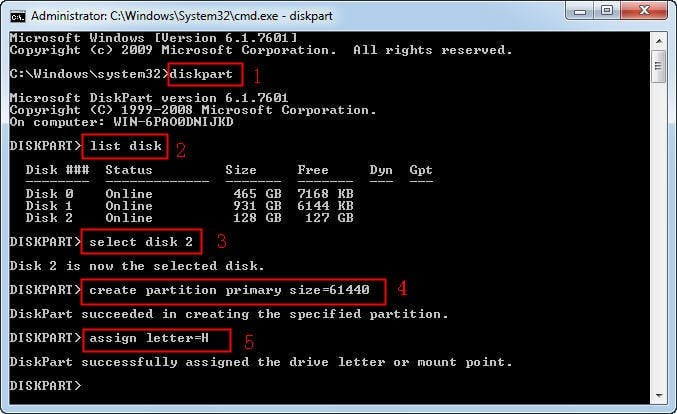
1. First, open a Command Prompt by clicking Start -> All programs ->Accessories -> Command prompt, or pressing "WIN+R" and typing "cmd". Type: diskpart.
2. At the DiskPart prompt, type: list disk
All the disks in current system will be listed so that you know the disk number on which you want to create a partition.
3. Type: select disk n
n means the number of the disk. To create a partition, please make sure there is unallocated space on the disk you select.
4. After selecting the disk, type one of the following command according to your requirements.
create partition primary [size=n] [offset=n] [ID=byte | GUID] [noerr]
or
create partition extended [size=n] [offset=n] [noerr]
or
create partition logical [size=n] [offset=n] [noerr]
5. Type: assign letter=H
Assign drive letter can give the partition a name.
For example, how to use DiskPart to create primary partition? You can refer to the following example.
You can change the step4's command to create other types of partition. for example, if you want to use DiskPart to create extended logical partition, change command in Step4. Is DiskPart the only way to create partition? No!
The DiskPart alternative - Qiling Disk Master
DiskPart is a great disk management tool, but it does have many limitations.
◉ To perform it on the computer, you must be a member of Administrators group, or you must have been delegated the appropriate authority.
◉ You can create primary/extended/logical partitions only on basic disks.
◉ You cannot create partitions on removable media.
To address the limitations of the built-in disk management tools, consider using a third-party software that can provide a more comprehensive and user-friendly experience. The Qiling Disk Master is a powerful and reliable hard disk partition manager that can help overcome these limitations.
Method 1: create partition with Qiling Disk Master GUI
Qiling Disk Master offers a user-friendly graphical user interface (GUI) to make partitioning hard drives a breeze. With its intuitive design, you can easily create partitions on existing partitions or unallocated spaces, even if you're not familiar with disk management.
Step1. Download, Install and launch Qiling Disk Master. You will see its concise main interface with the basic environment of your hard drive(s).
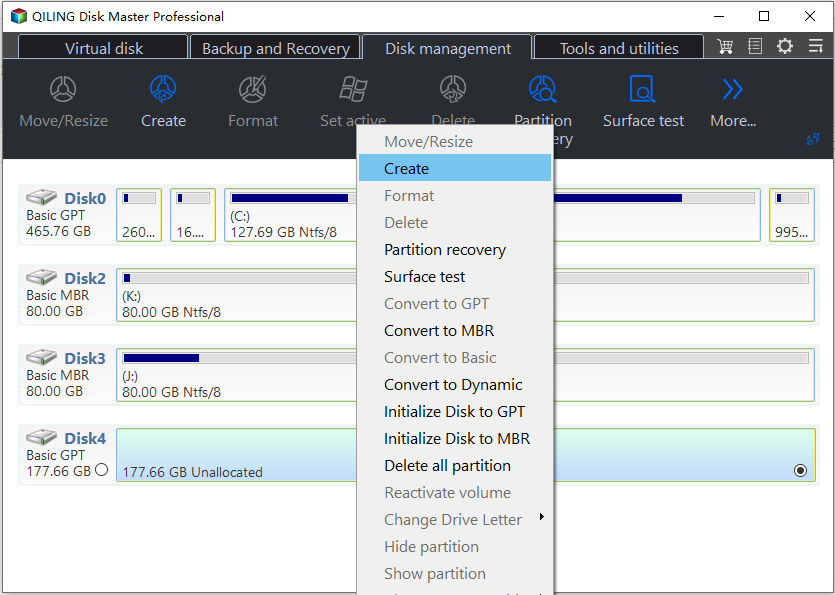
Step2. As we mentioned above, you can use it to create new partition directly on an existing partition or an unallocated space. Just right-click on a partition which has enough free space, and select "Create Partition" at the drop-down menu.
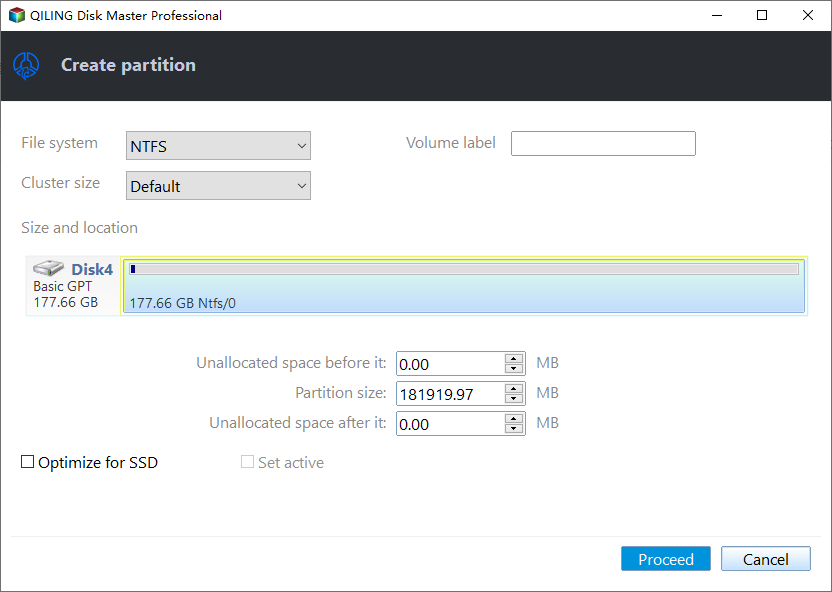
Step3. After clicking "Create Partition", it will pop out a window where you can resize partition for your new partition by drag the arrow to left or right, or you can type the number in the box.
Step4. Now, you can preview the change of your hard drive in the main interface. Don't forget to click Proceed on the toolbar to submit all operations.
Qiling partassist.exe offers a simplified command-line interface for managing disks, making it more accessible than traditional tools like DiskPart. This streamlined approach eliminates the need to list every disk every time, allowing for more efficient and user-friendly operations.
Related Articles
- How to Create New Partition from C Drive in Windows 7 Home?
This tutorial will introduce how to create partition from C drive in Windows 7 Home Basic using Disk Management and freeware Qiling Disk Master. - Failed to Create a New Partition on the Selected Unused Space
Learn how to fix the error 0x8004240f: failed to create a new partition on the selected unused space when installing Windows 10/8/7. - How to Make Partition in Windows 7/8/10 After Installation
Making partition can separate your OS from your data. In this post, you'll learn how to make partitions in Windows 7 in 2 ways. - Can Windows 10 Be Cloned [2024 Fullest Guide]
This article covers the theme Can Windows 10 Be Cloned and introduces a professional tool to clone Windows 10.


