Deploy System Image to Multiple Computers Over Network [5 Steps]
Quick Navigation:
What is Image Deployment?
Image deployment is a powerful technique that streamlines the process of setting up multiple computers with identical configurations. By customizing the operating system, applications, drivers, and settings on a single computer, you create a master image that can be easily deployed to other machines. This process is often referred to as cloning, as it replicates the exact configuration of the original computer across all target machines.
The Advantages of Image Deployment
Deploying images across multiple computers offers numerous benefits, making it an essential tool for organizations of all sizes. By streamlining the process of setting up identical configurations, image deployment simplifies IT operations, reduces errors, and improves overall efficiency.
- Save time and effort: Manually setting up a single computer can be a time-consuming and labor-intensive process, often taking several hours or even a full day. In contrast, deploying a standard image to all computers simultaneously can significantly reduce the time and effort required, making this task much easier.
- Standardization: Image deployment offers a significant advantage in terms of computer management and maintenance. By deploying a standard image to all computers, you can ensure that they are as close to identical as possible. This uniformity makes it easier to manage and maintain the computers, as they will have the same software and configurations.
- Rapid bare-metal installation: As a sysadmin, managing multiple computers can be a daunting task. When your company orders new computers, you want to ensure that each device is customized to meet your organization's specific needs. This involves installing a tailored operating system (OS), unique software combinations, and specially configured settings.
Free Image Deployment Software - Qiling Image Deploy
Many organizations are aware of the benefits of image deployment solutions, but often struggle to find the right tool for the job. With numerous options available, it can be overwhelming to choose a software that meets your specific needs. Some image deployment tools can be complex and difficult to use, while others may not support the latest technologies.
Many organizations face the challenge of deploying images across multiple computers, each with its own unique hardware configuration. This can be a time-consuming and error-prone process, especially for those with limited technical expertise. However, with the right image deployment software, this process can be simplified and made more efficient.
2 Methods for Image Deployment with Qiling Image Deploy
Deploying images across multiple computers can be a time-consuming and error-prone process, especially when working with diverse hardware configurations. However, with the right image deployment software, this process can be streamlined and made more efficient.
When using Qiling Image Deploy (AID) to restore system to multiple computers at the same time, it's essential to understand the roles of the server and client computers in the deployment process.
When deploying system images to multiple computers, it's essential to ensure that the backup file does not contain a Security Identifier (SID). A backup file with SID can cause compatibility issues with the deployed computers.
- Method 1: You need to download the image deployment software - Qiling Image Deploy and the free backup software - Qiling Disk Master Standard to accomplish this task. This method needs to be operated on two different software separately.
- Method 2: If you're looking for a more streamlined approach to system backup and image deployment, you can consider using the all-in-one backup and restore software - Qiling Disk Master Technician or Technician Plus. This software combines multiple functions in one, making it a convenient and efficient solution for protecting your computer.
If you're looking for a more streamlined approach to system backup and image deployment, you can consider using the all-in-one backup and restore software - Qiling Disk Master Technician or Technician Plus. This software combines multiple functions in one, making it a convenient and efficient solution for protecting your computer.
Note: When it comes to system image deployment, there are two versions of Qiling Image Deploy available: the standalone Qiling Image Deploy and the integrated Qiling Image Deploy in Qiling Disk Master Technician/Technician Plus. While both versions share some similarities, there are key differences between them.
Preparation for Image Deployment
Before deploying image to multiple computers, there are a few things that are necessary to confirm and prepare for Qiling Image Deploy to run smoothly. Let's have a look.
- You need to select a fully functioned machine running Windows PC system or Windows Server system as server computer, and the machines that need to be deployed are called client computers. Please check and make sure the server computer and all the client computers are on the same network segment of the same LAN.
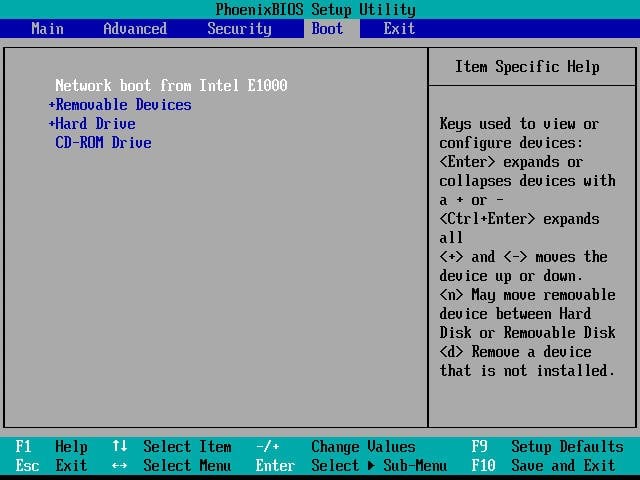
- Please confirm the NIC (also known as network adapter) in all the client computers supports PXE boot.
-
Start all the client computers and enter into BIOS to set the network boot (PXE boot) as the first boot device.

- Please confirm the sequence number of the destination disks that are used for image deployment is the same. It is recommended to remove all other disks in the client computer but only keep the destination disk for image deployment.
- Please confirm the Windows Recovery Environment (Windows RE) in the server computer system is complete. If it is incomplete or the system is older than Windows 7, please download Windows AIK/ADK. If you wouldn't like to download it, please choose a machine running Windows 7 or higher system as server computer.
- Custom a machine's operating system (OS), applications, settings and data to be your desired configuration. Create a full system image backup or disk image backup on the machine with Qiling Disk Master. The machine can be the server computer or personal computer. But the system backup or disk backup image file must be saved to a NAS or network share folder which is on the same network segment of the same LAN as the server computer.
When all the requirements and preparations are ready, please follow the steps to deploy image to multiple computers.
Deploy OS Image over Network with Qiling Image Deploy
Here's a step-by-step guide on how to deploy a Windows 10 image to multiple computers using Qiling Disk Master:
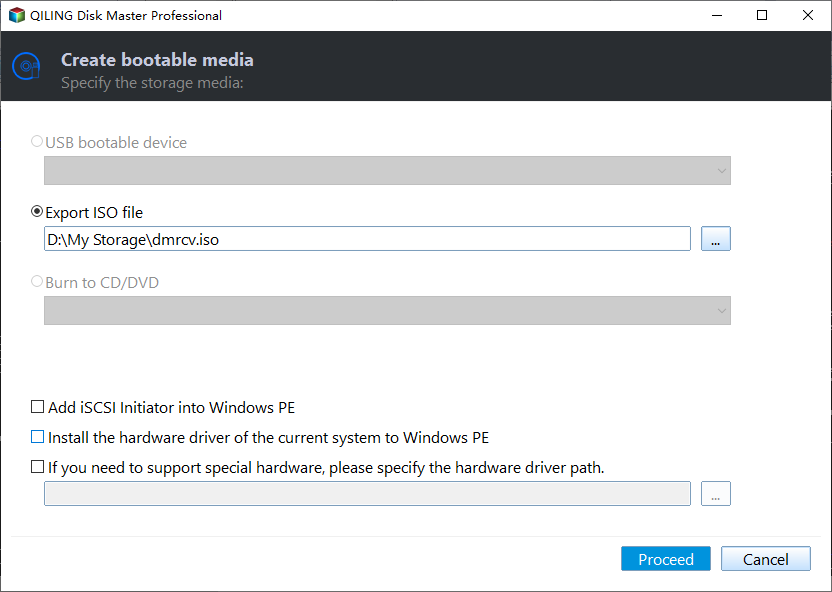
1. Download, install and launch Qiling Image Deploy. To boot up the client computers, there are two ways to create bootable WinPE ISO.
If you're experiencing issues with driver compatibility and the WinPE not starting up on client computers, creating a bootable WinPE ISO manually can be a viable solution. This method allows you to add custom drivers into the WinPE image, ensuring that it can recognize and start up on your client computers.
Note: When deploying a Windows image over the network, it's essential to have a DHCP server in your Local Area Network (LAN). This ensures that client computers can obtain an IP address and other necessary network settings to connect to the deployment server. If you don't have a DHCP server, you can enable the DHCP feature within the deployment software to provide a temporary DHCP service.
2. Once Qiling Image Deploy shows the message "The service has started, waiting for connect...", it's time to start the client computers. This is a crucial step in the deployment process, as it allows the client computers to boot into the Qiling Image Deploy recovery environment and initiate the deployment process.
As the client computers start to boot, you can monitor their progress on Qiling Image Deploy. This is a crucial step in the deployment process, as it allows you to track the status of each client computer and ensure that they are connected to the deployment service.
Once the client computers have successfully connected to the Qiling Image Deploy service, you will see a confirmation page on the client computer. This page will display the local IP address, server IP address, and connection status of each client computer.
3. In this step, you need to specify the system or disk backup image that you want to deploy to the client computers. This involves selecting the correct image and configuring the deployment settings.
3.1 Click "Browse" to find the system backup or disk backup image file you have prepared, and then click "Add share or NAS device". To proceed with deploying the system or disk backup image, you need to enter the network or NAS (Network-Attached Storage) path where the image file is stored.
To proceed with deploying the system or disk backup image, you need to select the computers on which to deploy the image.
3.3 Input the destination disk number on which to deploy the specified backup image. To proceed with deploying the system or disk backup image, you need to select the primary disk on which to deploy the image.
Note: Image deployment will overwrite the destination disk. Make sure that you are performing the deployment to the correct computer and to the correct destination disk on that computer.
3.4 Input every time how many computers will be deployed. When deploying an image to multiple computers, it's essential to consider the impact on deployment speed. The more computers you input, the slower the deployment speed will be.
3.5 Click "Settings" to preset client computers name and IP.
Tips:
👉 Setting up IP addresses for multiple client computers can be a tedious and time-consuming process, especially when done manually. However, with the Technician version, you can upgrade to automatic IP assignment, making the process significantly easier and more efficient.
👉 When creating an image of a client computer, it's essential to consider the possibility of hardware differences between the original computer and the target machines. If the hardware configurations are not identical, the image may not restore correctly, leading to potential issues.
4. You're about to deploy a Windows 10 system image to 10 computers. Before proceeding, let's confirm the details.
5. You can now view the image deployment progress for each client computer in real-time. This allows you to track the status of the deployment and identify any potential issues.
Deploying images across multiple client machines has never been simpler. With Qiling Image Deploy, you can streamline the process and ensure that all machines receive the correct settings and software.
Related Articles
- How to Use Qiling Image Deploy for Image Deployment (Secure Boot)
- Best Way to Backup Multiple Computers to One External Drive
- Best Way to Clone Multiple Computers over Network in Windows
- Best Free Disk Imaging Software for Windows 7 – Download Here!
Need free disk imaging software to help you create disk image in Windows 7/8/10/11? Read this article thoroughly to get the best disk imaging freeware with detailed steps.

