How to Convert Boot Disk Between MBR and GPT Styles without Data Loss?
About MBR and GPT partition styles
You can convert a Master Boot Record (MBR) disk to a GUID Partition Table (GPT) disk using various methods, including using built-in tools like the `gdisk` command in Linux or the built-in Disk Management tool in Windows, or third-party software like EaseUS Partition Master or Acronis Disk Director. These tools allow you to convert the partition style of an existing disk to GPT, enabling you to use larger disk sizes and more partitions than what is possible with MBR. However, it's essential to ensure that the disk is not in use during the conversion process to avoid data loss or corruption. Additionally, some older systems may not support GPT, so it's crucial to check compatibility before making the conversion.
An MBR disk uses the standard BIOS partition table, allowing for up to 4 primary partitions, with the option to convert one to an extended partition for additional logical partitions. However, it has a storage limitation of 2TB, which can cause issues with larger drives, such as a 4TB hard drive only showing 2TB in Disk Management.
A GPT disk uses the standard UEFI partition table, allowing up to 128 primary partitions, and can recognize up to 9.4ZB. However, it requires a computer's motherboard to support EFI firmware to boot Windows, otherwise it may not be bootable.
Why you need to convert boot disk between MBR and GPT style?
When you need to change the boot disk between MBR (Master Boot Record) and GPT (GUID Partition Table), there are specific situations that require this change. This typically occurs when you're upgrading from an older operating system that uses MBR to a newer one that supports GPT, or vice versa.
To overcome the limitation of having only 4 primary partitions on an MBR disk, consider converting the disk from MBR to GPT partition style. This would allow you to create more primary partitions, addressing the need for additional space.
To resolve the issue, Windows cannot be installed to a GPT style partition because the computer doesn't support EFI firmware, so converting the boot disk from GPT to MBR partition style is a suggested solution.
There are two ways to convert a boot disk between MBR and GPT without reinstalling the OS. Firstly, you can use the built-in disk management tool in Windows to convert the disk. To do this, open the Disk Management tool, select the disk you want to convert, right-click on it, and choose "Convert to GPT" or "Convert to MBR" depending on the desired conversion.
How to change boot disk between MBR and GPT styles without reinstalling the system?
Changing the disk style from MBR to GPT or vice versa can indeed resolve certain issues, such as limitations on the number of partitions in MBR or compatibility problems with newer operating systems. However, converting the boot disk between MBR and GPT styles requires careful consideration and execution to ensure the disk boots normally afterward. This process typically involves using specialized tools like EaseUS Partition Master or AOMEI Partition Assistant, which can convert the disk style while preserving the existing data and boot settings. It's essential to back up all data before attempting the conversion, as any errors during the process could result in data loss.
To safely convert a boot disk between MBR and GPT without losing data, you can use the partition tool Qiling Disk Master Professional to make the change. This tool allows you to modify the boot disk's partition table from MBR to GPT or vice versa, ensuring that your data remains intact throughout the process.
Convert system disk from GPT to MBR partition style without Data Loss
If you're trying to convert a system disk from GPT to MBR using Windows Disk Management, you'll find the "Convert to MBR Disk" option greyed out. However, with Qiling Disk Master Professional, this process becomes straightforward.
Note:
Although this operation won't result in data loss, it's still recommended to backup your disk beforehand to prevent any potential data loss in case of an accident.
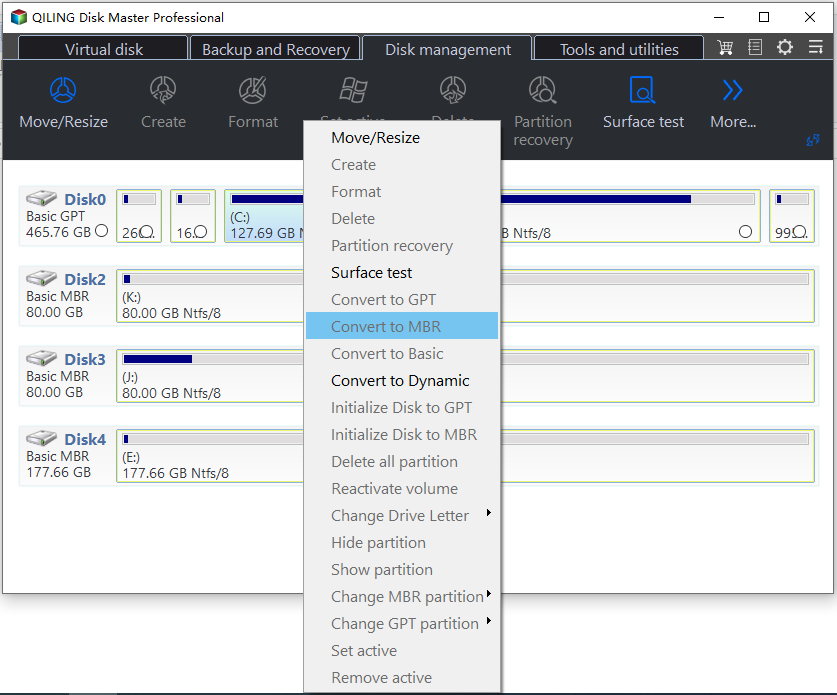
1>. Launch Partition Assistant, you will see the basic environment of your hard drive(s). To convert the boot disk from GPT to MBR, right click the disk and select Convert to MBR.
2>. The task will be executed immediately after running the command. Once the progress is complete, a notification will be displayed, informing you that the operation has been successfully completed. You will then be prompted to reboot your computer for the changes to take effect.
Convert system disk from MBR to GPT partition style without Data Loss
Changing the MBR disk with a Windows OS on it to GPT may cause boot issues, as Windows boots from MBR disks in Legacy BIOS mode and from GPT disks in UEFI mode, and 32-bit Windows can't be installed on a GPT disk. This can be a significant problem.
If you're planning to convert your system disk from MBR to GPT style, first check if your computer supports UEFI mode. If it does, you can use Qiling Disk Master Professional to convert your system disk from MBR to GPT partition style.
Note:
Back up disk before conversion to keep your data safe.
1>. Right click the MBR disk installed on Windows OS, select Convert to GPT.
2>. I don't understand what you're asking. Can you rephrase your question? I'll do my best to help you.
Optional: Use CMD to convert a system disk between MBR and GPT without reinstallation OS
Besides Qiling Disk Master, you can also use the CMD utility DiskPart to convert MBR to GPT. This tool is as powerful as Qiling Disk Master but may be more challenging for beginners, as it requires inputting specific command lines to perform the conversion.
1. To access the Command Prompt from a Windows installation media, you can follow these steps: Insert the installation media, which is typically a USB flash drive, into your computer. If your computer doesn't automatically boot from the USB drive, you might need to enter the BIOS settings and change the boot order to prioritize the USB drive.
2. Run Command Prompt from the media.
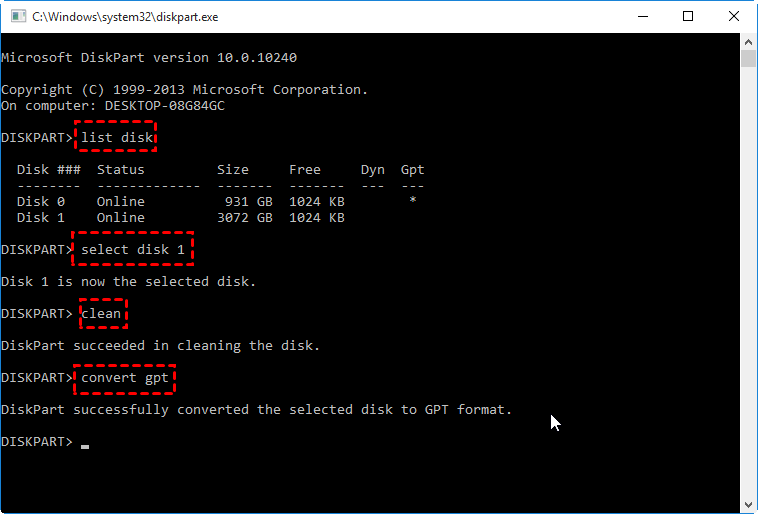
3. 1. Type "list disk" and hit "ENTER" to list all your disks.
4. To convert a hard disk to a GPT disk, type "select disk 1" and press Enter, replacing "1" with the number of the hard disk you want to convert.
5. Be careful with this command as it will completely erase all data on the disk. If you're sure, type "clean" and press Enter.
6. To convert the disk from MBR to GPT, type "convert gpt" and press "ENTER". This will commit the operation and convert the disk to GPT format. If you want to convert the disk from GPT to MBR, type "convert mbr" and press "ENTER".
With Qiling Disk Master Professional, you can convert MBR to GPT without deleting any partitions, preserving your data and avoiding the risks associated with DiskPart. This makes it a more user-friendly and secure option for managing disk partitions.
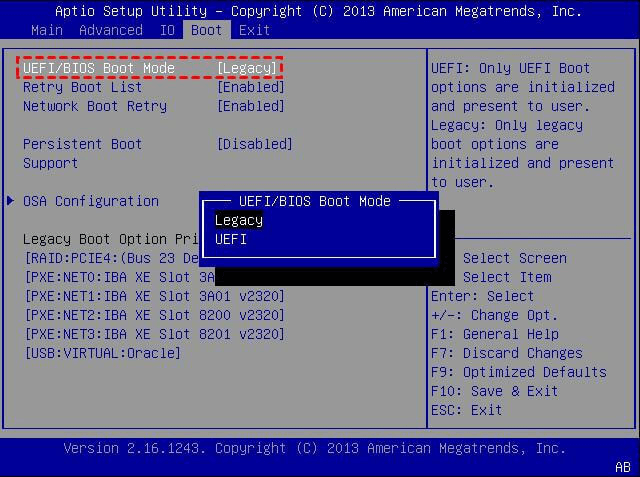
Note: After converting MBR to GPT, you need to change the boot mode from UEFI to Legacy or vice versa to make the operating system bootable.
Conclusion
Qiling Disk Master is a powerful disk manager that offers a range of features, including converting boot disks between MBR and GPT partition styles, converting between basic and dynamic disks, changing partition types between primary and logical partitions, and converting between FAT32 and NTFS without data loss.
Qiling Disk Master Professional supports all Windows PC OSes, including Windows 11/10/8.1/8/7/Vista/XP, and also has a server version for Windows Server users.
Related Articles
- Can't Delete Files or Format My SD Card, What Should I Do?
Why can't delete files or format my SD card? This article provides a detailed guide on this issue and introduces an efficient way to help format a write-protected SD card. - How to Format a Disk or Drive in Windows 10, Help
Do you know how to format a disk or drive in Windows 10? This short article focuses on this issue and provides detailed guides on it. - How Can I Format a USB Having Multiple Partitions on Windows 11/10
Do you know how to format a USB having multiple partitions on Windows 11/10? Don't worry. This article gives a detailed guide on how to perform this action. - How to Format the Write Protected Flash Drive
This page will give you a full detailed guide to solving the flash drive is write protected error. Read this article and follow the instructions to get your problem fixed.


