How to Check If It's UEFI or BIOS on Your PC?
Overview of UEFI and (Legacy) BIOS
Before moving forward, we need to know the definitions of both UEFI and BIOS. In the following paragraphs, I'll explain what are UEFI and BIOS in the most explicit words.
What is UEFI?
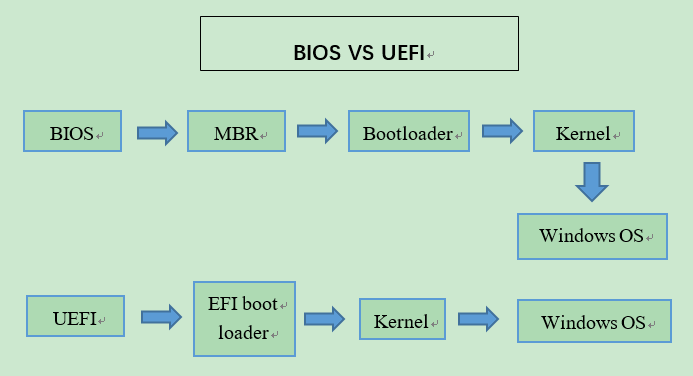
UEFI, short for Unified Extensible Firmware Interface, is a new system and boot mode that replaces its counterpart BIOS. UEFI comes with its own boot manager, delivers faster startup times, improves networking support, supports larger partitions on hard disks, and provides security features to keep your OS from bootkit and other malware attacks during startup.
What is (Legacy) BIOS?
BIOS, short for Basic Input Output System, is also a classic boot mode and a small piece of software stored on a non-volatile chip on the motherboard that guides the OS to boot up and configure system hardware including hard drive, keyboard, mouse, processor, memory and so on.
Although BIOS has been released many years ago and helps the OS to interact with your hardware, it still has some limit; for example, it usually needs to boot from the disk of MBR partition style, which supports 4 primary partitions or 3 primary partitions plus 1 extended partition and meanwhile, supports at most 2TB of storage space.
How to check if your PC is using (Legacy) BIOS or UEFI?
To know whether your PC is running on BIOS or UEFI is a critical step if you try to upgrade from Windows 10 to Windows 11, because in this way, a UEFI boot mode + GPT partition style is required for the Windows 11 installation.
In System Information
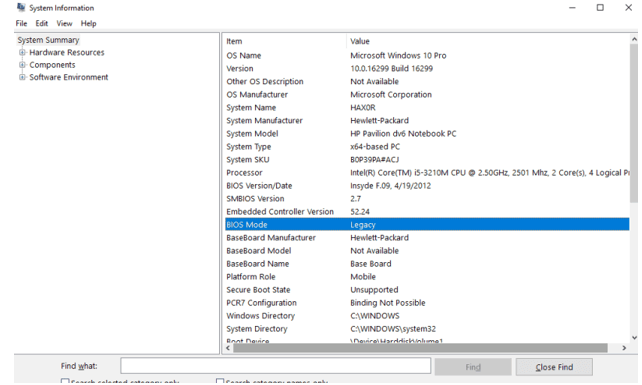
How to check if your PC is using BIOS or UEFI on Windows 10? The most common way is to find it out by entering System Information window.
1. Open start menu in Windows 10.
2. Search for "System Information" and hit the "Result".
3. Under the "System Summary" tab, spot "BIOS Mode". If the value is "Legacy", then, your computer is running on (Legacy) BIOS; if the value shows "UEFI", it means your PC is running on UEFI boot mode.
In setupact.log
Besides check system information, you can check the setupact.log file as well to find out if your PC is using BIOS or UEFI.
1. Run File Explorer.
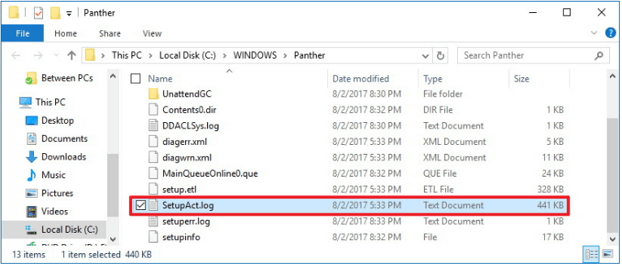
2. Type the following path in the address bar and hit "ENTER"
%SystemRoot%\Panther
3. Open the setupact.log file with the Notepad app.
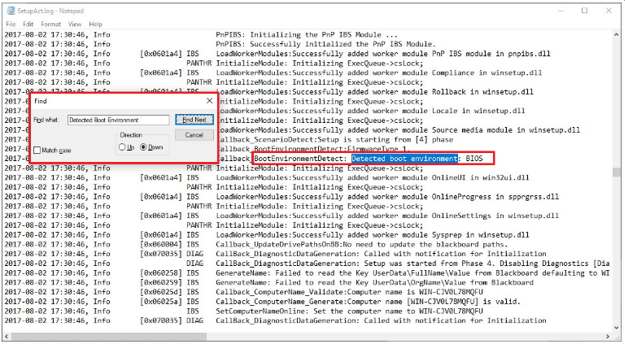
4. Press "Ctrl + F" to run "Find".
5. In "Find", search for "Detected Boot Environment".
If the result is "Callback_BootEnvironmentDetect: Detected boot environment: BIOS", then, your computer is running on (Legacy) BIOS.
If the result shows "Callback_BootEnvironmentDetect: Detected boot environment: UEFI", UEFI is the boot mode of your PC.
How to switch between UEFI and BIOS?
People may need to change UEFI to Legacy BIOS or Legacy BIOS to UEFI for different purposes, for example, for Windows 11 upgrade. But how to switch between these 2 boot modes? Read on and find the answer in the following tutorial.
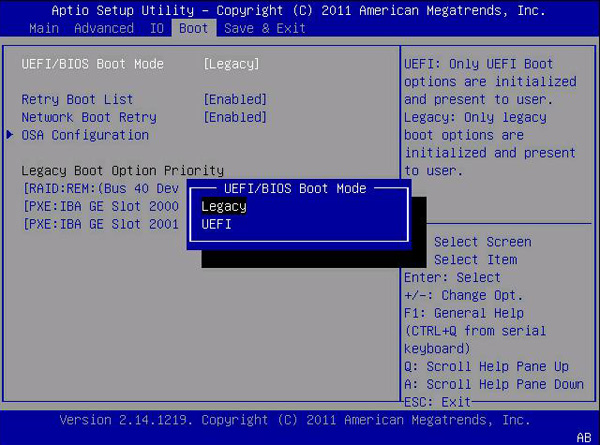
1. During the startup of your computer, keep pressing a specific key so as to enter the EFI Setup menu. Usually, for laptops, the key is Del while for desktops, the key should be F2. If neither of them works, just press Esc and it will give you a full menu and then, you can select BIOS Setup.
2. Under the Boot tab, you can find the UEFI/BIOS Boot Mode option. Now, you can switch between UEFI and Legacy.
How to convert between MBR and GPT without data loss?
To make your computer boot normally, you must match the boot mode with the corresponding partition style. Normally, if the boot mode is UEFI, then, the system disk should be GPT; if the boot disk is (Legacy) BIOS, the system disk should be MBR. And meanwhile, if you want to upgrade Windows 10 to Windows 11 directly with the "Check for Update" feature, then, the boot mode must be UEFI and the partition style should be GPT. Thus, sometimes, you also need to make conversion between MBR and GPT partition style for the corresponding boot mode.
When it comes to MBR GPT conversion, many people will think of Disk Management and DiskPart, the top 2 Windows built-in utilities for hard disk and partition management. Indeed, they help with MBR GPT conversion and many other operations. However, to successfully convert between these 2 partition styles, you have to manually delete all existing partitions on the target disk and in this case, you'll suffer from severe data loss.
So, is there any better alternative? Luckily, this time, Qiling Disk Master Professional may help you out. It's a powerful and multifunctional disk manager that's able to perform various operations including MBR GPT conversion, primary to logical disk conversion and, SSD 4k alignment. This software doesn't include any bundleware and free from adverse popup ads so you can use it without worries.
Here, we take MBR to GPT conversion for example.
Step 1. Install and launch Qiling Disk Master Professional, right-click on the target disk and select the option "Convert to GPT".
Step 2. Wait a while for the Disk master convert the partition to GPT.
As you can see, in only 2 steps, the conversion will be done. Much easier than using Disk Management or DiskPart. During the MBR GPT conversion, you don't need to delete any partitions either.
Conclusion
How do I know if I have UEFI or BIOS in Windows 7, 8, 10, 11? In this post, you learned to find it out in System Information and setupact.log. Meanwhile, to make Windows bootable, you need to match the boot mode with the corresponding partition style and thus, you must convert between MBR and GPT. A powerful and easy-to-use MBR GPT converter utility Qiling Disk Master Professional was introduced to help you get it done without any data loss. To use this software on Servers, remember to try the Server edition.
Related Articles
- Best Free GParted Windows Alternative Tool
Gparted Windows alternative tool - Qiling Partition Master makes everything simple and easy for you to manage Windows partition and space. 3 simple steps fix all complex partition management problems with this tool. - HDD Regenerator Free Alternative on Windows 10/8/7
Finding free HDD Regenerator alternative works similar or even better? Here is the best alternative to HDD Regenerator. Just free download the HDD repair software and try it to check and repair file system errors, bad sectors, disk error on your hard disk drive and recover corrupted files. - 4 Methods to Hide or Unhide Partition in Windows Server
In this tutorial, I will show you five methods to hide or unhide partitions in Windows Server. If you have confidential materials that restrict someone from accessing your hard drive, this article will guide you to place all critical files on a hard disk and hide it. No data deletes. - Check This Guide to Learn How to Check RAM Speed Windows 10
RAM speed can reflect your computer status. However, some users might don't know how to check RAM speed. In this article, we will introduce two ways for you to check RAM speed in Windows 10.
