Qiling Image Deploy | SYSPREP Workaround in Windows 7, 8, 10, 11
What is Sysprep and how does it work?
SYSPREP is Microsoft's system preparation tool for Windows installation image deployment, The tool resolves a common issue by allowing users to generate new computer names, unique SIDs, and custom driver cache databases during the Sysprep process, which is essential for system image deployment. It can be run from the sysprep.exe file, command line, or a script, making it convenient for users.
The official way is to generate an answer file and then use Sysprep /generalize command to generate the image for deployment. To customize Windows, add drivers, change settings, and install programs. Once complete, capture the customized image using DISM and deploy it to another computer during the Out-of-Box Experience (OOBE) screen.
✎Tip:
- To avoid issues with the Sysprep process, refrain from installing or updating Microsoft Store apps before generalizing your image. This will help ensure a smooth and successful Sysprep process.
- Before deploying an image, use Sysprep /generalize to generalize a Windows installation, which is necessary for image deployment. If not, the Sysprep command-line tool cannot be used.
Why do you need a Sysprep workaround?
Some users face issues when trying to deploy a customized image using Sysprep, experiencing repeated failures despite its convenience for creating reusable images. There are underlying reasons for these problems.
- The process of working with answer files is cumbersome as it necessitates users to respond to machine-specific questions that arise when the imaged PC is booted, and its individual attributes need to be loaded.
- You need a third-A utility used for preparing a machine for imaging, specifically changing the SID, but sometimes it fails to complete the SID change.
- Using the same Security Identifier (SID) on multiple computers can pose a security risk because it allows an attacker to access and control all systems with the same SID, potentially leading to unauthorized access and data breaches. This can be mitigated by ensuring each computer has a unique SID, which can be achieved through proper system configuration and management practices.
You can deploy a system image to a different computer using a sysprep workaround, which is available online.
Workaround: Deploy image when SYSPREP not working
Since the sysprep has limitations when deploying system images to multiple computers, you may want to consider alternative methods. Professional image deployment software, such as Qiling Image Deployment, can help you restore system images to multiple computers over a network, even with different hardware, making the process smoother and more efficient.
You can deploy images to multiple computers (Windows 7/8/10/11 supported) and 20 server computers using the free version of Qiling Image Deployment. For deploying images to multiple server computers, Qiling Image Deploy Technician is required, offering advanced features such as preset client computer IP addresses, deployment to different hardware, and technical support.
You'll need to download both system backup software and system deployment tool. Alternatively, you can use a single software like Qiling Disk Master Technician or TechPlus, which combines both functions and allows you to create bootable media as well as system image, making the process simpler and more streamlined. The steps remain the same, and having all the tools in one place can simplify the process.
Note: The standalone Qiling Image Deploy only supports BIOS boot, whereas the integrated Qiling Image Deploy in Qiling Disk Master Technician/Technician Plus supports both BIOS and UEFI boot.
Here take the free way as an example.
To prepare for deploying an image with an alternative to Sysprep, you need to accomplish the following:
- Use Qiling Disk Master Standard to create bootable media.
- Check out if all the client computers support network boot.
- To ensure the server computer and client computers are in the same network segment, make sure they are connected to the same router or switch, or at least have the same subnet mask and IP address range. This will allow them to communicate with each other directly and avoid the need for a router or gateway to forward traffic between them.
- To avoid SID-related issues when deploying a system image to different computers in the same domain, it's recommended to remove the SID before creating the system image. This can be done by following the steps:
1. Before using Sysprep to remove the SID, load the Qiling Disk Master to mark and record the partitions on your PC. This step is essential to ensure that the partitions are properly identified and configured during the Sysprep process.
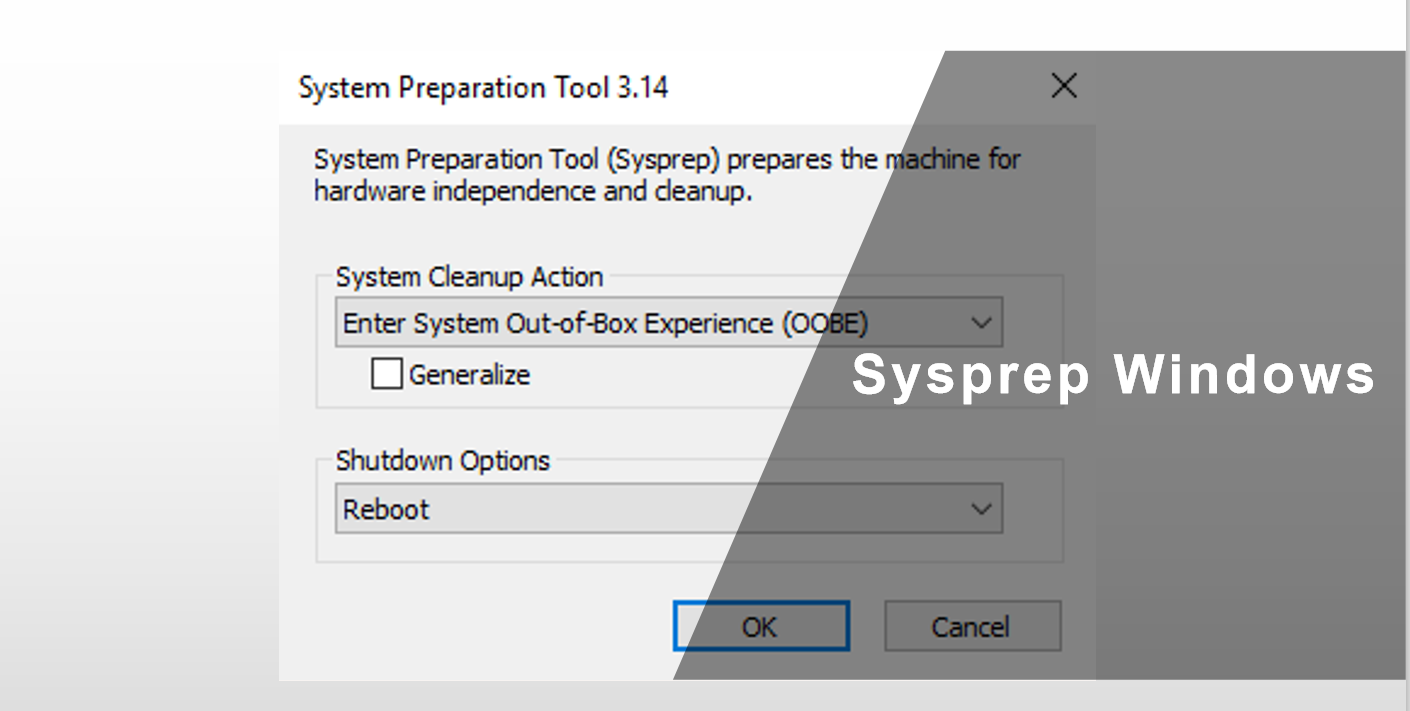
2. Type %WINDIR%\system32\sysprep\sysprep.exe to open the Sysprep.exe.
3. In the System Preparation Tool window, select "Enter System OOBE" under System Cleanup Action and check "Generalize" below.
4. Select "Shutdown" under the Shutdown Options and click "OK" to execute the SID removal operation, which will then automatically shut down your computer.

After running sysprep, boot the syspreped computer with bootable media created by Qiling Disk Master right after, otherwise the new SID information will be created. This allows you to create a system image and deploy it to multiple computers.
Deploy system image to multiple computers without SID issue
Step 1. Connect your bootable media to the syspreped computer, set it as the first boot option in the BIOS settings, save changes, and let the computer boot from it.
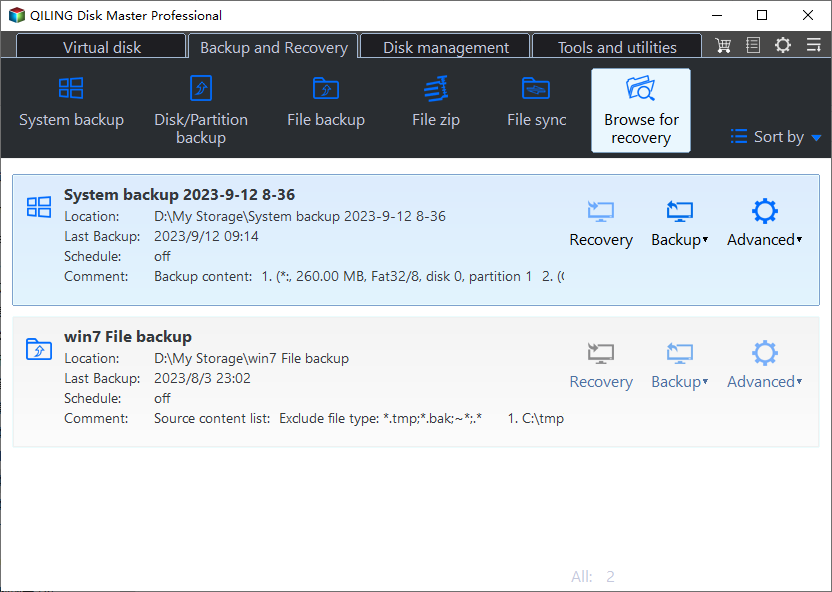
Step 2. After loading, proceed to the "Backup" and "System Backup" sections to create a system image, where you can also choose to save the image to network-attached storage. Ensure that the shared folder or NAS, as well as the client computers, are on the same network segment.

Step 3. To resolve the issue, disconnect the bootable media and restart your computer in normal mode. Then, download Qiling Image Deploy Free, open it, and select the option to create WinPE automatically. If you want to add custom drivers, you can choose the second option to continue.

✎Tips:
- If your computer is running Windows 7 or lower, you need to install AIK, while if it's running Windows 8 or higher, you need to install ADK.
Step 4. Specify backup image file and client computers for OS deployment.
To select your system image file, click on "Browse" and then select "Add Network Location". Enter the network path to locate your system image file.
- Universal Restore allows you to deploy a system to computers with different hardware configurations.
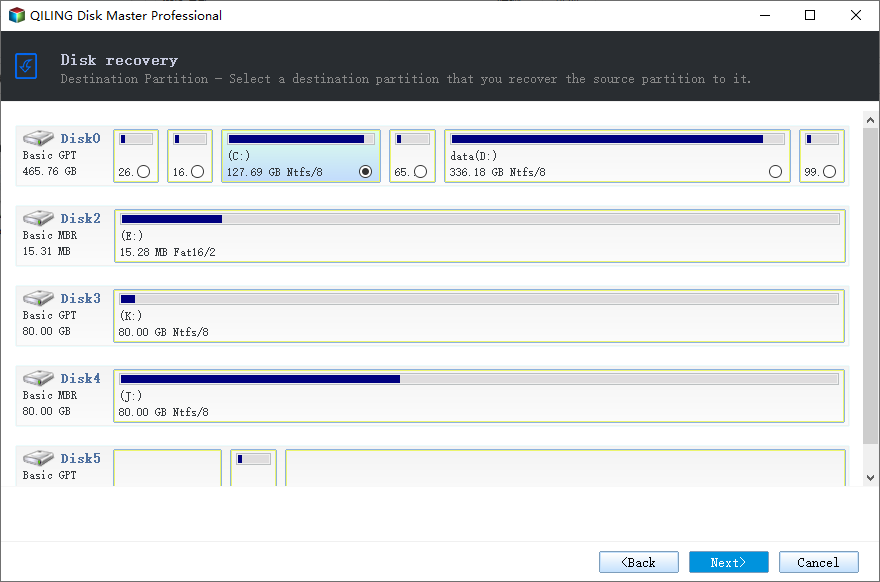
Step 5. You Select a partition on the SSD as the restoration destination and click "Next".
Step 6. Confirm your operations and click Proceed. You can also choose to shut down or restart client computers after OS deployment is completed.
Summary
You can complete the image deployment process using Qiling Image Deployment, which is a simpler alternative to Sysprep. To do this, simply follow the steps outlined above and click the corresponding buttons to proceed.
If you have a large number of computers, Qiling Image Deployment is the way to go. However, if you only have one or two computers, you might want to try Qiling Disk Master Standard, which allows you to clone your system and install it on another computer. Alternatively, you can also backup your system to an external hard drive and then restore the image from the external drive. Download Qiling Image Deployment to discover more of its useful features.
Related Articles
- Quick Start Guide to Sysprep in Windows Server 2012 (R2)
Before deploying an operating system to multiple devices, you must clear the security information via Sysprep. Learn how to run Sysprep in Windows Server 2012 (R2) and deploy OS to other computers simultaneously from this page. - How to Use Sysprep in Windows 10 | Step by Step
To deploy OS to different computers, you can run Sysprep in Windows 10 to prepare a system image. This article provides a detailed tutorial and also an easier alternative. - Deploy System Image to Different Computer in Two Situations
You will how to deploy system image to different computer in different situations. Support for dissimilar hardware restoration. - How to Transfer Files Between Two Computers Using IP Address
How to connect and transfer files between two computers using their IP addresses without using a serial cable or a special parallel transfer cable? Let Qiling Disk Master help. As long as the two computers, or perhaps multiple computers, are connected to the same LAN, you can easily put the IP address for a direct connection for data share or transfer.