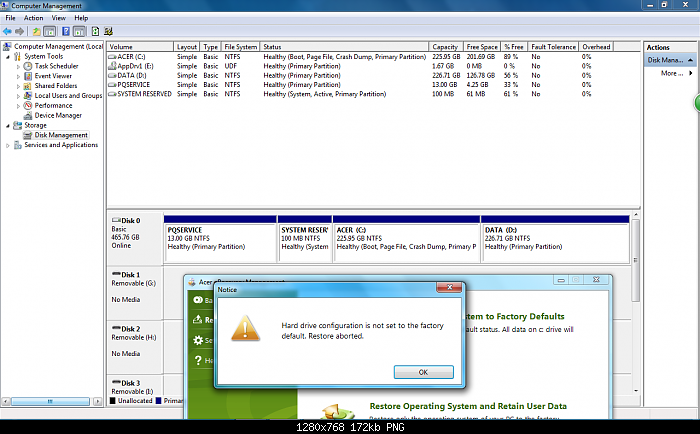
Acer eRecovery Hard Drive Configuration Is Not Set the Factory Default
Symptoms of Acer eRecovery Hard Drive Configuration Is Not Set the Factory Default
Case 1
I have a acer aspire 4920 and i want to restore it to factory default. i downloaded acer erecovery management and i click on restore system to factory default. A error message pops up saying acer erecovery hard drive configuration is not set to the factory default restore aborted. how do i fix it.
Case 2
You're trying to restore your Acer Aspire laptop to its original factory settings, but it's not allowing you to do so due to a hard drive configuration issue. The laptop is about 5 months old, so it's likely that the hard drive configuration has been altered since its purchase. You may need to try a different method or seek assistance from Acer's support team to resolve this issue.
Case 3
When I go into Acer Recovery Management to try to create a factory default backup I get a pop up that says acer erecovery hard drive configuration is not set the factory default - back up aborted. How do I get my hard drive set back to factory default?
Solutions to Acer eRecovery hard drive configuration is not set the factory default
Solution 1: Get a recovery disk from Acer directly
If you're unable to access your Acer laptop due to a crashed or corrupted operating system, it may be because you don't have a recovery disk or partition. In this case, you can purchase a set of recovery disks directly from Acer, which can be found in the Accessories section or on the main website.
Solution 2: Change SATA Controller settings to AHCI
Solution 3: Undo the jumpers
Going into the PC and undoing the jumpers (resetting them back to what the factory setting numbers, and are on the jumper chip or whatever it is called).
Solution 4: Perform system files checker and change the GUID value
This may be caused by having resized disk partitions by a third party software, so the system disk layout has been changed.
To fix the issue, run the System File Checker (SFC) tool to scan and replace any corrupted system files. Open Command Prompt as Administrator, type "sfc /scannow", and let the system scan and repair any issues. This should resolve the problem.
Then, follow the following:
To execute the commands, type "diskpart" in the Command Prompt as an administrator, then type "list disk" to list all available disks, select the desired disk by typing "select disk #" (replacing # with the actual disk number), and finally, type "list partition" to view the partitions on the selected disk.
To address the issue, we flag recovery partitions as OEM and then set their IDs according to the GUID system, specifically changing them to DE94BBA4-06D1-4D40-A16A-BFD50179D6AC. This is done for every partition with an OEM type.
Eg. > "select part 1" > set id = "de94bba4-06d1-4d40-a16a-bfd50179d6ac"
The issue should be solved then. Now you can try system refresh/reinstall to factory settings (or create a recovery media).
Solution 5: Use alternative software to factory rest Acer
Qiling Disk Master is a one-key recovery software that allows for system backup and restore, similar to Acer eRecovery Management. It also supports encrypting or compressing system backup images. Additionally, you can schedule backups to occur at regular intervals, such as daily, using its built-in scheduler.
If your Acer system crashes, you can restore it to its factory settings using a backup you created, which can be done by reinstalling the operating system and restoring the system to its previous state, including any newly installed programs and personal data. This can help resolve issues caused by viruses, hijacks, or software errors.
To Sum up
This article offers 5 solutions to resolve the issue of Acer eRecovery hard drive configuration not being set to factory default. You can try them one by one. However, in the long term, it's recommended to back up your system automatically using Qiling Disk Master. This way, you can restore your system to its previous state in case of any issues. If not, you can only restore it to factory settings, which will only include a clean OS, preinstalled programs, and essential files required to boot Windows.
Related Articles
- Acer eRecovery Management cannot install bootable file
Solutions for Acer eRecovery Management problem - Acer eRecovery Management cannot install bootable file. - Acer eRecovery Management not working
If you encounter the problem of Acer eRecovery Management not working, read this article carefully to get effective solutions. - Acer eRecovery Management Not Working – Solved Now!
If you encounter the problem of Acer eRecovery Management not working, read this article carefully to get effective solutions. - How to Move Picasa from One Computer to Another
This article provides clear instructions on how to move Picasa from one computer to another. It begins by explaining that Picasa is a photo editing program created by Google. The article then provides detailed instructions on how to transfer Picasa photos. Throughout, the instructions are easy to follow and accompanied by helpful screenshots. This makes the process of moving Picasa from one computer to another relatively straightforward. As a result, this article will be useful for anyone who wants to move their Picasa albums to a new computer.


