How to use Acer eRecovery Management in Windows 7
What Is Acer eRecovery Management in Windows 7?
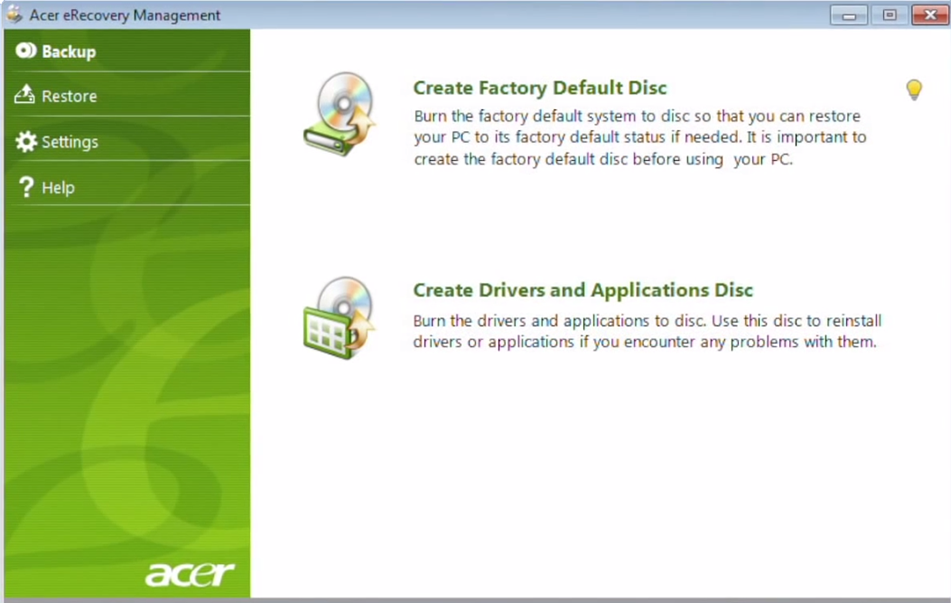
Acer eRecovery Management is just Acer eRecovery Management software in Windows 7, which can help you restore Acer's computer to default settings when it stops working or behave abnormally.
And this software was still kept in later systems, Windows 8/8.1/10/11, and the software version is also upgraded. Note that the interface may have a little different in different system, but you still can use it easily.
How to use Acer eRecovery Management in Windows 7
To use Acer eRecovery Management in Windows 7, you have 3 different ways to start it. Check them in the following and backup your Acer computer with this software.
- If you can boot into Windows, you can follow "Start" > "All Apps" > "Acer" folder > "Acer Recovery Management" to access Acer eRecovery Management Windows7.
- Also supposed that you can get into Windows. Then, Type "acer recovery" in the search box and click "Acer Recovery Management" to open Acer Recovery Management Win7.
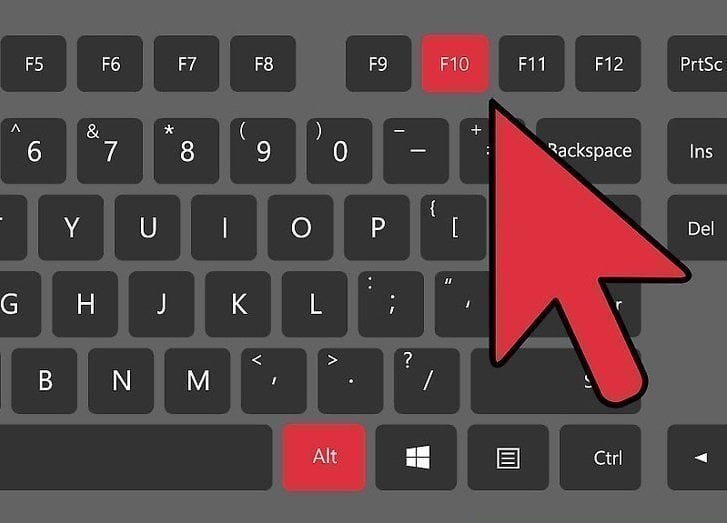
- f your system stops working, Power on your computer. When the Acer logo is displayed, press and hold the ALT key while pressing repeatedly the F10 key. Release the keys when a message displays that Windows is loading files.
Then, after starting Acer eRecovery Management in windows 7, follow the steps below.
1. Click Backup and select Create Factory Default Disc in the Acer eRecovery Management.
2. Then, you will be told how many discs are required for this task. Be sure you have enough discs ready and click Start to create backup recovery disk.
3. After a few while, you are asked to label the first disc as Recovery 1 and insert the next disc. Click OK.
How to fix Acer eRecovery Management Windows 7 Problems
Sometimes, there may be some Acer eRecovery Management Windows 7 errors which will cause Acer eRecovery Management Windows 7 not working.
Error One: Restoration takes a very long time, maybe over 24 hours.
Solution: First take your patience and wait until it finishes. If it seems like will never finish, cancel it and retry. Otherwise, you should search for help online or take your machine to repair shop.
Error Two: some of Keyboard does not work, such as, "fn" and "ctrl". This will stop users from getting access to Acer eRecovery Management in Win 7 using "ALT + F10".
Solution 1. If yours is a notebook, connect an external keyboard from USB port and have a try.
Solution 2. Re-install Acer Launch Manager (download from here) and try again.
Solution 3. Disable or Enable the Human Interface Device Access service and try the keyboard again. You can type "services.msc" in the search box and press Enter to access the services window.
Solution 4. If you are using Google Chrome, it may hijack your keys by its introduced Global Keyboard Shortcut control. You need to release the keys in the Extensions.
Overall steps: go to Chrome app menu> "Tools" > "Extensions", click "Keyboard Shortcuts" link and Google Play Music section, then change all l specified media key options from "Global" to "In Chrome". Also, you can uncheck the "Enabled" box of Google Play Music or click the trash can to remove it completely.
Error Three: The combination key "ALT + F10"not working, and you can't get access to Acer eRecovery Management in Windows 7.
Solution 1. The error may be caused by that the D2D function is disabled in BIOS. To fix by pressing F2 during the boot to access the bios menu and change the setting.
Solution 2. The error may be caused by that the Acer Master Boot Record (MBR) is damaged, or replaced by the MBR of another system. You can reinstall the Acer MBR if the partition PQservice is present or if you can have access to the necessary files. Learn more >>
Solution 3. The error may occur due to the OEM recovery partition is damaged or deleted. Hard disk replacement, formation or repartition can all influence the recovery partition. If you have got a set of recovery discs either created by yourself or ordered from Acer company, you can use them to replace recovery partition and do system recovery under the operation by Acer eRecovery Management Windows 7. If not, you are unable to make use of Acer eRecovery Management Win 7.
Other problems may cause Acer eRecovery Management not working:
- Acer eRecovery hard drive configuration is not set.
- Acer eRecovery Management cannot install bootable file.
Try Acer eRecovery Management Alternative in Windows 7
Since there are so many Acer eRecovery Management Windows 7 problems which can lead to Acer eRecovery Management Windows 7 not working, it is a good choice to resort to another tool to do system backup and recovery. Here I strongly recommend you Qiling Disk Master, it's more stable, safe, compatible and feature-rich.
With it, you can not only backup Acer computer, but also other comptuter brands, such as, Lenovo, Dell, HP, Sony, Toshiba, Samsung, Asus, etc. And the backup image is saved to a hidden recovery partition, so no one can delete it easily. And it supports backup system automatically with daily, weekly, monthly scheduler.
If you need a way to protect your system and data on it, it's worth trying. Please download this software and create one key recovery image right now! Thus, you will not worry about data loss in any situations.
Summary
This article shows you all you need to know about Acer eRecovery Management in Windows 7. You can use it to backup and restore system to its default settings. Also, you may encounter endless problems during the process.
If you do not want to always solve problems during the backup process or need a more powerful one key recovery software, Qiling Disk Master is a good option. It applies to all the Windows systems and different computer brands. Also, you can schedule backup your computer to keep the latest status, thereby minimizing data loss after recovery. For advanced users, try Qiling Disk Master Technician or Customization.
Related Articles
- Acer eRecovery Management Missing Fixed [2 Ways]
How to fix Acer eRecovery Management missing problem in Windows 7, 8, 10? This essay will fix acer erecovery management is missing problem with 2 simple solutions. - Acer eRecovery Management Not Working – How to Solve It Easily
If you encounter the problem of Acer eRecovery Management not working, read this article carefully to get effective solutions. - Backup and Restore with Acer Recovery Management in Windows 10
This article will show you how to backup and restore with Acer Recovery Management in Windows 10. With a backup in hand, you can restore Acer to a good state. - Best Qiling Disk Master Free Alternative for File, App, and Account Setting Transfer in 2022
Are you looking for a reliable Qiling Disk Master Free alternative tool that helps you migrate files, transfer apps, and even user account settings from PC to PC? This page will explain Qiling Disk Master Free, its Pros and Cons, and the best alternative tools you can rely upon.


