How to Setup PXE Boot Server in Windows Easily and Securely?
Case: setup PXE boot server in Windows to boot another PC
When a computer has aging hardware or system errors, it may be difficult to boot it by normal means. In this case, you can set up a PXE server to boot another computer(s) within the LAN.
PXE (Preboot Execution Environment) boot offers several significant advantages, making it a popular choice for administrators and users alike. Here are some of the key benefits of PXE boot:
- The administrator can boot and maintain multiple PXE-enabled client computers.
- In today's digital age, the need for physical installation discs or USB drives is becoming increasingly obsolete. With the advent of PXE (Preboot Execution Environment) boot, client computers can be booted and configured remotely, eliminating the need for these physical media.
- In today's digital landscape, remote troubleshooting and maintenance have become essential tools for administrators to manage and maintain client computers. With the help of PXE (Preboot Execution Environment) boot, administrators can remotely boot and configure client computers, making it easier to identify and resolve issues.
- PXE (Preboot Execution Environment) boot offers a powerful solution for centralized management and network integration. By leveraging PXE boot, administrators can streamline the process of adding new computers to the network, updating existing ones, and managing installations.
Setting up a PXE (Preboot Execution Environment) network boot server in Windows can be a bit involved, but it's a great way to centrally manage the installation and updating of computers on your network. Here's a step-by-step guide to help you get started.
- Prerequisites to PXE network boot
- How to deploy PXE boot server in Windows?
- Easier way to setup PXE boot server in Windows
Prerequisites to PXE network boot
Before setting up a PXE (Preboot Execution Environment) network boot server, each client computer you want to boot from the network should meet the following conditions:
1. A PXE-capable network interface controller supporting Wake-on-LAN mode
2. A wired Ethernet connection to the network
3. To ensure a successful PXE boot experience, all client computers you want to boot from the network should be connected to the same network as the PXE boot server. This shared network configuration is crucial for the following reasons:
How to deploy PXE boot server in Windows?
Setting up a Windows PXE boot environment involves two primary components: DHCP configuration and PXE boot configuration. While it may seem straightforward, the process requires careful attention to detail and can be more involved than initially apparent. Here's an overview of the steps involved:
- The process of setting up a Windows PXE boot environment involves several steps. Here's an overview of the steps involved:
- The server replies with a suggested IP address, the client uses the provided address.
- The client sends out a DHCP broadcast and states it needs to PXE boot, then the DHCP server replies it with the IP address to use.
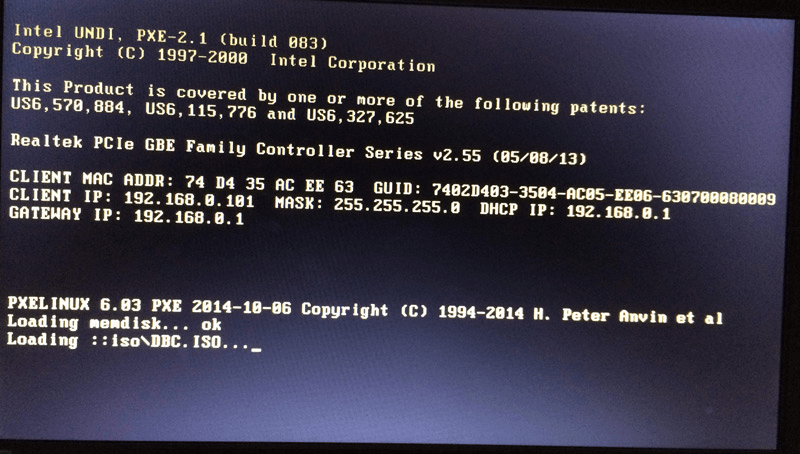
- The client contacts the PXE boot server to request and receive the boot file.
- The boot file is then loaded on the client machines.
You're right, setting up a PXE boot server can be a complex process, especially for those who are not familiar with computer networking and configuration. However, there are many tools and software available that can simplify the process and make it more accessible to a wider audience.
If you still want to set up a PXE boot server without using any third-party utilities, here's a more detailed step-by-step guide for your reference.
Easier way to setup PXE boot server in Windows
Among the various PXE boot utilities available, Qiling PXE Boot Tool stands out for its exceptional compatibility and user-friendly interface.
Qiling Disk Master Workstation is a robust and budget-friendly data backup and disaster recovery solution that is seamlessly integrated with Qiling PXE Boot Tool, providing a comprehensive and efficient data protection and recovery experience.
Qiling PXE Boot Tool is a user-friendly and efficient solution for safely booting and maintaining multiple client computers within a Local Area Network (LAN). This tool simplifies the process of creating a Linux bootable ISO or Windows PE bootable ISO image file, eliminating the need for extensive setup and configuration of a PXE boot server.
Steps:
1. Download and install Qiling Disk Master Workstation. Go to Tools tab and choose Qiling PXE Boot Tool.
2. Select Qiling Windows PE System and click Start Service. It will directly create a Windows PE system image for network boot.
◉ Boot from Qiling Linux System applies to older or Linux based computers, and the third one Boot from custom image file allows you to load the special micro-system created by Qiling PE Builder or Bart PE.
◉ Alternatively, you can create a bootable file by �reate Bootable Media in Tools tab.Create Bootable Media in Tools tab.
3. Now you can enable the computers within LAN to use PXE service. Turn on the client computers and press the required key to enter BIOS settings.
◉ The required key might be F2, F10, Del, etc., which depends on the specific brand and model of the device. You can search it on Internet or refer to the user manual.
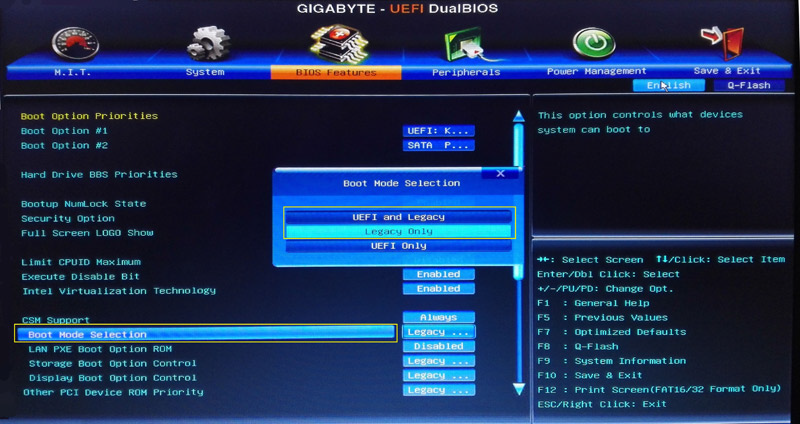
4. Find Boot mode selection and make your choice.
◉ When booting a computer, you have two primary options: UEFI (Unified Extensible Firmware Interface) mode and legacy BIOS mode. While UEFI mode is generally more secure and feature-rich, there are situations where legacy BIOS mode may be necessary.
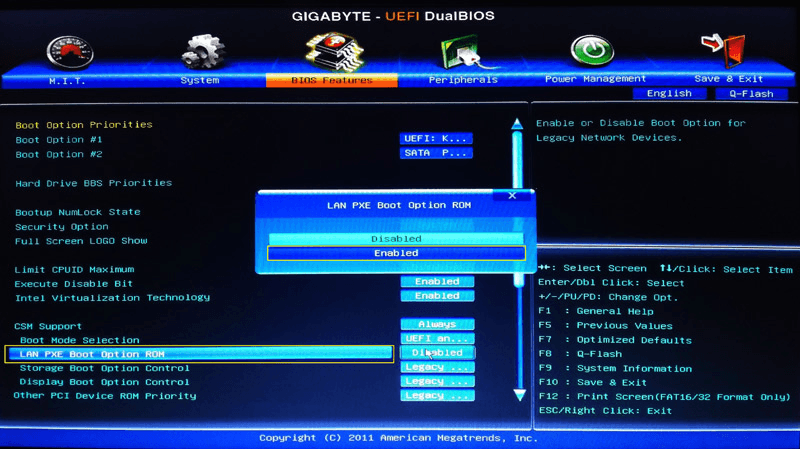
5. Then find and enable the PXE boot option.
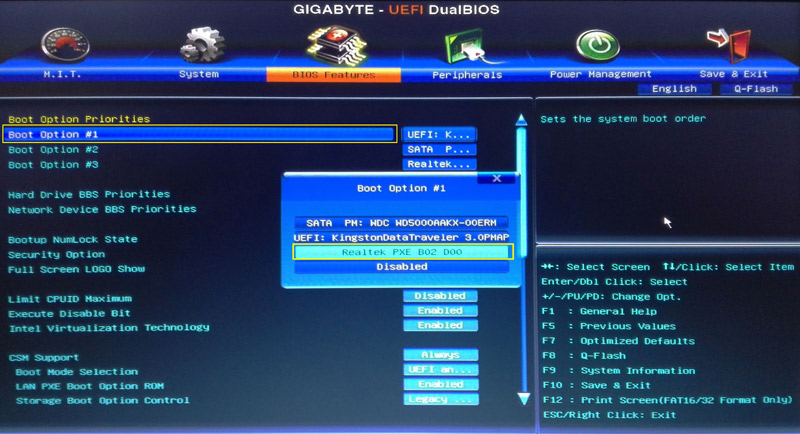
6. Set the PXE option as the first boot device in Boot Option Priorities.
7. It will take some time to boot from PXE boot server, specifically depending on your network speed and the size of the image file.
Related tips:
- Qiling PXE Boot Tool do support booting UEFI machines but currently only the WIM file can be used for UEFI (not the ISO file). If the file is an ISO file, you better change the boot mode to Legacy Boot Mode.
- The network speed may be impacted if there are many computers using PXE boot. Thus you can try dividing PXE boot clients into smaller groups to boost the speed.
- The Qiling PXE Tool includes a built-in DHCP server, which can be utilized when an existing DHCP server is not available. This can be particularly useful in scenarios where a DHCP server is not present, such as in a lab environment or during the setup of a new network.
Conclusion
The Qiling Disk Master Workstation is a powerful tool that allows you to easily set up a PXE boot server in Windows 10/8/7. With its built-in PXE Boot Tool and Create Bootable Media tool, you can create a PXE boot server that can be used to boot multiple computers within a LAN, even when you don't have any installation media.
The Qiling Disk Master Technician and Technician Plus offer a powerful feature called Image Deploy, which allows you to deploy system images created on one computer to others. This feature is particularly useful for large-scale deployments or when you need to quickly deploy the same system configuration to multiple computers.
Related Articles
- How to Network Boot Multiple Computers within the LAN?
If you have more than one computer to install or maintain, it would be much more convenient to network boot multiple computers with PXE. But how does it work? - Network Path Not Found or PXE Error, How to Solve it?
How to solve problems that network path not found or PXE error? There are a lot of reasons to account for that. If you worry about your computer, Qiling PXE Boot Tool is a good solution. - PXE Boot Windows 7 with PXE Boot Tool in Qiling Disk Master
If you have multiple computers to install and maintain, or want to boot Windows 7 without installation disc or USB, it may be a good idea to network boot Windows 7 via PXE. In this article, I'll show you a easy way to PXE boot Windows 7. - How to Install OS on Multiple Computers Simultaneously?
In order to install OS on multiple computers simultaneously, a must-be access is to create system backup image. Besides, you should deploy system image files to multiple computers in a same LAN.
