Mac Undelete Photos - How to Recover Deleted Photos on Mac Free or Paid
Quick Navigation:
- How to Restore Recently Deleted Photos on Mac without Software
- 1. Check the Trash to Find Deleted Pictures
- 2. Resave Deleted Photos from Photos App
- 3. Restore Deleted Photos on Mac with Time Machine
- 4. Retrieve Deleted Pictures in iCloud
- Recover Permanently Deleted Photos on Mac with Software [Free]
- Your Best Software for Recover Deleted Photos on Mac Free
- To Recover Deleted Photos on Mac for Free with Deep Data Recovery for Mac:
- [Paid] Recover Deleted Pictures on Mac Use a File Recovery Service
- How to Effectively Keep Your Photos Safe on Mac
- How to Repair Corrupted Pictures on Mac
- Summary
- Frequently Asked Questions (FAQs)

Losing pictures on Mac can be a painful experience, especially when they hold precious memories of family and friends. However, you may still be able to recover deleted photos on Mac. Before attempting to retrieve them, follow these precautions to increase your chances of finding accidentally deleted items.
- ⛔ To avoid overwriting the lost picture, please stop using your Mac/drives and try not to save any new files. This will help preserve any remaining data.
- ⚙️ To avoid losing a recently deleted photo, do not use any optimization program to improve macOS or hard disk performance. This can cause the photo to be completely erased or its properties to be destroyed, making it disappear permanently.
- 💻 Using the Command Line to retrieve deleted photos on a Mac is not recommended. It can only list deleted items, which then need to be manually put back in the trash bin, and any incorrect commands can potentially lead to further data loss.
Don't worry if you've lost your photos on Mac, regardless of the reason. There are six ways to recover deleted photos, including getting back permanently deleted ones. Choose the method that suits your situation.
How to Restore Recently Deleted Photos on Mac without Software
1. Check the Trash to Find Deleted Pictures
If you deleted a photo from your Mac desktop or folders or dragged it directly to the trash can, you can check if the pictures are in the trash can. All deleted items on Mac are put into the trash can for 30 days before being permanently removed, giving you time to recover the deleted photos.
- To open the trash can, click on the trash can icon at the bottom right of the desktop.
- To view all the items in the trash can on a Mac, you can either click on the Trash icon located on the Dock or use the "Finder" application to search for the items. Alternatively, if you remember the names of the photos, you can type them in the search box located in the top right corner of the screen. This will allow you to quickly find and restore the desired photos from the trash can.
- To recover deleted photos on Mac, select the desired photos, right-click and choose "Put Back," which will restore them to their original folder(s).
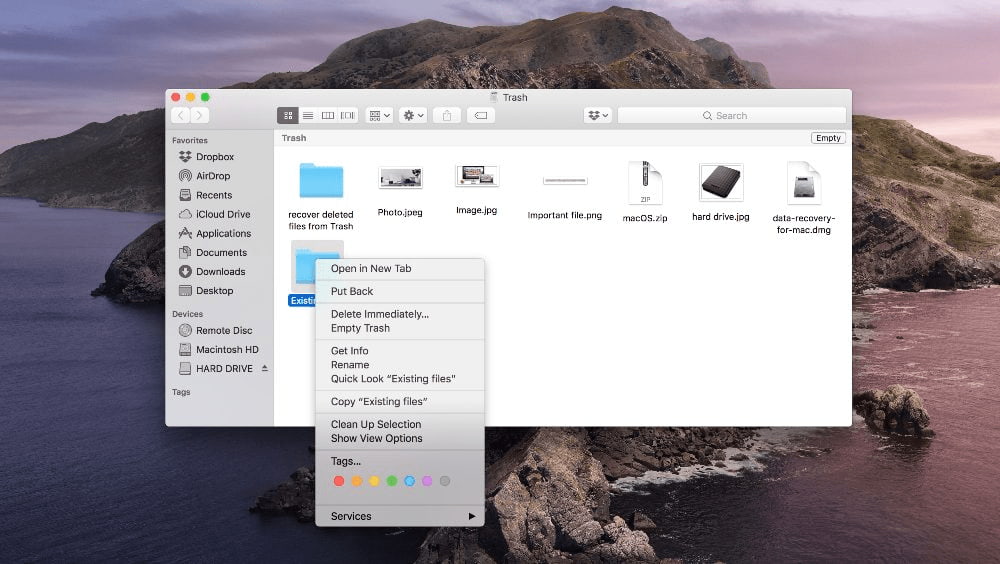
If you've recently deleted photos, there's a chance you can recover them. However, if it's been a while since deletion, it may be harder to find them since new data may have overwritten them. If you've also emptied the trash, you can try recovering deleted files from your Mac.
2. Resave Deleted Photos from Photos App
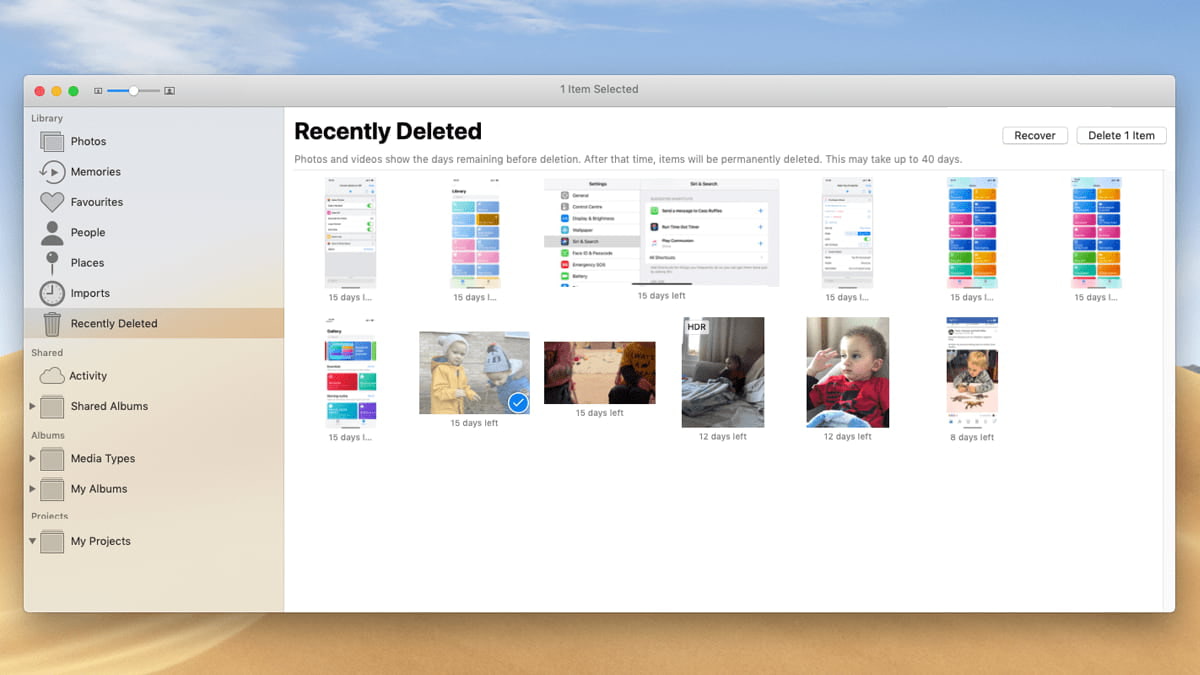
If you've accidentally deleted photos from the Photos App, they're likely in the "Recently Deleted" album, where they're kept for a 30-day grace period in case you change your mind. To recover deleted photos from your library on Mac, follow these steps. (Note: I didn't include the steps as they were not provided in the original text)
- Launch the app and click on the "Recently Deleted" album in the left panel to view deleted photos.
- Select the target photos, click "Recover", and they will return to their original folders.
3. Restore Deleted Photos on Mac with Time Machine
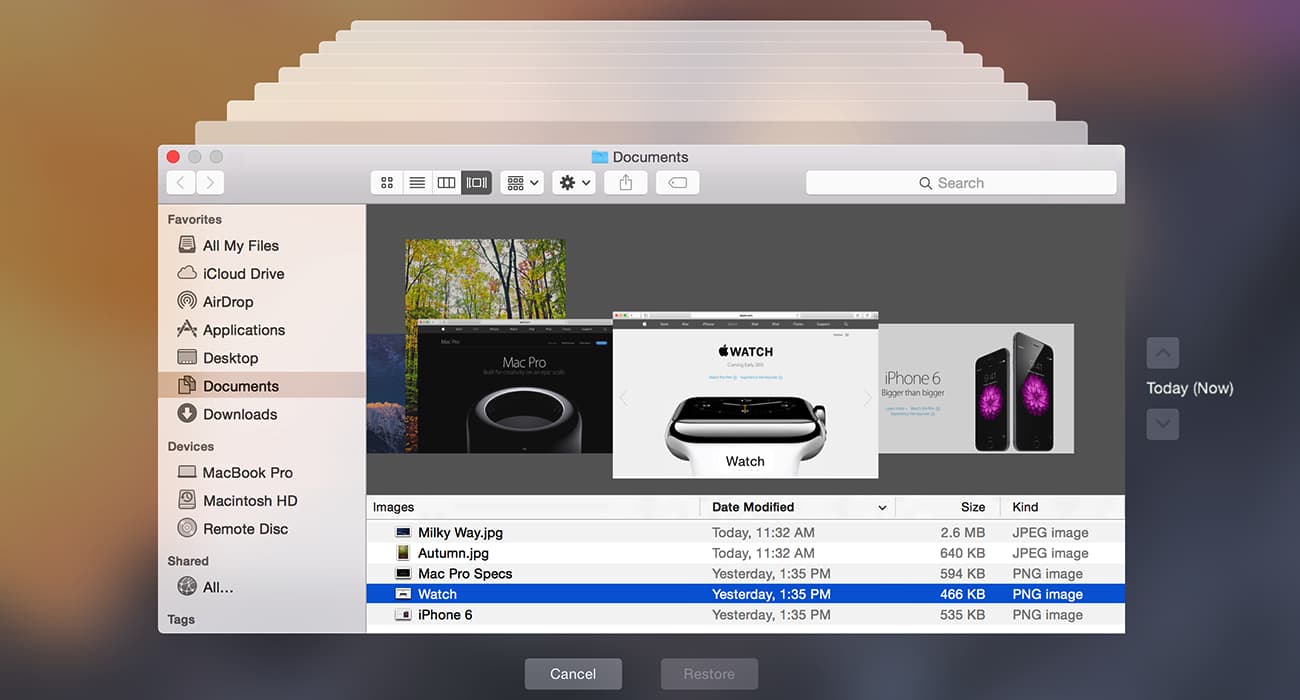
If you've backed up your Mac using Time Machine, you can recover deleted photos from the backup file. This is especially helpful if you've lost photos due to accidental deletion or a computer crash. Simply restore your Mac to a previous backup that contains the deleted photos, and they should reappear. This way, you can breathe a sigh of relief knowing that your cherished memories are still safe.
- 1. Connect the USB drive to your Mac using a USB cable, ensuring it is securely plugged in.
- Navigate to the deleted photos folder.
- To go back in time, click the Time Machine icon on the top left menu and select "Enter Time Machine."
- To find the target photos, scroll down to look for them and examine the timeline until you locate them.
- 1. Select the item you want to recover from Mac and click "Restore."
4. Retrieve Deleted Pictures in iCloud
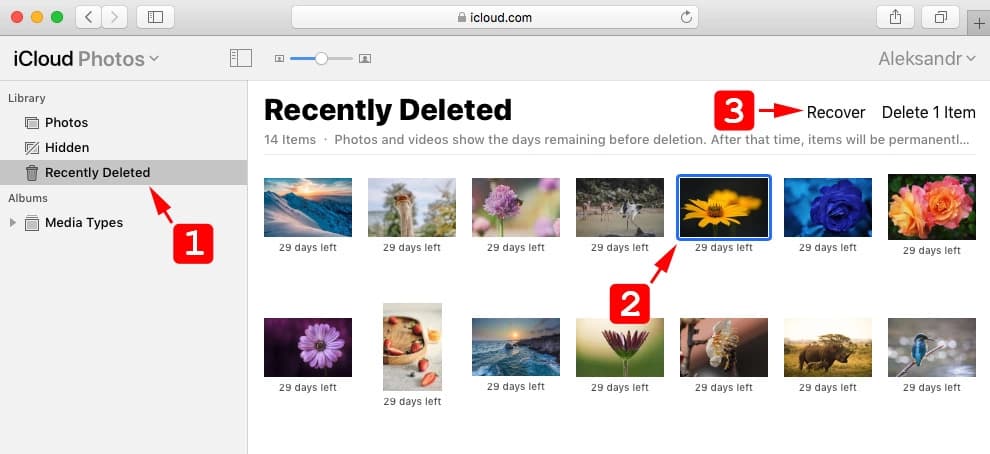
If you've enabled iCloud on your Mac, photos may also be uploaded to cloud storage. After deleting a picture, check if it's in the "Recently Deleted" folder in iCloud, where you can recover it.
- Open icloud.com on your Mac web browser.
- Log in with your Apple ID.
- Go to Photos > Recently Deleted album in the sidebar.
- To recover deleted photos, select the desired pictures and click the "Recover" button. This will restore the images to their original location.
Bonus tip: If you've shared deleted shots on social platforms like Facebook, Twitter, or Instagram, you can re-download them. The process varies slightly depending on the platform, but you can usually find the option to re-download shared content by going to the "Settings" or "Account" section of the respective app.
Recover Permanently Deleted Photos on Mac with Software [Free]
If you've accidentally deleted an essential picture from your Mac, don't panic! It's not lost forever. When you empty the trash or use the "Command + Del" key, the file isn't actually deleted, but rather marked as useless and hidden. This means you still have a chance to recover the permanently deleted photos from your MacBook Pro, MacBook Air, or other Mac devices.
You can use recovery software to help with data recovery, and Deep Data Recovery for Mac is a reliable option. This tool, specifically designed for Mac users, allows you to recover deleted files on your Mac without needing to seek help from a local data recovery service, making the process relatively straightforward.
Your Best Software for Recover Deleted Photos on Mac Free
- It can quickly retrieve pictures, documents, videos, and other files of over 1000 types with various file extensions.
- The best free data recovery software allows you to preview files before recovering them, ensuring you get the right files.
- The software is simple and easy to use, making it very user-friendly for individuals.
- It can recover deleted photos from various storage devices, including SD cards, USB flash drives, and removable storage devices.
To Recover Deleted Photos on Mac for Free with Deep Data Recovery for Mac:
- To use Undelete Photos Mac, download the application, double-click the .dmg installation package, and drag it to the APP folder on your Mac. The application is virus-free, but if you encounter any issues during installation, ensure that your System Preferences allow installation from the Apple App Store and identified developers.
- Launch the program, and you will see all supported file types selected. You can proceed by clicking "Next" or keep only "Pictures" selected to shorten the scanning time.
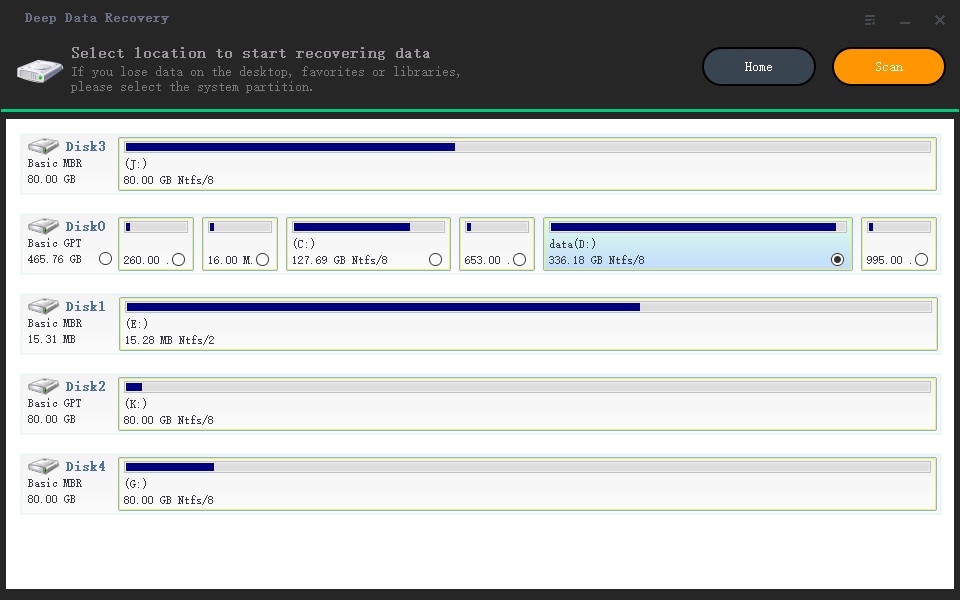
- To recover deleted photos, select the hard drive where the photos were deleted and click the "Scan" button in the software window. This will allow the software to extract the deleted photos.
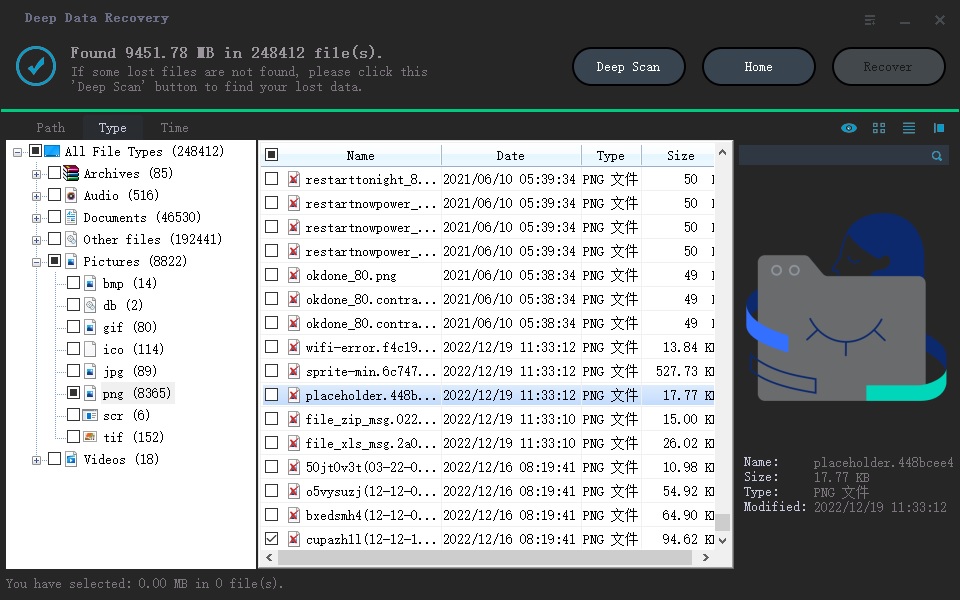
- After selecting the software, it will find pictures for you. To view the found photos, click on the "Type" and "Graphics" category names on the left side of the window to unfold them, and the found images will appear on the right side. Select the desired photo(s) and click "Recover" to choose a new location to save the recovered images on your Mac.

[Paid] Recover Deleted Pictures on Mac Use a File Recovery Service
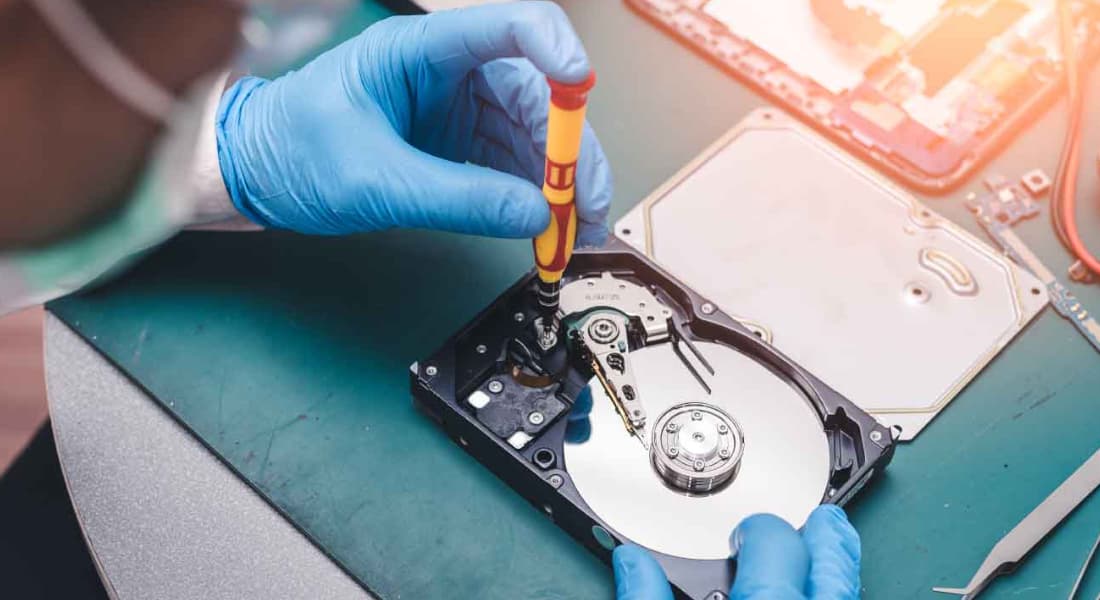
Another option for authentic and guaranteed photo recovery on Mac is to send your computer to a professional data recovery service center. These centers use three data recovery methods to recover data from any storage device, and they also provide repair services for physically damaged and corrupt devices, as well as software recovery.
PLEASE NOTE: 1. You can try to recover your data yourself using a recovery software. 2.
How to Effectively Keep Your Photos Safe on Mac
To avoid the hassle of recovering deleted photos on Mac, it's essential to take proactive measures to keep your photos safe. While there are many ways to recover deleted photos, they should only be considered a last resort. By following the methods below, you can effectively safeguard your photos and avoid the need for recovery.
- ⏰ Automatic regular backup of your photos is a good practice, and the best approach is to back them up to at least two locations, such as internal disks, external storage, or cloud storage.
- 🚀 Regularly cleaning up junk and cache files on your Mac can help prevent crashes when transferring photos, making the process smoother and more efficient.
- 📷 If you find similar images, don't use Command + Del to remove them as it can lead to accidental deletion and potentially lose photos on Mac.
- 📋 Before emptying the trash, double-check that you don't need them.
How to Repair Corrupted Pictures on Mac
If you're experiencing issues with pictures not being viewable on your Mac, there are several troubleshooting methods you can try to resolve the problem. Firstly, ensure that the image file is in a compatible format that your Mac can read, such as JPEG, PNG, or GIF. If the issue persists, try updating your Mac's operating system to the latest version, as this may resolve any compatibility issues.
- 🖐️ You can try to change the image format to jpeg or png to see if it resolves the compatibility issue.
- 🗂️ To repair the Photos app, hold down the Option and Command keys on your Mac while launching Photos, which will open a dialog. Follow the wizard to complete the repair.
- 🛠️ To repair corrupted photos, consider using third-party tools such as Adobe Photoshop Express and �nline Office Recovery Tool for online assistance, or �tellar Repair for Photo and �ysInfoTools Image Repair software for offline solutions. These tools can help recover and restore damaged images, making them usable again.Online Office Recovery Tool for online assistance, or �tellar Repair for Photo and �ysInfoTools Image Repair software for offline solutions. These tools can help recover and restore damaged images, making them usable again.Stellar Repair for Photo and �ysInfoTools Image Repair software for offline solutions. These tools can help recover and restore damaged images, making them usable again.SysInfoTools Image Repair software for offline solutions. These tools can help recover and restore damaged images, making them usable again.
Summary
If you accidentally remove photos on your Mac, first check the Trash can, iCloud/iPhoto's "Recently Deleted" section, and your backup files to see if you can restore them. If these methods don't work, consider using data recovery software or services for help, which is often the most efficient way to recover permanently deleted photos on Mac.
Frequently Asked Questions (FAQs)
-
It depends. If you delete these photos with the usual deletion way, you can get them back. If you have used a file shredder to carry out the zero fill-in technology, you can't recover permanently deleted photos on Mac, PC, phone, and more.
-
You can try your luck by restoring deleted items with Time Machine backup files or recovering files with the best free data recovery software.
-
If you delete them in iPhoto, they go to the "Recently Deleted" album until they're removed automatically by macOS after 30 days. If you delete photos in Finder, they go to the Trash can, saved temporarily for 30 days before being permanently removed from Mac.
-
Go to iPhoto > Recently Deleted, and check whether the deleted photos are there or not. If not, you must try data recovery software, like Deep Data Recovery for Mac, to retrieve deleted pictures on Mac as soon as possible.
-
No, Apple doesn't offer any such kind of service. You must use data recovery software to recover permanently deleted photos on Mac or iOS devices.
-
The only method is using iPhone data recovery software for Mac, which runs on the computer, to scan iPhone for deleted photos. Here are the steps.
- Connect your iPhone with your Mac.
- Download and install it on your Mac.
- Launch it and click "Recover from iOS Device."
- Click "Scan" beside the iPhone and let the software scanning iPhone.
- In the result window, open to preview the found photos.
- Select the needed ones and click "Recover" to save them on your Mac.
Related Articles
- How to Recover Data from Raw USB Flash Drive
- Adata USB Flash Drive Recovery Tool Free Download
- How to Recover Files from Formatted USB Drive
- Unformat SD Card on Android Phone
- How to Recover Deleted Snapchat Photos on iPhone/Android Phone/Computer
- How to Recover Deleted Photos on Android Phone
- Recover Call Recording from Automatic Call Recorder on Android Phone