How to Recover Data from Unmounted Hard Drive on Mac/Windows
Data recovery can be a challenge, especially when dealing with malfunctioning devices. The issue can stem from various reasons, but when it comes to an unmounted hard drive, understanding what it is can be the first step towards recovering data. This guide will walk you through the process of restoring files from an unmounted drive on both Mac and Windows PC, providing a solution to this common problem.
- Quick Navigation
- Part 1. What Does Unmounted Hard Drive Mean?
- Part 2. Reasons for Disk Unmounted
- Part 3. How to Mount Unmounted Hard Drive on Mac and Windows PC
- Part 4. How to Recover Data from Unmountable Hard Drive
- Part 5. Frequently Asked Questions for Hard Disk Mount
Part 1. What Does Unmounted Hard Drive Mean?
Mounting a hard disk involves connecting it to a computer's motherboard, allowing it to be read. This process varies depending on the type of drive and computer, but typically involves connecting through a SATA cable or similar mounting method for internal drives, applicable to both PCs and Macs with non-soldered drives.
Even if a hard drive is directly connected to the motherboard, it can become unmounted, preventing access to files. To rectify this, it's essential to identify the reasons behind the unmounted drive. This can occur due to various factors. Once the underlying cause is understood, the drive can be remounted, allowing access to stored files.
Part 2. Reasons for Disk Unmounted
Here are some of the most common reasons behind hard drive unmounting, including hardware issues, software glitches, file system corruption, power outages, and human error, which can be resolved by checking the drive's connections, running disk checks, and updating software, and in some cases, recovering data from the unmounted hard drive.
- Connection Issues
- Corrupted Disk
- Formatting Issues
- Software Conflicts
- OS Problems
Sometimes, a seemingly complex issue can be resolved by a simple solution, such as reconnecting a disconnected wire. However, if it's a connection issue, it could be due to a faulty connector on the drive or PC. If it's the drive connector, it may not be repairable and you'll need to contact the manufacturer for assistance. But if the issue lies with the system, you can try connecting the drive to a different computer to recover files from the unmounted hard drive.
If your disk is showing as unmounted, it may be due to corruption, in which case you'll need to recover data before replacing the drive. The drive will likely continue to display the error even when connected to a different computer.
Formatting a drive to the wrong standard can cause it to appear unmounted on your computer, especially if it was previously used in a specialty device with its own formatting system. If you format the drive to a recognizable standard, you may risk losing files. In this case, it's a good idea to learn how to recover data from an unmounted drive before wiping it for future use.
Software conflicts can render a drive unusable, just like hardware issues, causing it to show as unmounted. The problem is often caused by a software issue on the drive itself, but it can also be triggered by software not even installed on the drive. In either case, knowing how to retrieve data from an unmountable hard drive is crucial to resolve the issue.
In some cases, a computer's operating system may malfunction, causing issues such as a hard drive becoming unmounted. This can be confirmed by connecting the drive to another computer, where it should work properly. To resolve the issue, one can wipe the computer for a fresh OS installation and then reconnect the drive. However, if the problematic drive contains OS components or is the primary OS drive, it's necessary to recover files from the unmountable hard drive before wiping it for OS reinstallation.
Part 3. How to Mount Unmounted Hard Drive on Mac and Windows PC
To solve the issue of a USB drive not mounting on your computer, you can try physically mounting the drive back into your computer. For Mac users, this involves opening the Finder, selecting the drive from the left-hand sidebar, and then dragging it to the right-hand sidebar. For Windows users, you can right-click on the drive in File Explorer, select "Eject," and then physically remove the drive. After reinserting the drive, ensure it is properly mounted by checking the drive icon in the sidebar or File Explorer.
In macOS
Before recovering data from an unmountable drive on a Mac, try the following steps: check if the drive is properly connected, restart your Mac, and run a disk utility check to see if the drive is damaged. If the drive still won't mount, you may need to use a third-party tool or seek professional help to recover your data.
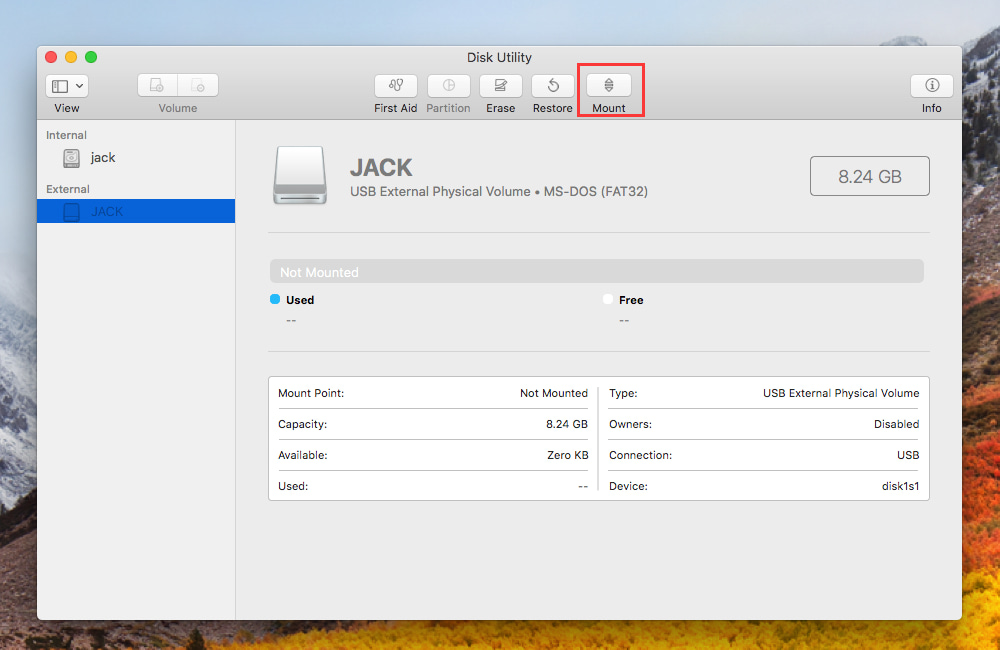
- In the Finder app, click on the "Go" option and then select "Utilities" from the drop-down menu.
- To access the Disk Utility app, follow these steps: Select the "Disk Utility" app from the Utilities folder, which can be found on the Applications folder of your Mac. Alternatively, you can also use Spotlight to search for "Disk Utility" and select it from the search results.
- Once the app is launched, a list of drives appears on the left side panel, displaying the available drives.
- In the list of drives, you will find your unmounted drive showing as "Untitled" under the External list.
- Click on the greyed-out "Untitled" option and then from the Disk Utility bar on top, click on the "Mount" option.

If you're experiencing issues with your external drive not showing up on your Mac, try restarting your Mac, then go to Disk Utility, select the external drive, and click 'Verify' to check for errors. If the drive is still not showing, try using the 'First Aid' tool to repair any disk errors.
In Windows
If you're using a Windows PC, you can try running the built-in Check Disk (chkdsk) utility to scan and repair any disk errors. To do this, open Command Prompt as an administrator, type "chkdsk" followed by the drive letter of the unmountable drive (e.g.
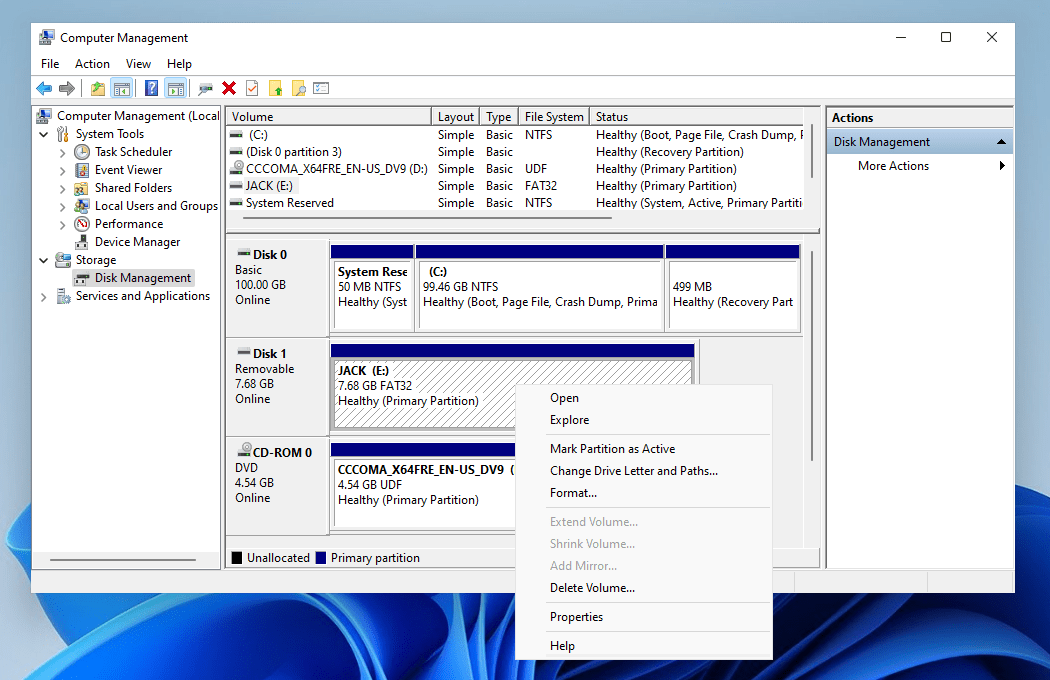
- To access Disk Management, right-click the Windows button on the Taskbar, select "Disk Management" from the list, and wait for the window to load its contents.
- If everything else is OK, you should see the drive you want to mount showing up in the list and in the bottom tiles as well.
- Right-click on the drive that you see showing with a drive letter and select the "Change Drive Letter and Paths…" option from the menu that appears.
- In the window that opens, click on the "Add" button.
- To assign a drive letter to a new drive, open the Disk Management window and select the drive you want to assign a letter to. Then, in the next window, select the drive letter you want to assign to the drive and click "OK".

After the process is complete, your drive should appear normally in Windows Explorer within a few seconds, and a restart is usually not required.
Part 4. How to Recover Data from Unmountable Hard Drive
If you're experiencing issues with an unmountable drive in Windows 11/10/8/7, there are several methods to restore files. However, if you're using a Mac, the options are limited, and you may eventually need to recover data from the unmountable drive to avoid losing it permanently. Fortunately, there are tools available that can help you easily retrieve your data in just a few steps.
For this situation, our software of choice is Deep Data Recovery for Mac, an easy-to-use and effective tool that can help you find all your files in just a few clicks, supporting a wide range of formats and allowing you to preview files before recovering them. Additionally, it offers the option to recover files for free to some extent before needing to purchase the full version, making it useful for small data extractions.
using the Deep Data Recovery tool, see the following steps:
- Install and launch Deep Data Recovery for Mac on your computer.
- Select the types of files you want to recover from your drive, or keep the "All File Types" option selected to recover everything.
- Click on the "Next" button to begin the drive search.
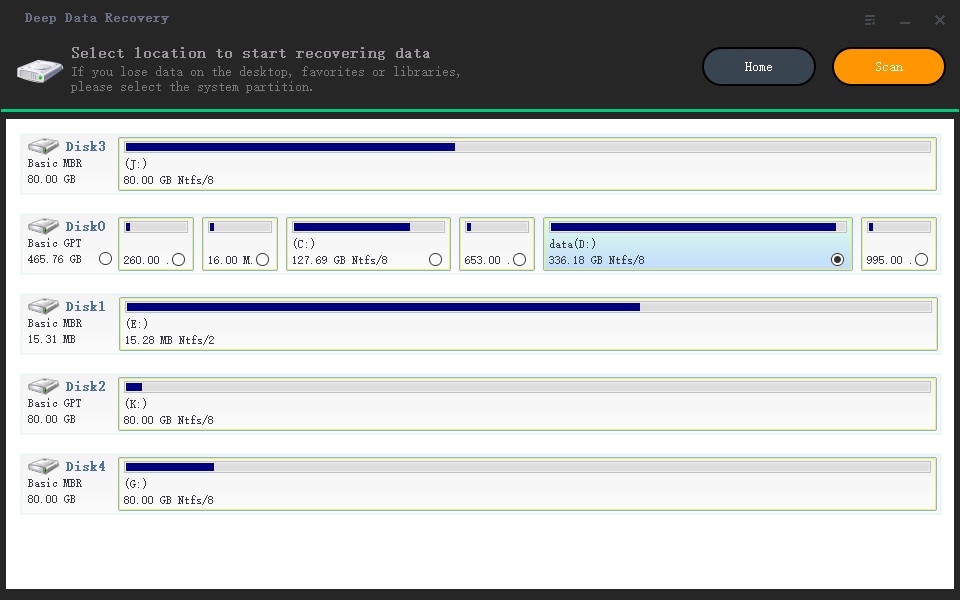
- Select the unmounted drive and click on the "Scan" button to begin the data recovery process.
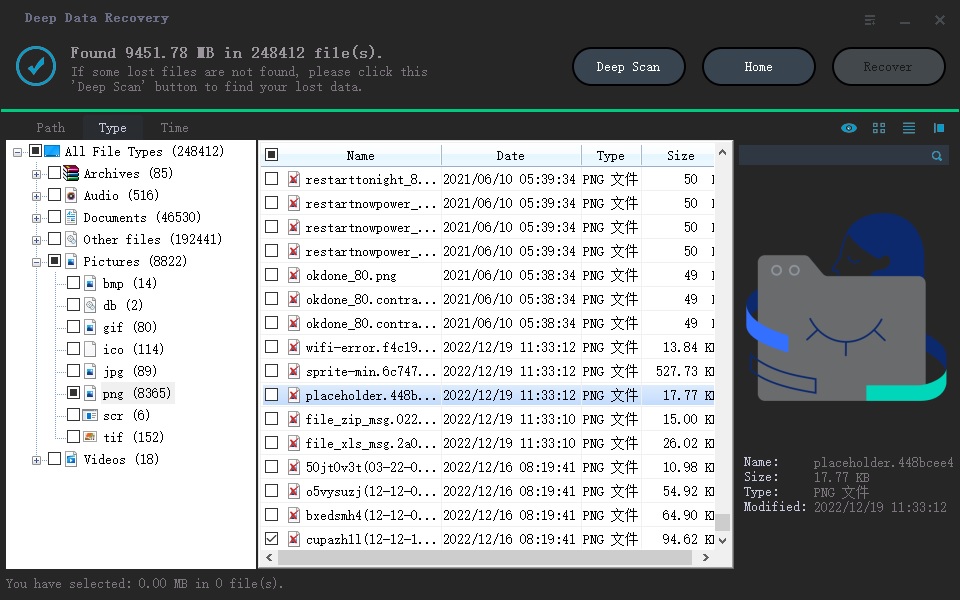
- The app will scan your system, displaying a list of file types and their quantities. You can select each option and preview files to recover individual ones. If desired files are not visible, you can click the "Deep Scan" button, which may take longer but will find all files, including hidden ones.
- Once all the files are scanned, select the files you want to recover, and click the "Recover" button to download them to your computer.


Now that we have taught you how to retrieve data from an unmountable hard drive on Mac, you should be able to find your data easily. You can also use this step to recover files from an uninitialized disk on Mac or Windows PC.
Part 5. Frequently Asked Questions for Hard Disk Mount
- To restore your external hard drive that won't mount, try restarting your computer and re-plugging the drive. If that doesn't work, try using a different USB port or cable.
- Does mounting a drive erase data?
- How do I mount an unmounted hard drive on Mac?
If your drive isn't mounting on your Mac, you can try formatting it. However, to recover data from an unmountable drive, you can use Deep Data Recovery for Mac to quickly get your files.
Formatting a drive is not the same as erasing data, unless the drive itself needs to be formatted. If the drive needs to be formatted, it will wipe all data on it, and you will need to either copy the data somewhere or use free hard disk recovery software to retrieve it.
To mount an unmounted drive on a Mac, open the Disk Utility app, select the drive from the left sidebar, click on it, and then click the "Mount" button at the top. Restart your Mac and the drive should be visible and accessible as usual.
Related Articles
- How to Recover Files from Raw Drive Free
- How to Recover Data from Failed Hard Drive
- How to Recover Files from Erased Hard Drive on Mac
- How to Recover Data from Dynamic Disk
- How to Recover Data from Raid 0 Hard Drive
- How to Recover Data from Show 0 Bytes Hard Drive
- How to Recover Files from Formatted Hard Drive in Windows 11