How to Recover Permanently Deleted Photos in Windows 10
Quick Navigation:
- Method 1. The Quickest Way to Restore Permanently Deleted Photos in Windows
- 1. Download the Best Photo Recovery Software – Deep Data Recovery
- 2. How to Recover Permanently Deleted Photos in Windows 10 with Software
- Method 2. Get Permanently Deleted Photos Back from Previous Version
- Method 3. Retrieve Permanently Deleted Photos from File History
Losing precious moments, such as vacation photos or party memories, can be devastating when they're accidentally deleted from your Windows PC. These memories are irreplaceable, and it's frustrating to lose them. Fortunately, there is a solution to recover permanently deleted photos in Windows 10, which can help you regain those cherished moments.
You can recover deleted pictures from your Windows 10 PC using various methods, with or without additional software.
Method 1. The Quickest Way to Restore Permanently Deleted Photos in Windows
Data recovery software offers the quickest and best way to recover deleted photos, providing a higher chance of success. It works by reconstructing files from their previous location before deletion, utilizing the file structure that existed before the photo was accidentally deleted. This allows the software to recover the photo from its original location, giving you a second chance at preserving your memories.
When using data recovery software to recover deleted pictures, it's crucial not to modify the previous location of the deleted files. To ensure successful recovery, install the data recovery software on a different hard drive or an external hard drive, rather than the same drive where the deleted pictures were stored, to avoid altering the file structures and making recovery impossible.
1. Download the Best Photo Recovery Software – Deep Data Recovery
The best photo recovery software to retrieve deleted pictures is Deep Data Recovery, a professional data recovery software that can easily and efficiently recover permanently deleted photos from Windows 10. It supports various data loss scenarios, including deletion, formatting, system errors, factory reset, and virus attacks, and can recover deleted pictures from Windows 10 PC internal hard disk, external hard drives, SD cards, or cameras.
The picture recovery tool is free to trial, allowing you to see all recoverable photos deleted from a Windows 10 PC. It can be downloaded to try out its functionality.
2. How to Recover Permanently Deleted Photos in Windows 10 with Software
- Once you have installed the software, it will automatically launch the app. If it doesn't, you can launch it yourself by double-clicking on the desktop shortcut.
- When the photo recovery software for Windows 10 opens, you will see different locations, which are the different partitions and drives of your computer. To recover your lost photos, select the location where they were saved and click on the "Scan" button found on the side.
- The software for recovering deleted files in Windows 10 will start searching for the lost files and display the different file folders found in the chosen location on the left of the window.
- To recover photos, click on the folder where the photos were found, preview them, and then click on "Recover" once you've confirmed they're the desired photos.


Method 2. Get Permanently Deleted Photos Back from Previous Version
To recover deleted photos, you can try getting them back from a previous version, but you'll need to recall the location where the pictures were stored before they were deleted. This method allows you to access photos that were permanently deleted, making it a viable option for retrieving lost images.
- Go to the folder that contains the photos.
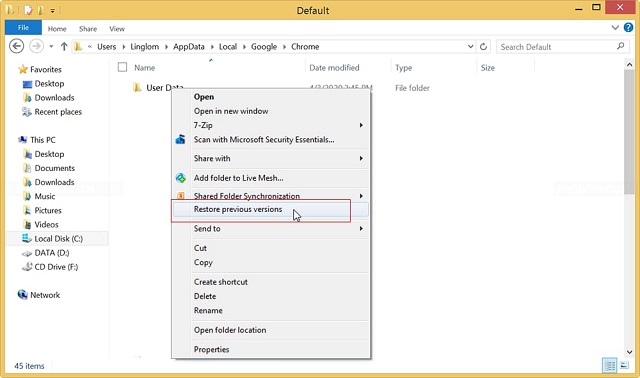
- Right-Click on the folder and then click on Restore Previous Version. Alternatively, you can access this by going to the folder's properties and clicking on the "Restore Previous Version" tab.
- Open an older version of the folder that existed before the photos were deleted by selecting it from the file history and double clicking on it to open it.
- To restore a folder to its previous version, click on the "Restore" button, which will replace the present version of the folder. If the "Restore" button is not available, pull the photos from the previous version to a new location on your computer, effectively saving them.

To be able to find previous versions, you need to have enabled versioning before the incident occurred, otherwise, there will be no previous version available.
Method 3. Retrieve Permanently Deleted Photos from File History
File History creates automatic backups of your files, excluding apps and programs, which can be reinstalled. The frequency of backups depends on the time you enable File History, and it also protects your photos from permanent deletion.
To view your updates available and recover permanently deleted pictures on Windows 10, you can use File History. This feature allows you to view all the updates you've made to your files, including pictures, and recover them if needed.
- To access File Explorer, click on the "Start" button in the toolbar and then search for "File Explorer" using the search button. Alternatively, you can click directly on the File Explorer icon.
- To recover deleted photos, start by going to the folder that contained the photos you deleted and opening it.
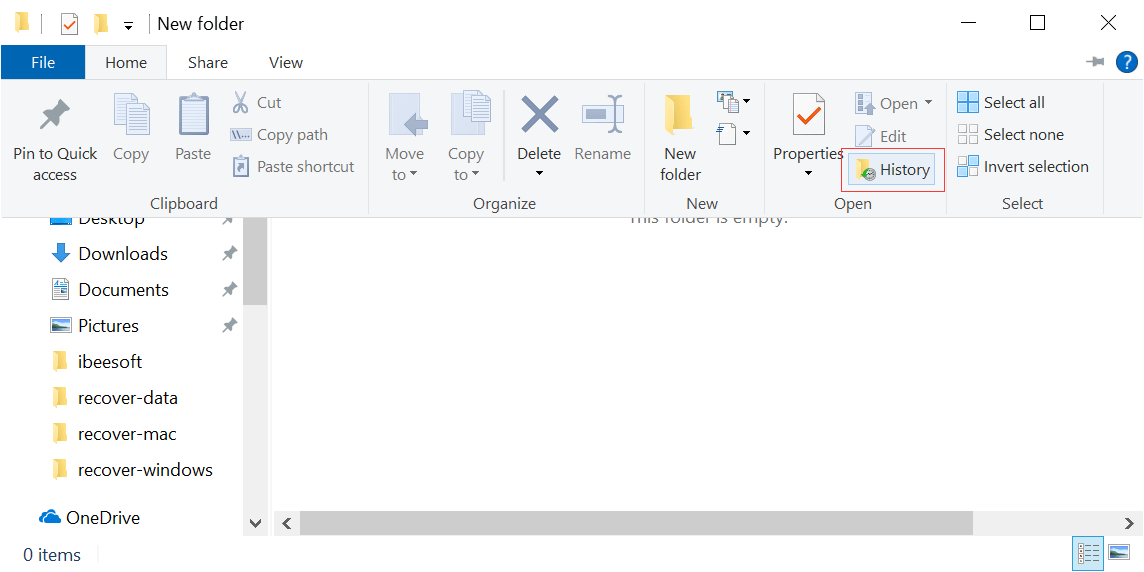
- To view your backed up folders, click on the home tab and then click on the "History" button.
- If you want to restore the entire folder, open the folder. If the photos are not in a particular folder, proceed to the next step.
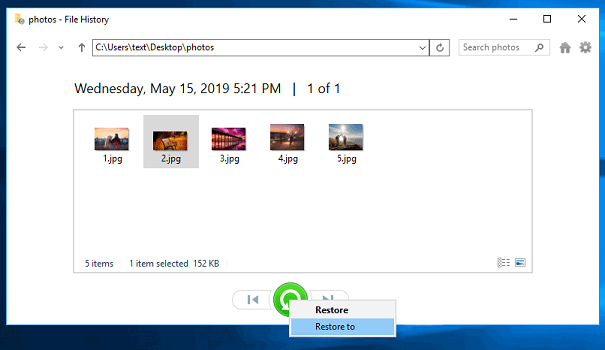
- To navigate between different versions of backed-up files, use the left and right arrows to move forward and backward. Click on the right arrow to view newer versions and the left arrow for older ones. You can also click on folders to check if the desired photos are in the backup.
- Once you see the photos or folder containing the photos in one of the backups, click on "Restore" to bring them back to their original location. If a file or folder with the same name is still present, you'll need to manually resolve the conflict.
- Replace the file in the destination, but only if the older version is the better version. If the newer version is better, keep the original file.
- If you don't want to restore that particular file or folder, skip the file; and proceed with restoring the rest of the data.
- Comparing the contents of both files allows you to make an informed decision about which one you prefer, and in the best case scenario, you can keep both. If you choose to do so, Windows will rename the incoming file or folder by adding a number to its name, which is the recommended approach.


Once you're done, close the file history and your photos will be recovered.
You can almost guarantee getting your photos back using one of these three methods. The second and third methods require previous versions and file history backups to be enabled, and won't work if they weren't. However, the first method, Deep Data Recovery, is a safe and guaranteed way to recover deleted photos if you follow the steps effectively, making it the best choice.
Related Articles
- How to Recover Deleted Photo from Laptop
- How to Recover Deleted Photos from Canon Camera
- How to Recover Deleted Pictures from SanDisk
- How to Recover Permanently Deleted Files in Windows 11
- How to Recover Deleted Photos from Windows Phone 7/8