How to Show Hidden Files on Windows 7
Windows users often hide personal files to keep them private. If you need to view these hidden files on Windows 7 but don't know how, you're in the right place. You can easily learn how to show hidden files in Windows 7 either manually or using the best data recovery software available. The process is straightforward, and with the guidelines provided, you'll be able to access hidden files in no time.
- Quick Navigation
- Part 1: How to Show Hidden Files in Windows 7 Manually
- Part 2: How to Use Tool to Recover and Show Hidden Files on Windows 7 PC
Part 1: How to Show Hidden Files in Windows 7 Manually
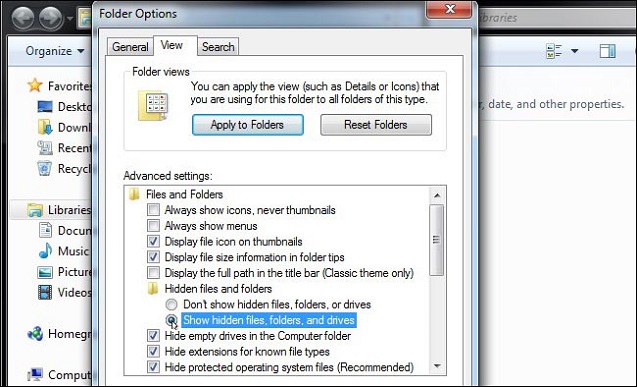
To show hidden files in Windows 7, you can manually view them by navigating to the folder that contains the hidden files, clicking on the "View" tab in the ribbon, and selecting the "Hidden items" checkbox. Alternatively, you can also use the File Explorer to show hidden files by clicking on the "View" tab, selecting "Options", and checking the box that says "Show hidden files, folders, and drives". This will allow you to see all hidden files and folders in Windows 7.
To access the "Appearance and Personalization" settings, click on the "Start" button and navigate to the "Control Panel".
To access the Folder Options and View tab, select the "Folder Options" from the list, then click on the "View" tab.
To view hidden files on Windows 7, go to "Advanced" settings, select "Show hidden files, folders, and drives", and click "OK".

Part 2: How to Use Tool to Recover and Show Hidden Files on Windows 7 PC
If you're struggling to unhide folders in Windows 7, don't worry - the right tool can make all the difference. If you've lost or deleted hidden files, you can easily recover them using �eep Data Recovery software, which can show hidden files from various storage devices, including hard drives, external hard disks, RAW drives, SD cards, and USB drives. With its advanced features and user-friendly interface, this software can help you unhide folders in Windows 7 in just a few clicks, providing a safe and efficient recovery process.Deep Data Recovery software, which can show hidden files from various storage devices, including hard drives, external hard disks, RAW drives, SD cards, and USB drives. With its advanced features and user-friendly interface, this software can help you unhide folders in Windows 7 in just a few clicks, providing a safe and efficient recovery process.
Your Professional Windows 7 Show Hidden Files Software
- This view hidden files tool is easy to use and highly effective, allowing you to scan and display all types of hidden files or data in Windows 7.
- This software recovers and shows hidden files on Mac or Windows, helping in situations like operating system crash, accidental deletion, or virus attack.
- This tool supports viewing hidden files of various types, including photos, graphics, documents, audio, and video files, based on FAT, exFAT, NTFS, NTFS5, ext2, ext3, HFS+, and APFS file systems.
- You can preview files and select specific file types to unhide and save to a new location.
Step by Step to See Hidden Files in Windows 7 by Using This Tool
Step 1, Download and install the Windows 7 unhide files software on your computer. Once installed, launch the program and access its main interface on your PC screen. Since you're aware that your hidden files were lost from your own computer, you'll know which drive contains the hidden files that you lost or deleted.
Step 2, Next, you'll see a list of available drives on your computer. Select the one that contains the lost hidden files and click the "Scan" button to begin the scanning process.

Step 3, The show hidden files Windows 7 software automatically scans your drive and displays all recoverable data. From the left side menu, select the desired data to recover, then choose the specific files you want to recover. Finally, click the "Recover" button in the top right corner to initiate the hidden file recovery process.

After initiating the recovery process, you'll need to wait for a short time, which depends on the size of the file being recovered. Once the process is complete, all your lost or deleted hidden files should be restored on your computer.
Using Deep Data Recovery software is the wisest choice to show hidden files on Windows 7, providing a 100% safe and effective solution. This tool can easily help you view hidden files, eliminating the need to manually search for them or rely on other methods. With its success guaranteed, you can stop wasting time on other software and methods available online and start using the unhide software to solve your problem.
Related Articles
- Recover Deleted Folder in Windows 7
- Recover Permanently Deleted Files in Windows 7
- Recover Deleted Hidden Files in Windows 10
- DiskDigger Video Recovery from Windows PC/Android/Mac