How to Build Windows 8 Bootable USB with Win To Go Creator?
Content
- What is Windows To Go?
- How to build Windows 8 bootable USB with Windows To Go?
- How to build Windows 8 bootable USB without Enterprise Enterprise?
- How to boot computer from the Windows 8 USB drive?
- Conclusion
What is Windows To Go?
"Windows To Go" is a feature that was originally put forward by Microsoft. And it was embedded in Windows 8, 8.1 Enterprise, Windows 10 Education, and Windows 10 Enterprise, and allows you to install Windows in certified USB drive to boot, so that you can run the installed Windows on any other computer.
"Windows To Go" is very helpful for many business and personal Windows 8 users. When you work from home or on a business trip, it can quickly build a familiar Windows 8 environment. And if you want to run a program or game that only runs well in a certain OS, "Windows To Go" USB also helps you to deal with the incompatibility.
Next, we will show you how to build Windows 8 bootable USB with Windows To Go.
How to build Windows 8 bootable USB with Windows To Go?
For Windows 8, 8.1 Enterprise users, you can refer to this part to make a Windows 8 Enterprise USB. And if your PC is running with other OS, and don't have the certified USB drive, you can skip to the next part to make a bootable Windows 8 USB without Enterprise limit.
Firstly, you need to prepare a WTG certified USB with at least 32GB, and backup the drive because it will be formatted.
✍ List of WTG certified USB:
● WD My Passport Enterprise
● Kingston DataTraveler Workspace
● Super Talent RC4/ RC8
● Imation IronKey™ Workspace W300 / W500 / W700
● Spyrus WorkSafe
● Spyrus Portable Workplace
● Spyrus Secure Portable Workplace
Step 1. Insert the USB drive, and go "Control Panel" and find "Windows To Go"
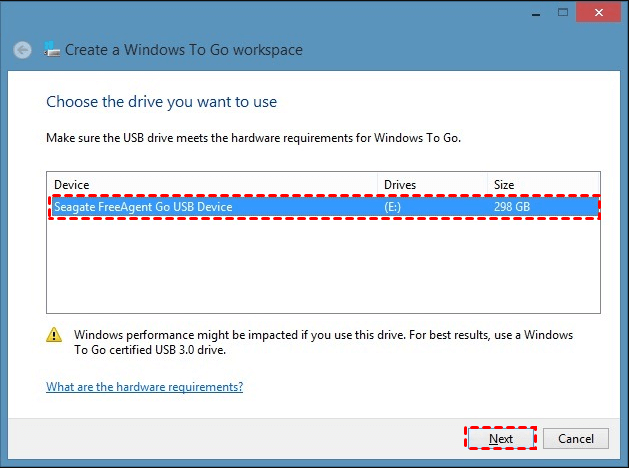
Step 2. In the "Windows To Go" window, the USB drive is recognized and listed on the window. And click "Next".
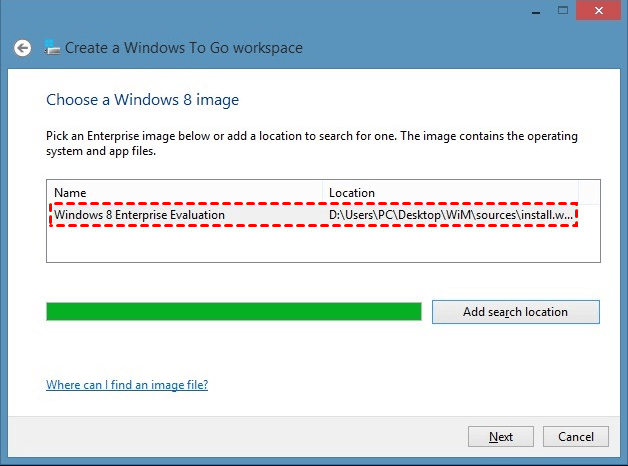
Step 3. And choose a Windows 8 image file.
Step 4. And decide if set a password for the Windows 8 USB. And click "Create". It will start to make a Windows To Go workspace.
How to build Windows 8 USB without Windows 8 Enterprise?
For Windows 8, Microsoft "Windows To Go" feature only supports Enterprise version. Besides, the certified USB drives are very expensive. Is there any creator that can use a normal USB drive to make a portable Windows 8 OS without Enterprise limit?
"Yes, there is". Qiling Disk Master Professional is such a mazing Windows To Go Creator for Windows. And it has lots of advantages over the Windows built-in Windows To Go tool.
✌ It supports non-certified USB drive.
✌ Qiling Disk Master can make Windows 8 bootable USB with the current system of your PC. If you are using Windows 8 computer, you don't need a ISO file.
✌ It supports "Windows on Mac" that can run Windows 11, 10, 8, 7 on an Apple Mac.
✌ It owns a concise and intuitive interface making the operation can be easily done.
Next, you can click download the demo version firstly, and follow the steps to see how to operate it.
How to boot computer from Windows 8 USB drive?
When you insert the Windows 8 USB to a computer, usually, you will need to enter BIOS to set it as the boot drive. And see how to do it.
Step.1 Turn on the computer, and tap the BIOS key when the logo appears.
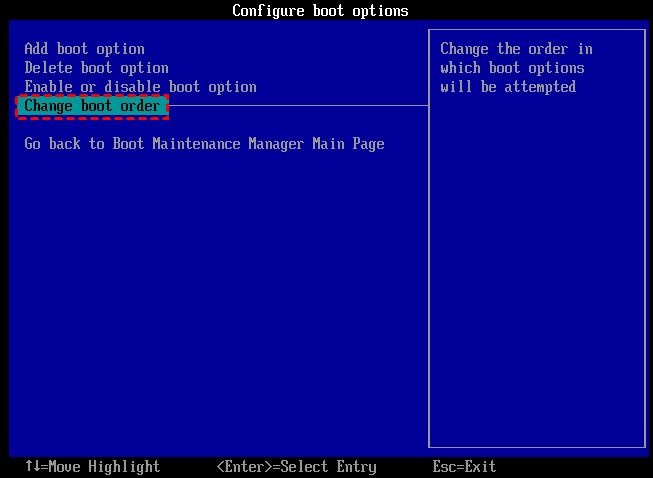
Step 2. When the BIOS window is launched, choose the "Boot" tab, and choose "Change boot order".
Step 3. Select the USB drive to the top of the listed device. and save the change. And the PC will be started from the USB drive.
Conclusion
By contrast, Qiling Disk Master is the better Windows To Go creator to build a Windows 8 USB. Besides, Qiling Disk Master also can help you to create a bootable USB for repairing. If your PC encounter a boot problem, you can use such USB to boot and repair your PC. And there is Qiling Disk Master Unlimited edition which covers all the features of Server version and provides unlimited usage. It is very economical for companies.
Related Articles
- How to Unboot USB Drive to Normal in Windows 10/8/7(3 methods)?
Need to unboot USB stick? This article will illustrate 3 methods to unboot USB flash drive to normal status. - How to Wipe Hard Drive in Windows 8 Permanently?
You can wipe hard drive in Windows 8 from Command Prompt. If the hard drive is with OS installed, you can employ a third-party partition tool, Qiling Disk Master Professional.


