2 Methods to Secure Erase SSD in Windows 10, 8, 7
When need to secure erase SSD?
Unlike hard disk drives (HDDs), solid-state drives (SSDs) have a unique internal architecture that requires a different approach to data erasure. Unfortunately, the methods used to wipe a hard drive are not effective for SSDs, and may even leave behind residual data.
Wiping an SSD can be a complex process, as it requires careful consideration of the drive's limited lifespan and performance. Unlike hard disk drives, SSDs have a finite number of write cycles, and improper wiping can lead to premature wear and tear. To address these concerns, a specialized method called Secure Erase was developed.
2 Ways to secure erase SSD drive in Windows PC
If you're looking to securely erase an SSD drive, there are two reliable tools you can consider using. Parted Magic and Qiling Disk Master Professional are two popular options that can help you completely wipe an SSD, ensuring that all sensitive data is removed.
1. Parted Magic
Parted Magic, a Linux-based boot disc, is a popular tool for securely erasing SSDs and hard disk drives (HHDs). With its built-in ATA Secure Erase routine, Parted Magic provides a safe and effective way to erase sensitive data from your SSD. In this guide, we will walk you through the steps to securely erase an SSD using Parted Magic.
Step 1. Download the Parted Magic image and then burn it to a USB disk or CD.
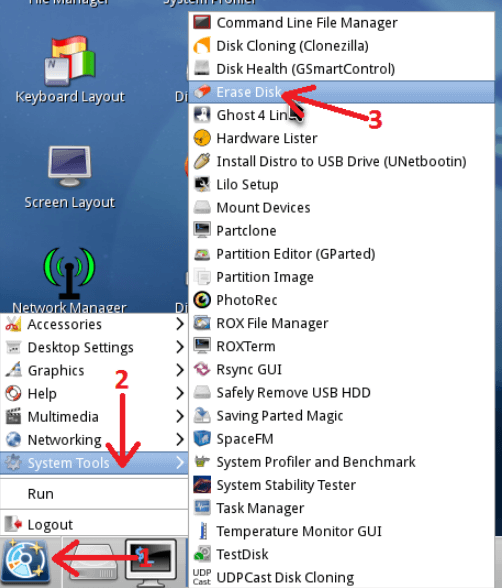
Step 2. Boot your computer from the Parted Magic media. When it is fully loaded, click on the lower-left hard drive icon, click "System Tools", and then select "Erase Disk".
Step 3. Click on the button "Internal: Secure Erase command writes zeroes to entire data area" and then click Continue.
Step 4. choose the SSD that you want to erase and then click the OK.
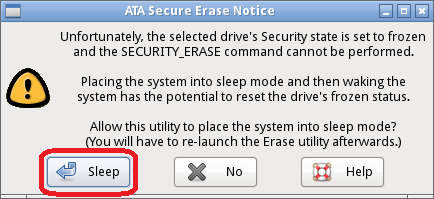
Step 5. If the drive's security state is set to freeze at boot time in BIOS/EFI, click on the Sleep button to put your computer to sleep. Then wake it up by pressing the power button and repeat Step 2 through Step 4.
Step 6. Leave the password as default, "NULL", and click OK.
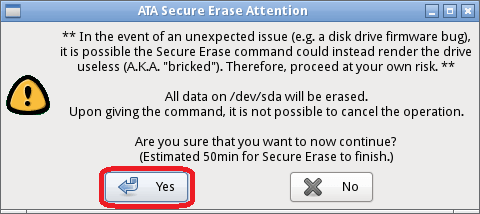
Step 7. To confirm the secure erase operation, click the "YES" button. This will initiate the process and ensure that the data on the SSD is securely erased.
To ensure the secure erase process completes successfully, it is essential to keep the power and interface cable connected to the drive until the process is complete. Do not disconnect the power or interface cable at any point during the Secure Erase SSD operation.
2. Qiling Disk Master Professional
If you're looking for an alternative to Parted Magic for securely erasing your SSD, you may want to consider Qiling Disk Master Professional. This powerful and reliable disk partition management tool offers a "SSD Secure Erase" feature, making it an excellent choice for securely erasing your SSD within Windows 7.
1. To securely erase your SSD using Qiling Disk Master Professional, you'll need to connect it to a Windows 7 computer via the SATA port. **Important:** Do not connect the SSD via a USB port, as this may cause issues with the erase process.
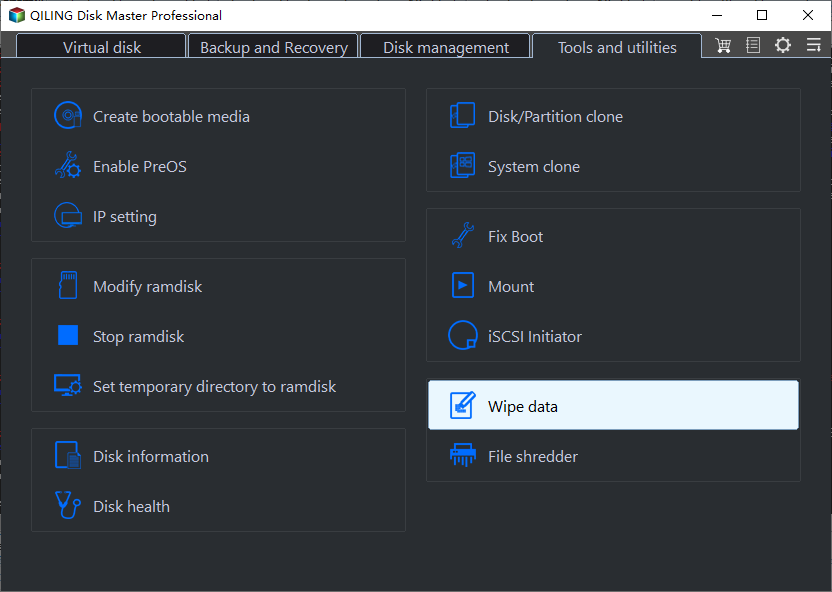
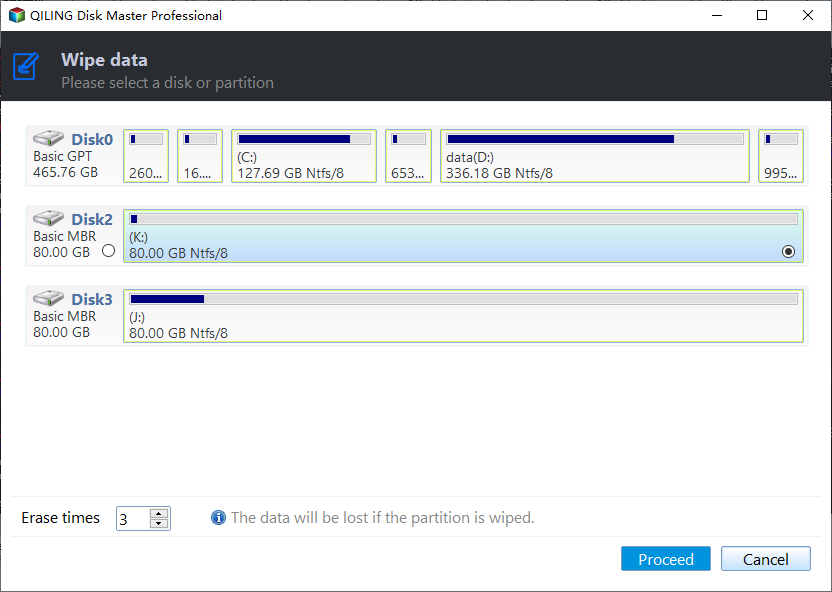
2. Open Qiling Disk Master, click "Tool and utilities" tab page, and choose "Wipe Data".
3. Select the SSD that you want to Erase.
4. Before proceeding with the wipe process, it is crucial to confirm the correct SSD identification. This step ensures that you are wiping the intended SSD and avoid accidental data loss.
5. If, upon proceeding to the next screen, you encounter an SSD in a frozen state, preventing it from being unlocked, there is a simple solution. In this scenario, you can resolve the issue by physically disconnecting the SATA cable from the SSD and then reconnecting it.
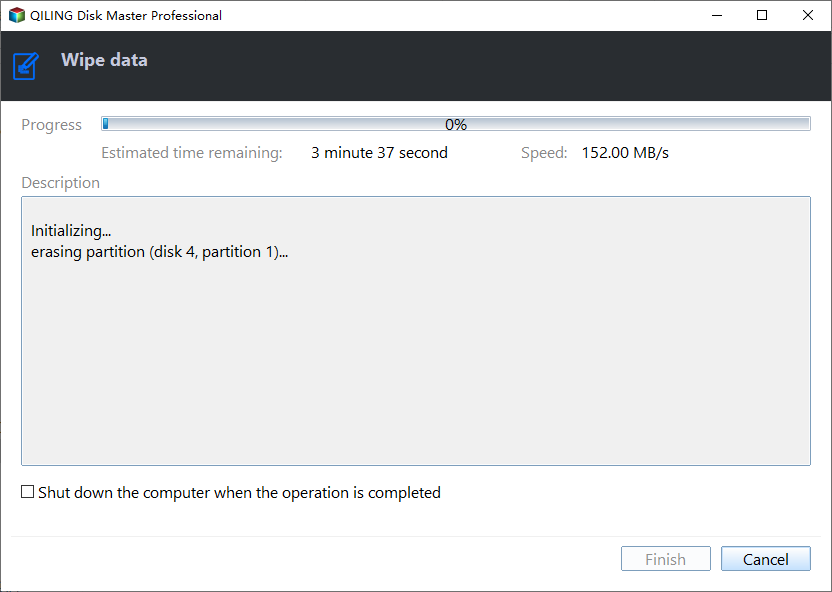
6. Following the resolution of the frozen SSD state, you can now proceed with the SSD Secure Erase process. To do this, click on the "Proceed" button to initiate the secure erase operation. This step is crucial in completely wiping the SSD, and it's essential to wait for the process to complete.
The Secure Erase process is now complete, and you will see the SSD displayed as a block of unallocated space. This indicates that the secure erase operation has successfully erased all data from the SSD, rendering it unrecoverable. The entire process takes place almost instantly, ensuring that the SSD is completely wiped and ready for reuse.
Summary
To securely erase an SSD drive in Windows 10, 8, 7, you can utilize specialized software such as Parted Magic or Qiling Disk Master Professional. The latter is specifically designed for Windows PC users, offering a range of features, including:
Related Articles
- Free Up Your Disk Space on Windows 7 – 7 Useful Tips
This article shares 7 tips to free up your full disk space in Windows 7 and presents a tutorial on wiping your disk space for reuse. - Secure Erase SSD on Windows 11: Simple, Unrecoverable
In this essay, you are able to master the most secure way to erase an SSD so that it can never be recovered. Read on to learn more detailed information and steps. - 8 Best Windows File Shredder Software for Windows 11, 10, 8, 7
Do you need software that helps you completely get rid of those confidential data and prevent any form of privacy file leakage? This article provides you with the eight best windows file shredder software that helps you get the task done. - 5 Best Free Drive Wiper Tools Are Here, Feel Free to Download
Are you going to sell off your PC? Make sure to delete all your files before selling. The data can still be recovered by data recovery software. So what's the solution? It is. Read here the 5 best free drive wiper software with a step-by-step guide to wipe confidential data permanently from your hard drives and SSDs.
