Top 2 Ways to Automatically Upload Photos to Dropbox
Want to automatically upload photos to Dropbox?
Dropbox is a frequently used file hosting service. After installing it, a special folder appears on your computer enabling you to upload files easily, so as to access them later from anywhere via Internet.
In this way, you can free up precious space by sending files to Dropbox, especially photos and videos occupying your storage. It also helps you to avoid data loss by creating a backup on the Internet. Thus even if you encounter a disk failure or system crash, these photos will always stay safe.
But for anyone who loves photography, saving photos manually to Dropbox after each shoot can be a time-consuming and laborious task. If there's a way to upload photos to Dropbox automatically, things will get easier.
How to upload photos to Dropbox automatically
To realize this idea, there are 2 available approaches. You can either make use of the built-in camera uploads feature of Dropbox or turn to a reliable third-party software that can sync local folders to Dropbox automatically.
Preparations for both methods:
Either way you choose, you should download and install the Dropbox desktop app on your computer and sign up for an account at first, then log in and get started.
Steps:
1. Download the Dropbox desktop app from its official website.
2. Go to your download directory and double-click the Dropbox icon to start the installation.
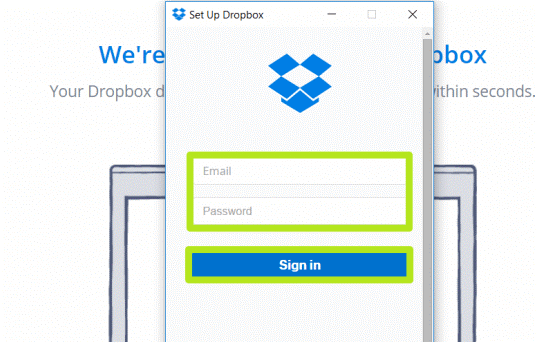
3. Once it's installed, you'll be prompted to sign in or create a new account.
4. If you don't have an account, please create one with a prompt. If you do, please log in with your Dropbox account. Afterward, click Open my Dropbox and Get Started subsequently. Now you've completed the installation.
Then you can try the following methods to upload photos:
- Method 1. Automatically upload all photos from phone to Dropbox
- Method 2. Automatically sync photos to Dropbox with freeware
1. Automatically upload all photos from phone to Dropbox
Camera uploads are an optional feature provided by Dropbox. Once you enable it, your photos on mobile devices will be uploaded to the Camera Uploads folder automatically. You can then move them to different folders in your Dropbox account as you like. Here's a simple guide for turning on camera uploads on the desktop app.
Steps:
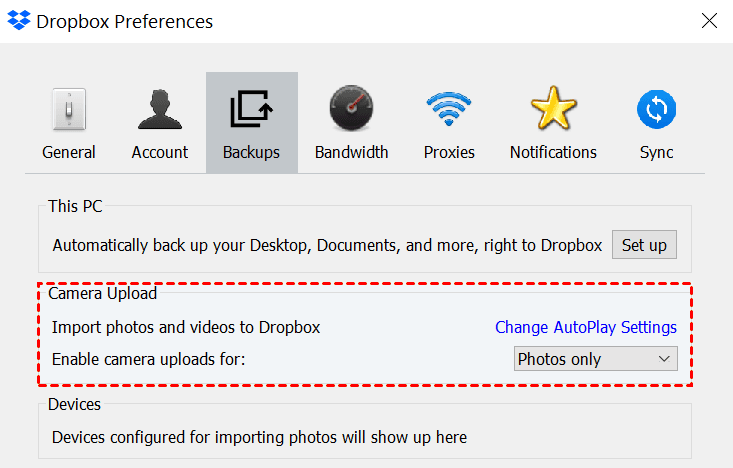
1. Hit the Dropbox icon in your system tray. Then click the gear icon to manage settings.
2. Choose Preferences... from the list.
3. Switch to the Backups tab and check Photos only or Photos and videos next to Enable camera uploads for.
4. After toggling on this feature, you'll see a prompt asking if you'd like to enable camera uploads for that device when you connect a camera or mobile device to a computer with the Dropbox desktop app. If you accept, that device will automatically save photos to Dropbox each time it's plugged in.
At the same time, you need to enable cameral uploads on iOS or Android app if you don't want to connect your device every time you want to upload files.
For Android app:
1. Click Menu > Settings in the Dropbox mobile app and then select Cameral uploads under Features.
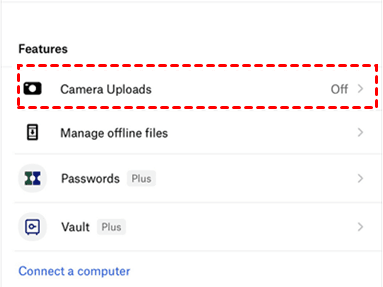
2. Click Back up my photos and click Allow when prompt. Then, it will upload all photos to Dropbox automatically.
For iOS devices:
1. Open the Dropbox mobile app. Then, click the person icon and Cameral Uploads. Click OK if you are asked to grant access to Dropbox.
2. Click on the slide button next to Cameral Uploads, then it will upload photos to the Cameral Uploads folder in Dropbox.
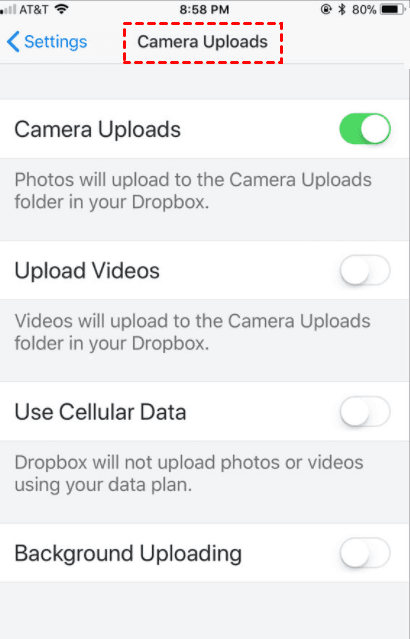
3. Then, choose whether to upload videos, use cell data, or background uploading feature. If you turn the background uploading feature on, it will automatically upload photos from iphone to Dropbox when you take a phone.
This feature is only available for photos on mobile devices. For more details, check the official tutorial online. It's relatively convenient, but many users have complained the Dropbox camera uploads not working unless they open the app and refresh it. Therefore, Method 2 is more recommended.
2. Automatically sync photos to Dropbox with freeware
If you want to sync photos to Dropbox more stably and from more diverse media, a powerful desktop freeware - Qiling Disk Master Standard can satisfy you better. It allows you to upload photos from your PC, external hard drive, NAS, cloud drive, mobile device (via USB cable or SD card adapter), etc. By using this freeware, you can also set up a sync schedule to achieve automatic uploading.
As for compatibility, Qiling Disk Master Standard works on Windows 10/8/8.1/7/XP/Vista and supports photos in various sizes and formats, including JPEG (or JPG), PNG, and GIF, etc. You can download it on your PC to proceed.
As an example, I'll introduce the approach to upload photos to Dropbox automatically from a certain folder on PC.
Steps:
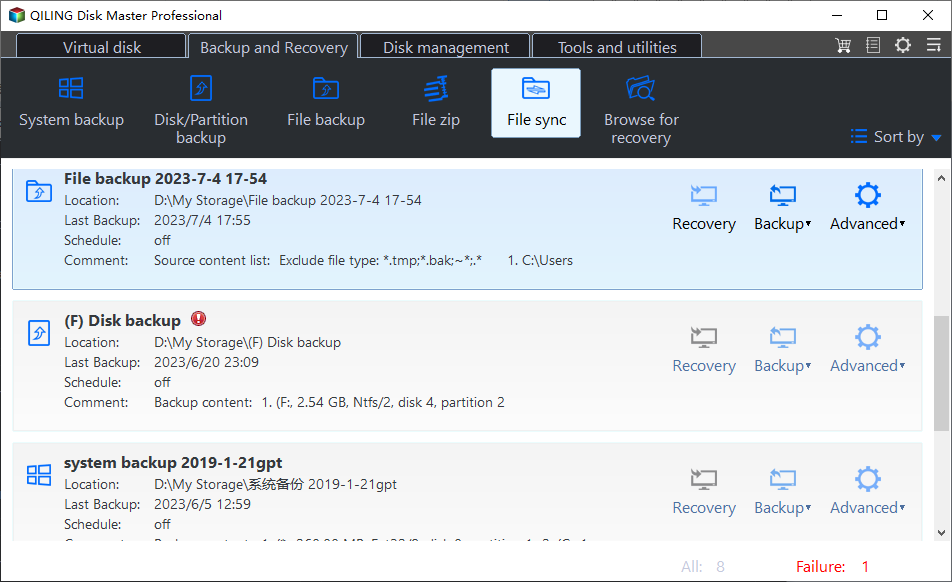
1. Install and launch the freeware, switch to Sync tab and choose File Sync.
2. Click Folder to select the folder containing photos you want to sync. If you want to upload photos from other locations such as USB or external drive, just make the corresponding choice of the source directory after connecting the device.
Tip on how to sync files with certain file extensions:
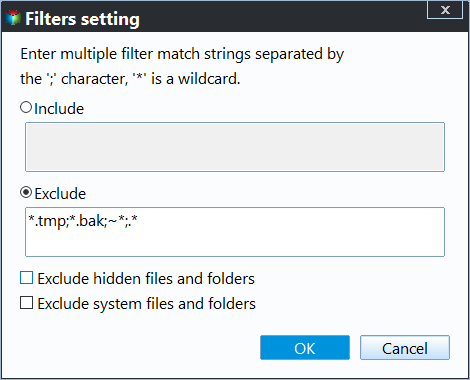
Click the funnel-button of the selected folder, and then type the file extension you want to exclude or include in the corresponding box. Either way, the wildcards are supported, and you can separate multiple masks with semi-colons, such as,*.doc;*.xls;*.ppt.*.temp;*.tmp;*.bak;*~*. *temp;temp*. This feature helps to save space by syncing less files, you need to upgrade to Qiling Disk Master Professional before using it.
3. Click the small down arrow and choose Select a cloud drive in the drop-down menu. Then you can select Dropbox in the popping-out window to specify it as the sync destination.
4. Set up a Schedule Sync for automatic uploading. There are several plans along with more specific settings to run the sync task automatically as you like. Alternatively, you can do further settings in Options.
- Daily, Weekly, Monthly: It allows you to sync files automatically based on different frequencies. Among them, you can set hourly backup in a day by checking the intervals and setting the task to run from every 1 hour to 6 hours.
- Event triggers (premium feature): It is to sync files on specific events, such as, system startup, system shutdown, user logon and user logoff.
- USB plug in (premium feature): It is to copy files automatically when USB drive connected. Thus, you don't need to connect it every time manually.
- Options: comments, email notifications, or enable options such as sync the deletions in source directory to destination, verify the integrity of files in the destination directory during synchronization, etc.
5. Confirm your operations and then click Proceed. After finishing, you can manage the sync task in Home tab and view the synchronized photos in Dropbox.
Tips:
- Please don't change the folder name of the source directory after syncing. Otherwise the program cannot detect it anymore.
- You can also automatically upload photos to Dropbox, even don't set up scheduled sync settings, with the help of File Sync (advanced editions only).
- Except for File Sync, you are able to sync files with File Sync (advanced editions only). It is the best option to keep the files in the target directory always consistent with the source directory. For example, if you accidentally make some changes to the destination directory, like adding a new file, it will be detected and deleted at the next sync.
Conclusion
With Cameral Uploads or Qiling Disk Master, you can automatically upload photos to Dropbox, which helps you to avoid accidental data loss and get rid of repetitive operations. But Sometimes the Dropbox Cameral Upload missing photos or directly not working, to avoid this situation, it's suggested to use Qiling Disk Master.
Beyond that, you can also sync files to other cloud drives such as Google Drive and OneDrive, sync folders between drives, or mirror folder to network drive in real time. And it's also an all-around data backup and cloning software to perform file backup, system backup, disk cloning, partition cloning and so on to protect your important data.
Related Articles
- Sync Folder to Network Drive in Windows 7/8/10 | 3 Ways
Syncing local folder to network drive automatically is one of the best ways to protect data in the long-term. For easy access, you can choose to make network files available offline. - Dropbox Not Syncing in Windows 10 - How to Fix and Sync Files?
Dropbox not working in Windows 10? You can fix this issue with 6 solutions below or directly sync files with an easier way. - How to Sync Desktop to OneDrive Automatically? (2 Ways Included)
Syncing desktop to OneDrive is one of the best ways to protect data safely, not only the current files but also changes made later. - Easiest Way to Sync SD Card to Computer or Google Drive in Windows
