Download, Install, Set up Google Backup and Sync Tool
What Is Google Backup and Sync?
Google Backup and Sync is a sync tool published by Google in late June 2017, aiming to synchronize files between online Google Drive and local desktop folder. This folder will be created once the sync task is started.
And, this is a two-way sync: changes made to local desktop folder will be synchronized to network Google Drive and differences happening in online Google Drive files will also be mirrored to local storage.
On the one hand, it safely backup your important files. “Upload and store files from any folder on your computer, camera, and SD cards in the cloud. You can find your content on any phone, tablet, or computer using Google Drive, and your photos and videos in Google Photos.”
On the other hand, it syncs Google Drive with your computer, so you can access Google Drive files even when you are offline.
- Is Google Backup and Sync still available?
- Google Drive for desktop vs Backup and Sync
- How to setup Google backup and sync tool in simple steps
- Easier way to use Google backup and sync tool
- Google Drive for desktop vs. Qiling Disk Master Standard
Is Google Backup and Sync still available?
Since Oct 1, 2021, you will no longer be able to use Google Backup and Sync, and when you open this app, you will be told, "Google Drive for desktop is replacing Backup and Sync", and ask you to move your account to Google Drive for desktop.

You just need to click Sign in and follow the on-screen instructions step by step, you are able to move all the folders from Backup and Sync to Drive for desktop and then use it to backup files or sync photos and videos.
Google Drive for desktop vs Backup and Sync
Now, you may be eager about the similarity and key differences between Google Drive for desktop and Backup and Sync. Below is the overall explanation from Google Drive, if you don't understand it clearly, it does not matter, and we will detail them later.

In fact, Google Drive for desktop integrates Google Backup and Sync as well as Drive File Steam, so it still keeps the ability to backup files to Google Drive and sync photos and videos to Google Photos plus the file stream feature. But there are differences between them, just as you can see from the above picture:
- About file copies: Backup and Sync keep two backup copies, one is on the local drive and the other is on the cloud, which occupies more disk space and cloud storage. But, in Drive for desktop, you can keep them only on the cloud.
- Types of offline files: Backup and Sync only allow you to select specific folders and make them offline while Desktop for desktop supports both specific files and folders.
- Way to backup photos and videos: Backup and Sync backup only photos and videos to Google Drive, if you check "Upload photos and videos to Google Photos", you will have two copies of them on Google Drive and Google Photos. In Drive for desktop, you can choose to sync all files including photos and videos to Google Drive and or backup them to Google Photos.
- Other backup and sync features: Backup and Sync supports excluding certain file extensions to free up space and choose to delete files between Google Drive and PC. And these are not available on the Drive for desktop.
How to setup Google backup and sync tool in simple steps
To set up Google backup and sync tool, you may be in the following two situations:
#1: You don't have Google Backup and Sync. This is very easy, you just need to download Google Drive Backup and Sync and install it. Then follow the on-screen instructions to set it up.
#2: You have Google Backup and Sync installed and well-configured. This will be much more complex and most users are in this situation, you need to migrate your account and data from Bacup and Syn to Drive for desktop.
Here I'll take situation 2 as an example and tells you how to set up the Google backup and sync tool.
Step 1. Search Google Backup and Sync in the Start menu and select it. Or click the google drive icon (
 ) on the system tray.
Step 2. It does not directly open Backup and Sync, but tells you Google Drive for desktop is replacing Backup and Sync. Click Sign in and then GET STARTED to find your Google Drive account and then sign in with it.

Step 3. Now, the process of moving accounts is starting. First, it will move My Drive to your computer, and usually, it's the default location. Click Got it.

Step 3. After moving My Drive, you can move your folders from Backup and Sync. Click Check folders, it will scan all the folders on the computer and cloud.

Step 4. Click Next to continue, it will ask you to select folder options and the way to sync or backup the checked folder.

Step 5. Select Sync with Google Drive or Back up to Google Photos. You can also select both, which will use more storage.

Step 6. And then, repeat Step 5 until you move all the checked folders. Click Save on the Almost done page and then Open Drive for desktop.

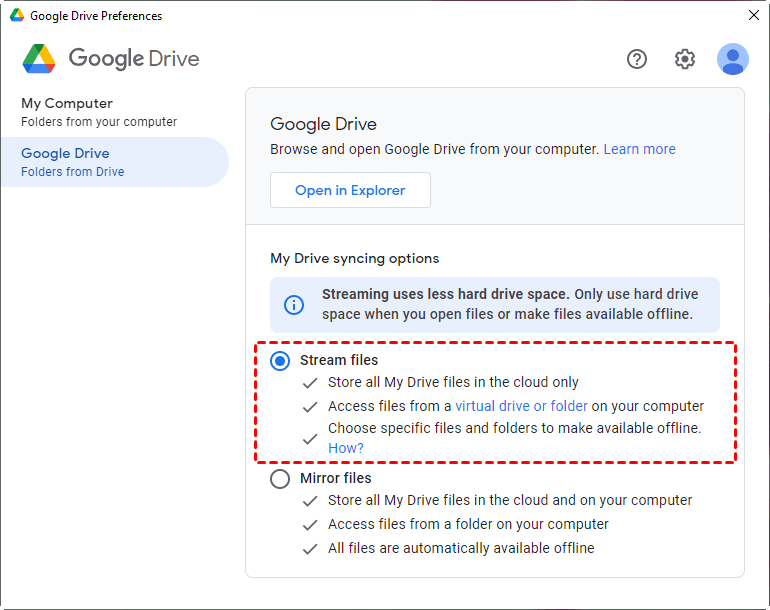
Step 7. After set up, you can click the Google Drive icon on the system tray > Settings > Preferences > Google Drive, and set My drive sync options - Stream files or Mirror files. The Stream files option is recommended because it uses less hard drive space.
✐ Notes:
- If you want to stop this task, just disconnect your Google account. Click the Google Drive icon > click More (three dots) and select “Preferences” > select “Settings” and choose “Disconnect account”.
- You can also pause or resume Backup and Sync through the icon. If you want to uninstall Google Drive Backup and Sync tool, do it in Control Panel just like uninstalling any other software.
- Besides Windows systems, the Google app also supports Mac operating systems. Yet, it can only backup and sync files between local and Google Drive.
Easier way to use Google backup and sync tool
Google Drive for desktop replaced Backup and Sync, but you still cannot sync folders outside the desktop folder or virtual drive. To make this process easy and automatic, you need to use reliable sync software to drive the process.
Qiling Disk Master Standard is a great choice. It not only supports syncing local folder to Google Drive, but also other cloud drives like Dropbox, OneDrive, Box, etc. You can also backup files to Qiling Cloud if you have an Qiling account. It offers you 1TB free storage for 15 days after you sign up for an Qiling account.
Following are its main features:
✩ Basic Sync: you are allowed to sync local folders to mainstream cloud drives, such as Google Drive, Dropbox, and OneDrive. In addition, it still supports syncing files to external hard drive, NAS devices and network share, and vice versa.
✩ Sync schedule: you can set the sync task to run automatically at a specific date, time, or interval, depending on whether you choose daily, weekly, or monthly.
Learn how to sync local files to a cloud drive via Qiling Disk Master below. First, download, install and open Qiling Disk Master Standard Edition. For server users, try Qiling Disk Master Server!
Step 1. In its Backup and recovery tab, select “File Sync”.

Tip: To enjoy more advanced sync modes like “Mirror Sync”, “Real-Time Sync”, or "Two-Way Sync", please upgrade to higher editions.
Step 2. Click “Folder” to select the folder(s) you want to sync.

Tips:
✿ You can only select one folder at one time. To add more folders, just click the “+” icon after adding the first folder.
✿ Optionally, you can enable Filter settings (supported by the Professional version) to include or exclude files or folders, so you can sync files with certain file extensions.
Step 3. Expand the drop-down menu of the second column and choose “Select a cloud drive”.

Step 4. In the pop-up window, select “Google Drive” and click “OK”. Please note a cloud drive is accessible from Qiling Disk Master only if you have installed its desktop app beforehand.
Step 5. Set up schedule settings to make this task convenient and automatic. And then, click Proceed to sync Google Drive with PC.
- Click “Options” at the bottom to write a comment for this sync operation so as to distinguish it from other sync tasks, and you can enable email notification to get an email informing you of the synchronization result.

- Also, click “Schedule Sync” to sync files or folders daily, weekly, or monthly. In the premium version, you still can enjoy event triggers and USB plug in feature.

Google Drive for desktop vs. Qiling Disk Master Standard
Qiling Disk Master Standard has many other features, but here I will only take its Sync function for comparison.
|
Google Backup and Sync |
Qiling Disk Master Standard |
|
|
Charge |
Free |
Free |
|
Supported OS |
Windows, Mac |
Windows PC |
|
Supported device |
Desktop, laptop, notebook |
Desktop, laptop, notebook |
|
Supported cloud drive |
Google Drive |
Google Drive, Dropbox, OneDrive, Box, SugarSync, hubiC, and CloudMe |
|
Sync from local to cloud |
Yes |
Yes |
|
Sync from cloud to local |
Yes |
No |
|
Sync from local to local/NAS/network share |
No |
Yes |
|
Schedule sync |
No |
Yes |
Conclusion
Now you know how to sync files with Google backup and sync tool - Drive for desktop. If you want to sync local files to other cloud drives like OneDrive and Dropbox, you may prefer the easier way and free file sync software - Qiling Disk Master. It makes this process easier and more automatic.
And you can also use Qiling Disk Master as hard drive transfer software. With its disk clone feature, you can easily clone a hard drive to SSD, replace laptop HDD with SSD, make NVMe drive bootable, etc. To unlock more features, please download it to have a try!
Related Articles
- Sync Files to Google Drive Automatically | 4 Ways Included
- How to Backup PC Files to Google Drive Automatically?
- 6 Tested Solutions to Google Drive Not Syncing in Windows
- How to Monitor a Folder and Move Files Automatically?
Need to copy files from one folder to another automatically? Read this article patiently to get the best automated file mover utility in Windows to assist you.