MirrorFolder Software: Mirror Folder in Windows 10
Quick navigation:
- What is a mirror folder?
- What does it mean to mirror files?
- How to mirror a folder in Windows 10 -2 common ways
- Easier way to mirror folder in Windows 10
- Over to you
What is a mirror folder?
A mirror folder is a Windows-integrated software that enables real-time mirroring and synchronization of important folders. This feature allows you to mirror one or more folders to a local, network, or removable drive, or even sync an entire local disk to another internal disk. Once set, the mirroring or synchronization process runs quietly in the background, with options for auto-sync or real-time synchronization. This ensures that your critical data is always up-to-date and secure.
What does it mean to mirror files?
Mirroring files means to make an exact copy of original files on different locations, that's redundancy or fault tolerance, so you can get your files back instantly. Below are some situations you may want to mirror/sync files and folders.
- Sync folders on the local drive to another internal/external/network drive.
- Sync files between a laptop and desktop computer over network.
- Sync files between two computers that are in the same location.
- Migrate entire system drive to another drive.
How to mirror a folder in Windows 10
In Windows 10, there are two primary methods to mirror a folder: using the MirrorFolder software and accessing the Properties page. These tools enable you to synchronize folders in various ways, including:
To begin mirroring files or folders, simply download the MirrorFolder software from the official website. Once the download is complete, you'll need to restart your computer to finalize the installation process. After restarting, you'll find a new folder containing two files, indicating that the installation is complete. From here, you can proceed with setting up your mirror folder using one of the synchronization methods, such as auto sync, real-time sync, or two-way sync.
Method 1: Mirror folder with MirrorFolder software
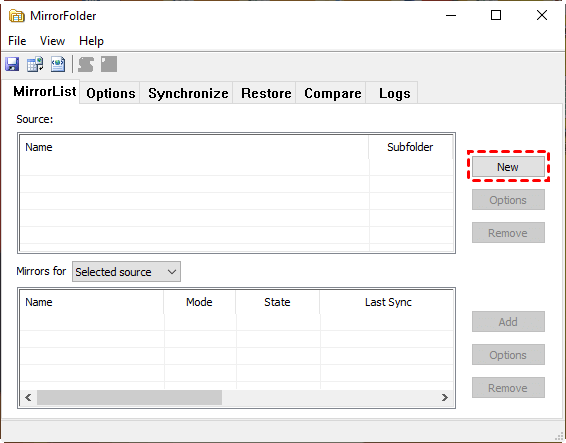
Step 1. To access the main program, simply double-click the MirrorFolder icon. This will take you to the MirrorList tab, where you can begin setting up your mirroring process. To do this, click the "New" button located at the top of the source box.
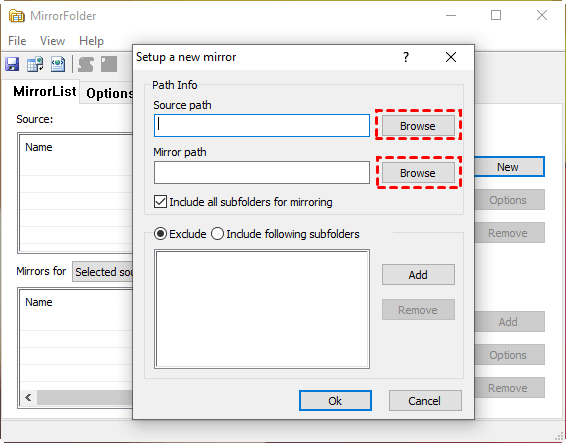
Step 2. To complete the mirroring process, click the "Browse" button next to the Mirror path field. This will allow you to select a target path where you'd like to save the mirrored folder. Choose a location on your local disk, network drive, or removable device, such as a USB flash drive.
Notes:
◉ To exclude subfolder, you should uncheck "Include all subfolders for mirroring" and tick "Exclude", click "Add" and "Browse" subsequently to exact subfolder name. Also, you can exclude later by clicking Options for Source.
To add more folders to the mirror, simply repeat the process of selecting a folder and clicking "Add" until you have included all the desired folders.
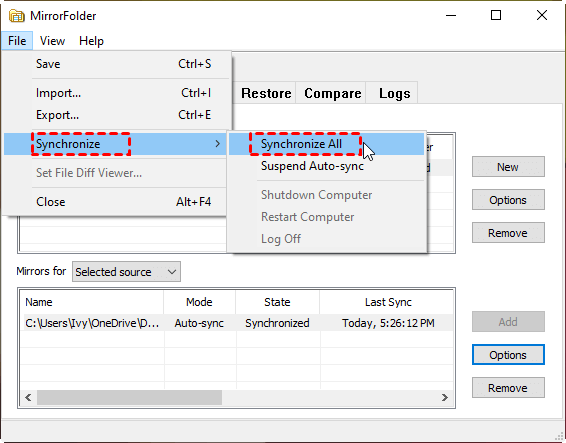
Step 3. By default, this tool mirrors for selected source, but you can change it to all sources from the context menu. Then, click "File" > "Save" and then "File" > "Synchronize" > "Synchronize All" to start the pending mirror.
Notes:
◉ If this is the first time for you to make a mirror, this tool will treat it as a change, so you will see a (*) sign in the upper right corner of MirrorList. Please remember to save changes before syncing, otherwise this tool will not mirror folder.
◉ The default sync mode is auto-sync. To change it in real-time, click "Options" at the right side of Mirrors for Selected source and check "Synchronize in real-time" under the SyncMode tab.
◉ To perform two-way data synchronization, click the SyncOptions tab and check "Bi-directional synchronization".
Method 2: Windows 10 mirror folder with MirrorFolder property page
As previously discussed, MirrorFolder seamlessly integrates with Windows, allowing you to mirror any folder on your Windows 10 system.
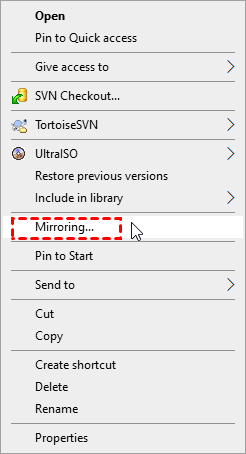
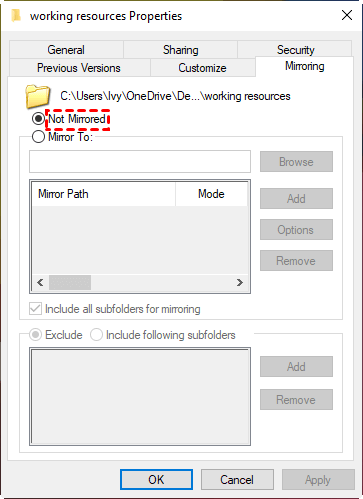
Step 1. Right-click the folder (here is working resources) you want to mirror and select "Mirroring" from the pop-up menu list.
Step 2. In the Properties page of the working resource, select the "Mirror To" option and click "Browse" to choose the mirror path. Once selected, click "Add" to confirm the changes and then click "Apply" and "OK" to enable silent background synchronization of the folder.
To stop mirroring a selected folder, such as a working resource, you can right-click on the folder and select "Not Mirrored" in its Properties window. This will disable the mirroring functionality for the selected folder.
After conducting an in-depth research on MirrorFolder, I found it challenging to find a comprehensive tutorial on how to mirror a folder using the software. Even after some time, I struggled to locate the sync option, which was not intuitive in the main program. Furthermore, I encountered difficulties in determining whether the folder was synced, if the operation was successful, or if it failed, as there was no clear prompt to indicate this. This lack of transparency made it frustrating to use the software.
Fortunately, there are easier ways to perform Windows folder mirroring. One option is to use a different file sync software that can simplify the process. This alternative approach can save you time and frustration, making it a more efficient and effective solution for your needs.
Easier way to mirror folder in Windows 10
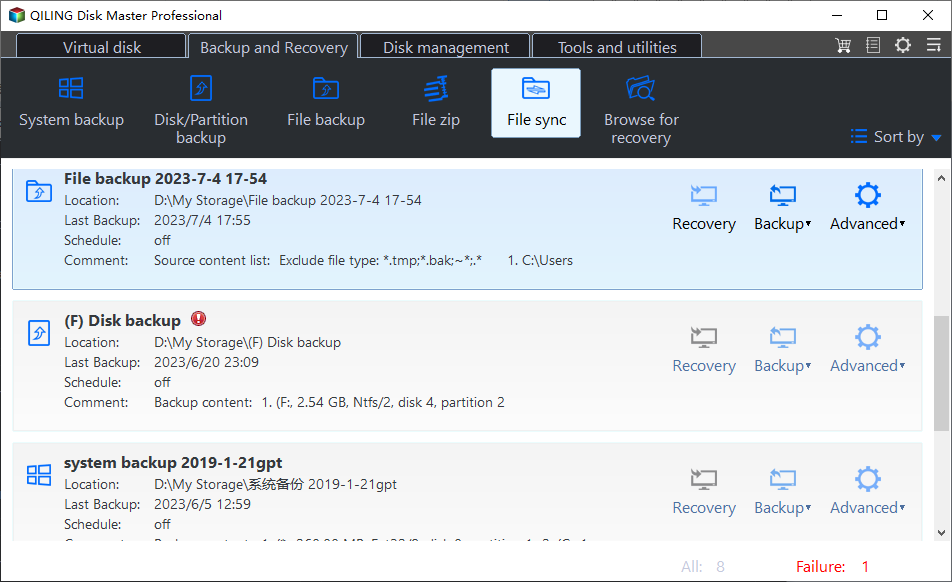
If you're looking for a more efficient way to perform Windows folder mirroring, you might want to try Qiling Disk Master Professional. This specialized file sync tool is designed for Windows 11/10/8/7/Vista/XP, making it a great option for those who need a reliable and user-friendly solution.
- One of the standout features of Qiling Disk Master Professional is its intuitive interface, which makes it easy for even novice users to find and access all the necessary options. The user-friendly design allows users to operate the software like a professional, making it a great option for those who want to get started quickly and easily.
- It supports 4 different sync solutions to meet different users' needs. They are Basic Sync, Mirror Sync, Two-Way Sync and Real-Time Sync.
- Qiling Disk Master Professional allows users to schedule sync operations in advance, ensuring that data is transferred at the desired frequency. This feature enables users to:
Before mirroring one or more folders using Qiling Disk Master Professional, it's essential to make some preparations to ensure a smooth and efficient process. These preparations include:
- If you're planning to mirror a folder to an external hard disk, make sure to connect the device and verify that it's being detected by your system. On the other hand, if you want to mirror a folder to a network drive, ensure that both your computer and the network drive are connected and accessible.
- Download and install file sync software Qiling Disk Master Professional If you're using a Windows-based system, you can consider using Qiling Disk Master Server for folder mirroring. This software is compatible with various Windows versions, including Server 2003, Server 2008(R2), Server 2012(R2), Server 2016(R2), Server 2019, and Server 2022.
Without further ado, let's get started to perform Windows mirror folder with the following steps.
Step 1. Launch Qiling Disk Master Professional, and then click "Backup and recovery" and "File Sync". If you want to mirror files or folders immediately when any changes occur, you could use "File Sync" to replace it.
Step 2. Click "Folder" to select folder on your computer, then select a destination path.
>> To mirror folder to network drive, click the inverted triangle and "Add Share or NAS Devices". In the pop-up window, type IP address of the network drive and enter username and password if prompted. Then, you can choose the shared folder on network drive as destination.
>> To sync folder between desktop and laptop at different locations, ie, home and office, you can click folder-shapped button and select previously connected removable device, such as external disk or USB flash drive. Also, you can use cloud storage as destination.
Step 3. To automatically sync files, click "Schedule Sync" and select daily/weekly/monthly, event triggers, or USB plug in. Then, click "Proceed" to begin the mirroring process. Then, you will see the Finish button when the process is 100% completed.
Notes:
◉ Event triggers: It allows you to sync files at a specific event, such as user logon, user logoff, system startup, system shutdown.
◉ USB plug in: A unique feature designed for USB device, which can automatically mirror files from or to USB flash drive when it's plugged in.
◉�Wake up the computer to run scheduled tasks: sync files anytime even without your attention, such as midnight. Wake up the computer to run scheduled tasks: sync files anytime even without your attention, such as midnight.
Summary
If you're looking for a way to mirror folders in Windows 10, you may have come across MirrorFolder. However, users have reported that this tool can be confusing and not user-friendly. In contrast, Qiling Disk Master offers a more intuitive interface that makes the mirroring process simple and efficient.
Except for file/folder sync, Qiling Disk Master can do more for you, such as system/disk/partition/file backup (including restore), Incremental or differential backup, system/disk/partition clone, �reate bootable media, universal restore, etc. Please download this software to explore it yourself.create bootable media, universal restore, etc. Please download this software to explore it yourself.
Related Articles
- Mirror PC Folder to OneDrive | 3 Ways
- How to Sync Folders to NAS Automatically in Windows 10/8/7
- Sync Folders between Drives in Windows 10/8/7 (with Video)
- 3 Ways to Make Windows Sync Folders between Computers
- Top Two Ways to Synchronize Files between Windows Server
