How to Run Robocopy Two-Way Sync in Windows 11/10/8/7
About Robocopy
Robocopy (Robust File Copy) is a command that is used to copy directories and files from one location to another. It has been a built-in feature since Windows Vista and Windows Server 2008. The basic syntax of the robocopy command is as follows:
robocopy [source] [destination] [(file)( ...)] [(options)]
There are various options you can use with the robocopy command to meet different needs. Here I’d like to list some helpful options:
☞ Copy options
▪ /s: copy subdirectories except empty directories.
▪ /e: copy subdirectories including empty directories.
▪ /z: copy files in restartable mode which lets you resume a large transfer if it’s been interrupted.
▪ /purge: delete destination files and directories that no longer exist in the source.
▪ /mir: mirror a directory tree and delete files and folders in the destination if they no longer exist in the source. It is equivalent to /e plus /purge.
▪ /mt[:n]: create multi-threaded copies with “n” threads. “n” must be an integer between 1 and 128. The default value for “n” is 8.
☞ File selection options
▪ /xd [directory][ ...]: exclude directories that match the specified names and paths.
▪ /xn: exclude newer files. If the files in the source are newer than those in the destination, they won’t be copied.
▪ /xo: exclude older files. It is opposite to /xn.
▪ /maxage:[n]: specify the maximum file age (to exclude files older than “n” days or date).
▪ /minage:[n]: specify the minimum file age (to exclude files newer than “n” days or date).
▪ Learn more >>
How to use Robocopy to sync folders in two ways
To run Robocopy 2-way synchronization, you can type the corresponding command lines in a Command Prompt window directly. However, if you want to perform two-way file sync on a regular basis, it is suggested to create a bat file to run the robocopy command. Thus, you don’t need to retype the same command every time. Follow the steps below to use Robocopy to sync folders both ways:
1. Search for Notepad from the search box in the taskbar, and click the top result to start the app.
2. Type the following lines to create a batch file:
- @echo OFF
- echo Syncing from C drive to E drive
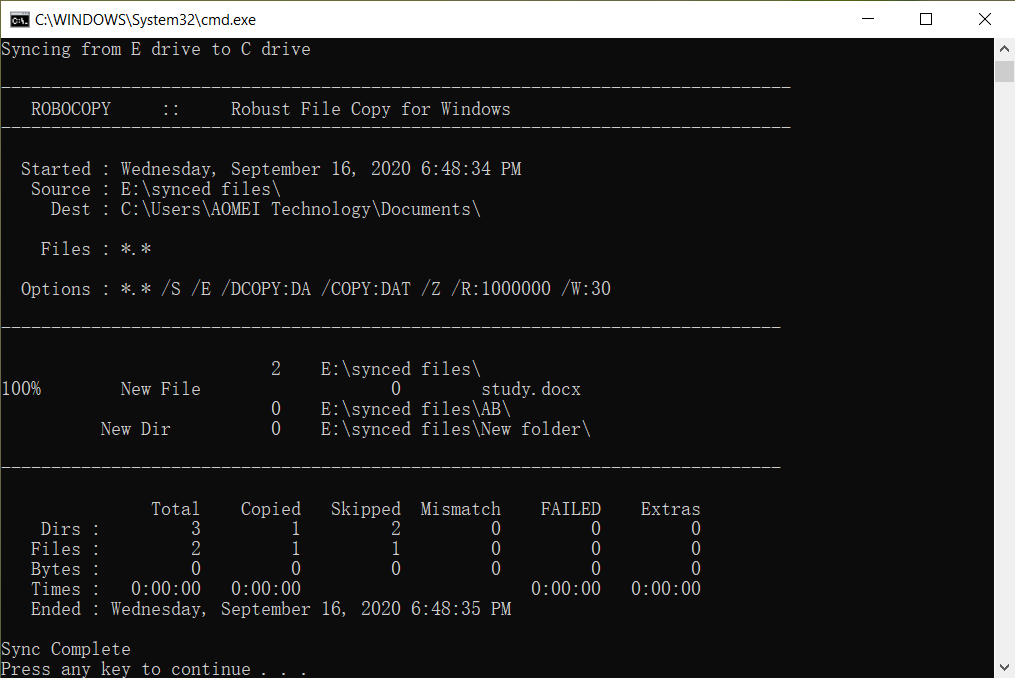
- robocopy "C:\Users\Qiling Technology\Documents" "E:\synced files" /e /z (As there are spaces in the directory names, I add quotation marks around the source and destination path.)
- echo Syncing from E drive to C drive
- robocopy "E:\synced files" "C:\Users\Qiling Technology\Documents" /e /z
- echo Sync Complete
- pause (It prevents the console window from closing after executing the command.)
3. Press Ctrl + S to save the batch file. Name the file with the “.bat” extension, “robocopy_sync.bat” for example. Put the file in a location you can easily find.
4. Double click the “robocopy_sync.bat” file to sync files and folders between two specified locations. It will bring out a Command Prompt window to show you the sync result. Press any key to close the window.
✍ Tips:
◈ To edit the batch file, right click it and select Edit.
◈ If you encounter Robocopy error 5 (0x00000005) access denined, try to log in your computer as administrator. Then right click on the batch file and select Run as administrator.
Now you know how to perform Robocopy bidirectional sync. Although the whole process seems not complicated, there are some limitations of Robocopy you should know:
- It does not copy open files.
- It does not mirror properly on systems older than Windows Vista. It ignores changed security attributes of previously mirrored files.
- It can’t sync files automatically unless you use Task Scheduler.
Luckily, there is a powerful file sync tool which makes up the flaws of Robocopy. Read on to get it.
Easier way to perform two-way sync in Windows
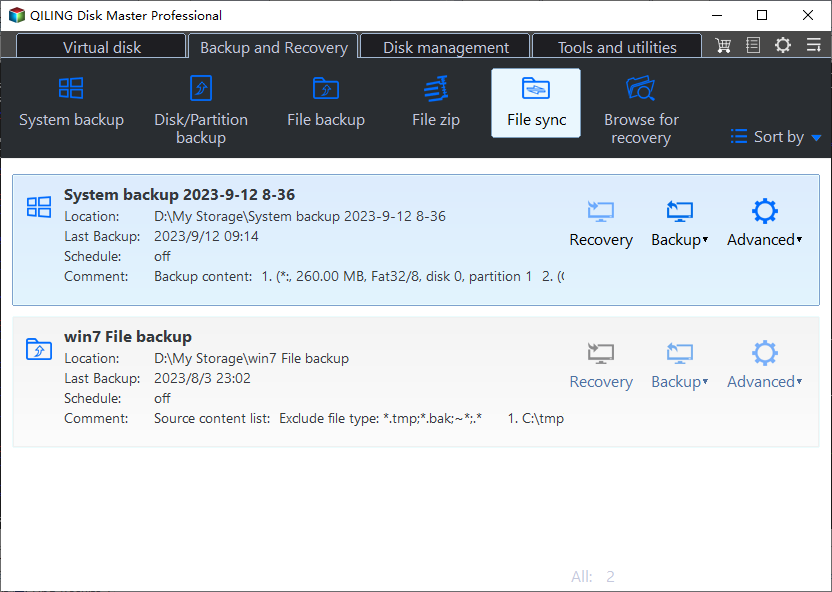
Qiling Disk Master Professional is superb file sync software designed for Windows 11/10/8.1/8/7/Vista/XP, 32 bit and 64 bit. Let’s have a close look at its sync features:
- Versatile sync modes: it offers Basic Sync, Mirror Sync, Real-Time Sync, and Two-Way Sync. You can choose one mode that best meets your need.
- Abundant sync locations: it enables you to sync files from one folder/disk/computer to another one. You are also allowed to sync two external hard drives and sync local folders to OneDrive, Google Drives, etc.
- Auto sync: it is embedded with the “Schedule” feature that can help you sync files at fixed intervals.
- Background sync: it is able to copy open or running files. You don’t need to close other running applications to launch the sync process.
How to perform two-way sync via Qiling Disk Master
Step 1. Download, install, and launch Qiling Disk Master. At the main interface, click Sync and select Two-Way Sync.
Step 2. Edit the task name so that it can be easily identified. Click Folder to select the folder you want to sync.
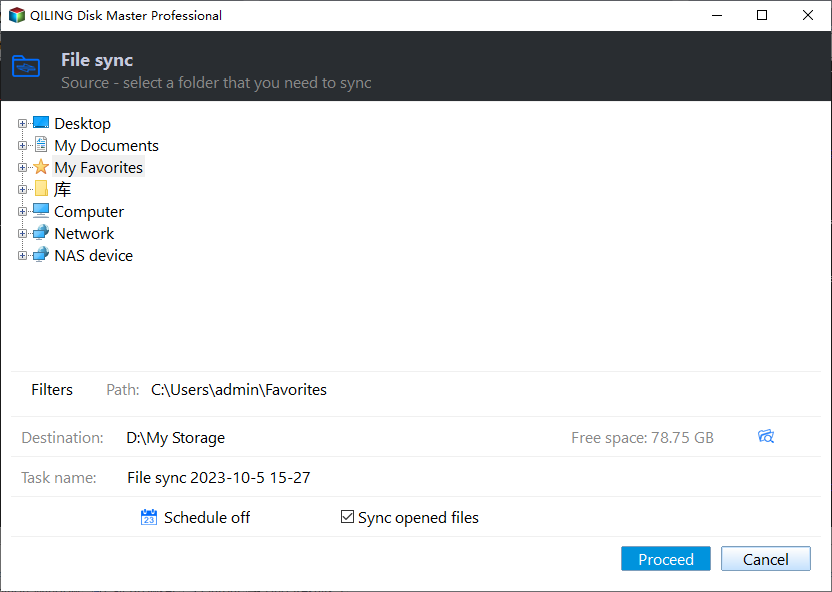
✍ Tips: You are only allowed to choose one source folder in one task when performing Two-Way Sync. You can sync multiple folders at once if you choose the other three sync modes.
Step 3. Click the second bar to choose another folder as the destination folder.

Step 4. (Optional) To run two-way sync automatically, you can click Schedule Sync in the bottom and choose a proper frequency in the Schedule Settings window.

Step 5. Confirm the source and destination directory and click Proceed. Any changed files will be synced from the source to the destination as well as the other way around.

★ Bonus tip: backup files to Qiling Cloud
As cloud storage is becoming more and more popular, Qiling offers users its own cloud - Qiling Cloud. If you create an Qiling account, you can backup files to Qiling Cloud. It offers you 1TB free storage for 15 days after you sign up for an Qiling account.
To sum up
You have learned how to run Robocopy two-way sync for folders in Windows 11/10/8/7. However, Robocopy may disappoint you when it comes to copying open files and running auto copy. Qiling Disk Master can help you out under these circumstances.
What’s more, it offers backup, restore and clone features. You are able to backup a hard drive to cloud and clone a hard drive via Command Prompt using Qiling Disk Master. Try it now by yourself!
Related Articles
- Sync Two Folders with Command Line - Robocopy in Windows 10/8/7
- How to Sync Changes Only with Robocopy in Windows 10/8/7?
- Easy Way to Mirror Folder to Network Drive in Real-Time
- Best Free Syncthing Alternative to Sync Files Between PCs
This tutorial provides the best free Syncthing alternative for Windows and shows how to sync files between computers via Syncthing and its alternative step by step.