Best Free Way to Sync Files between Desktop and Laptop
Quick Navigation:
- How do I sync two Windows 10 computers?
- What is the best free way to sync files between two computers?
- Automatic sync files between desktop and laptop with Qiling Disk Master
- Sync files between laptop and desktop in Windows 10 with OneDrive
- Sync your settings between desktop and laptop
- Conclusion
How do I sync two Windows 10 computers?
"I want to fully sync two windows 10 computers. I use a laptop at work and a desktop at home (both seem to run windows 10 fine). I want a way to do this, I keep finding articles about syncing documents or using SkyDrive, but I want it all. Applications, games, documents etc. Anyone else want this too?", one user asked.

For users who have two or more Windows 10 computers, syncing files between desktop and laptop in Windows 10 seems to be a common demand in daily usage. You may always want to keep files up-to-date or retain an exact copy of files to prevent data loss. Whatever the reason, you definitely need an easy and quick way to make it. Keep reading below and this article will introduce you 5 effective ways to sync files.
What is the best free way to sync files between two computers?
If you have done in-depth research online, you probably know there are several ways to sync files between laptop and desktop in Windows 10, that is, using folder sharing, external drive, cloud storage, SyncToy, or third-party program. Now, let's have a closer look at them and pick out the best way.
- Folder sharing: In simple words, you need to create a shared folder on the primary computer, and ensure both computers are in the same network segment. Also, you can only access files on the primary computer when it's on.
- SyncToy: This is a built-in file sync software for Windows XP/7/8/10/11 to sync files or folders between two locations. What's a pity, it does not work properly sometimes, saying “SyncToy failed to create folder pair”, “SyncToy not copying all files”, “SyncToy access denied”, etc
- Third-party program: Most software works well in syncing folders between computers, either a laptop, desktop, or both. Moreover, it supports automatic file sync via daily/weekly/monthly. Also, you can make a comment for easy distinction, choose to sync deletion or not, etc.
- External hard disk: As its name suggests, you need to connect an external disk externally, ie: HDDs, SSDs, and USB flash drive, and access data through it. And the transfer process can be manual or automatic, depending on the way to sync files, copy and paste or set automatic sync with an external disk and file sync software. It is portable to take work home or vice versa.
- Cloud storage: Indeed, cloud storage like Microsoft OneDrive, previously called SkyDrive, is the most flexible way to sync files across multiple devices, such as laptops, desktops, mobiles, and tablets. You can choose to sync local folder to OneDrive as well as make files offline via the File on-demand feature as long as there is a network.
Whether both your computers are in the same network segment or not, you can sync your files between two computers. It's recommended to sync files with Qiling Disk Master if your computers are in the same LAN. If not, please use cloud storage as a middle man, ie: Microsoft OneDrive. Then, Keep reading below to learn the step by step guide.
Automatic sync files between desktop and laptop with Qiling Disk Master
Qiling Disk Master Standard is one of the best free file sync software for Windows 7/8/8.1/10/11/XP/Vista, which can help you sync files between desktop and laptop easily and quickly. Thanks to its user-friendly interface, all users even novices can use it effortlessly.
- Its Schedule Sync (eg: daily, weekly, monthly) makes the process automatic and the scheduled task will sync changes including newly added and modified files.
- Also, you can enable Options to make a comment for the task to distinguish, choose to sync deletion or not, set up email notifications to get the final result timely, etc.
- In addition, you still can sync folders between drives, sync files between computer and flash drive, etc. To sync files between Windows Servers, try Qiling Disk Master Server!
Please download the best free sync software to have a try!
Then, without further ado, let's get started. Before that, you need to do some preparations in the following.
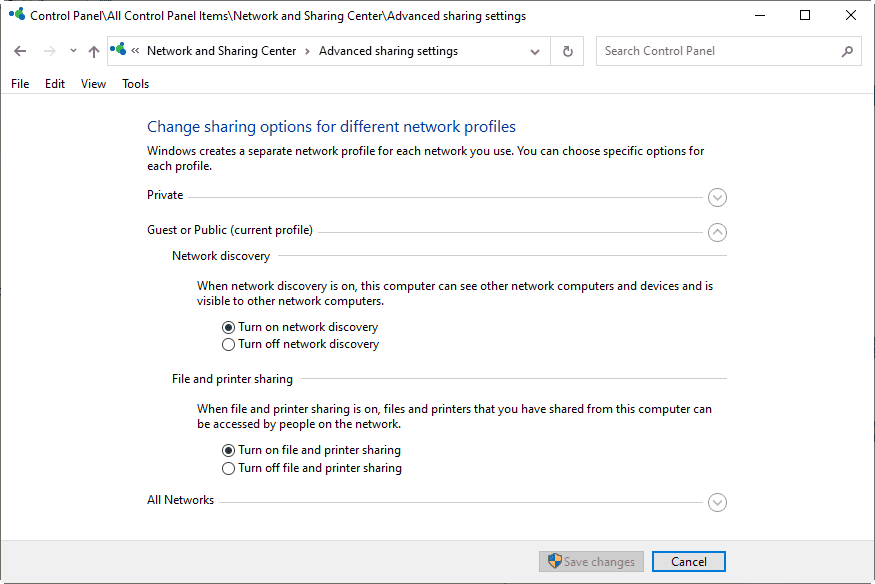
1. Turn on the sharing options on both computers. Search for Control Panel and open it, then go to Network and Internet > Network and Sharing Center > Change Advanced sharing settings. Afterward, tick the following settings on both computers and click Save changes.
- Turn on network discovery
- Turn on file and printer sharing
- Turn on sharing so anyone with network access can read and write files in the Public folders
- Turn off password protected sharing
2. Create a network shared folder on both computers, including your desktop and laptop computer. Only shared folders can be accessed through the internet.
- Select the folder you want to share, right-click it and select Properties.
- Click on the Sharing tab. Then, under the Advanced Sharing section, select Advanced Sharing... button and tick Share this folder,

- Click Permissions under the Comments box. Then, click Add and type everyone, click OK to confirm you want to share files with everyone. And then, set permissions for everyone, the read permission is checked by default, and you can allow it to change or grant full control for it.
Then, follow the steps below and sync files between desktop and laptop automatically:
1. Launch Qiling Disk Master Standard on the desktop, click Backup and File Sync.

2. Select the shared folder on desktop and laptop computers.
- For files you want to sync on desktop: Tag on + Add folder >Share/NAS >Add Share or NAS Device. Then, type display name and IP address, click OK to confirm it. Afterward, all the shared folders will be listed in the pop-up window, select the shared folder containing files that need syncing.

For the shared folder on the laptop: click the inverted triangle button and then Add Share or NAS Device. Then, type network path and select shared folder to store files on the desktop, click OK.

Tips:
✔ Optionally, you can click Filter settings (supported by Qiling Disk Master Professional), displayed as a funnel shape, to sync files with a certain file extension, thereby saving much time and space, especially in a scheduled task.
✔ To sync files with OneDrive, click Select a cloud drive and choose OneDrive as the destination path instead.
3. Click Schedule Sync and enable it, then click OK to activate daily sync in it. You can also select Weekly or Monthly. Finally, click Proceed to automatic sync files between desktop and laptop.

Notes ✎...
✘ Don't modify the source folder name, otherwise this tool will not sync changes anymore.
✘ The Basic Sync task will not transfer the deleted files by default. Click Options to enable it.
✘ The Sync method does not sync files over 4GB to the target drive with the FAT/FAT32 file system. Instead, try its File Backup feature to backup larger files.
✔ To sync changes from desktop to laptop and vice versa, try Two-Way Sync. Also, you can try the fastest sync method - Real-Time Sync and safest sync method - Mirror Sync.
Sync files between laptop and desktop in Windows 10 with OneDrive
To sync files with OneDrive, you have two available ways.
- First, copy and paste files into the desktop folder. It's simple and easy to operate but requires human intervention. In addition, it's time-consuming.
- Second, use Qiling Disk Master Standard to sync files. The file sync steps are very similar and you just need to replace the destination path above with OneDrive.
Here, I only introduce the first way. And then follow the steps below.
By default, the desktop folder in Windows 10 or 11 is located at C:\Users\Username\OneDrive. If you are currently using Windows 7/8/8.1, You need to download OneDrive desktop app first.
Then, you can go to that location and open the folder, then copy and paste files. Later, your files will be synced to onedrive.com and other devices logged in to the same account.

Also, you can choose which folder you want to sync and download files from OneDrive.
- To sync OneDrive files to local drive, click the OneDrive icon on the system tray> Settings > Files On-Demand, tick Save space and download files as you use them.

- Furthermore, you can specify folders available on this PC under the Account tab. Click Choose folder button and then uncheck Make all files available, only tick the frequently used.

- To sync specific folder to OneDrive, go to the Backup tab and click Manage backup button. Uncheck the important folder you don't want to sync.
But if this is the first time you use OneDrive, you will be asked to register an account, log in with your account and set your preference, then click Open my OneDrive folder and do as above. During the setup process, you can change the default location of OneDrive folder.

Sync your settings between desktop and laptop
Except for syncing Windows 10 files, some users still want to sync Windows settings to enjoy the same desktop on two computers and other settings, such as, account, desktop settings, Microsoft Edge browser settings, Internet Explorer, command prompt, passwords, date, time and region settings etc. That's what Windows 10 sync settings can help you with. Below are steps:
1. Turn on your primary computer, such as your desktop, type account > select Manage your account > choose Your account and sign in with a Microsoft account.
2. Tap on Sync your settings > turn on the Sync settings button. Then, your settings will be synced to the computer using the same Microsoft account.

3. Log in to your laptop with the same Microsoft account and enable Sync your settings.
Note: If you don't want to always use the same desktop between two computers, you can turn off "Sync your settings" by clicking the sync settings button "On".
Conclusion
Whether you are currently using desktop and laptop at home, work or both location, you can sync files between desktop and laptop in Windows 10. Please note majority of methods require two acomputers at the same network segment. If this is also your case, you could consider using Qiling Disk Master Standard to automatic sync files. If you are traveling, external hard drive or cloud storage will be a better choice for file sync.
In addition, you can sync your Windows settings with built-in "Sync your settings" feature. After syncing, all of your computers will have the same preference settings. The most intuitive thing is that two computers use the same desktop image, and your computer desktop image will change accordingly.
Related Articles
- How to Transfer Files Between Laptop and Desktop PC Regularly
- 3 Ways to Make Windows Sync Folders between Computers
- 2 Easy Ways to Sync Files between Computers without Cloud
- Sync Folders between Drives in Windows 10/8/7 (with Video)
- How to Sync Desktop to OneDrive Automatically (2 Ways Included)