Auto Sync Files between Two Computers on the LAN (Freeware)
Quick Navigation:
- What is file sync?
- Best software to sync files between computers
- How to sync files between 2 computers with Qiling Disk Master
- Conclusion
What is file sync?
Sharing files between computers can be a convenient way to keep your data up-to-date and accessible across different devices. File sync is a great way to achieve this goal. In this tutorial, we'll show you how to share files between computers using file sync.
File sync is a game-changer for anyone who needs to share files between multiple computers. It's a convenient and efficient way to keep your files up-to-date across different devices, eliminating the need for manual file transfers or synchronization.
Best software to sync files between computers
There are many file sync utilities for you to sync files. If you are using Windows PC operating system, including Windows XP/Vista/7/8/8.1/10/11, here we highly recommend you a freeware Qiling Disk Master Standard. It has a function called “Sync”, which can sync files between two computers via network, and it supports all Windows PC OS. What’s more, you don’t need to pay for it.
File Sync in free Qiling Disk Master
The Sync feature in Qiling Disk Master is user-friendly and efficient. It allows for easy synchronization of files and folders between two locations, making it quick to update folders/files in two different places. This free utility supports synchronization of files stored on desktops, laptops, or external storage devices.
This freeware enables easy synchronization of various file types, including documents, photos, music, and movies, to another location. When changes are made to files or folders on the source location, they can be automatically updated on the other location if the automatic sync feature is enabled.
Why should you choose Qiling Disk Master?
In comparison to other file synchronization software, Qiling Disk Master possesses several distinct advantages.
Notably, Qiling Disk Master is a free software, eliminating the need for any payment. You can download its free edition below to effortlessly synchronize your files.
Qiling Disk Master supports Windows PC OS. If you work with Windows Server OS, you should use Qiling Disk Master Server instead.
Qiling Disk Master is a powerful software that offers features beyond file syncing, including system backup and restore, and creating bootable media, among others.
Qiling Disk Master also features scheduled sync, allowing users to set up automatic file/folder synchronization at fixed times, such as daily, weekly, or monthly, ensuring seamless data updates without manual intervention.
How to sync files between 2 computers with Qiling Disk Master
Qiling Disk Master boasts an intuitive interface, making it accessible to users of all technical levels, including non-technicians. Its user-friendly design enables individuals to easily sync files between computers, even without prior experience, ensuring a seamless and hassle-free process.
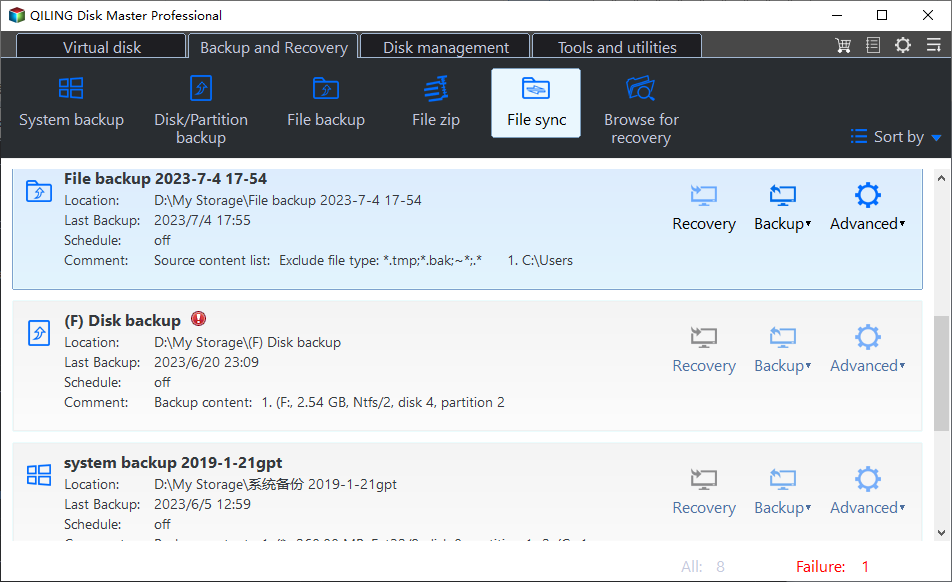
Step 1. To begin, install and launch Qiling Disk Master Standard on your computer. Once launched, navigate to the Backup and recovery section and select File Sync from the available options. This will initiate the file synchronization process, allowing you to easily manage and sync files between computers.
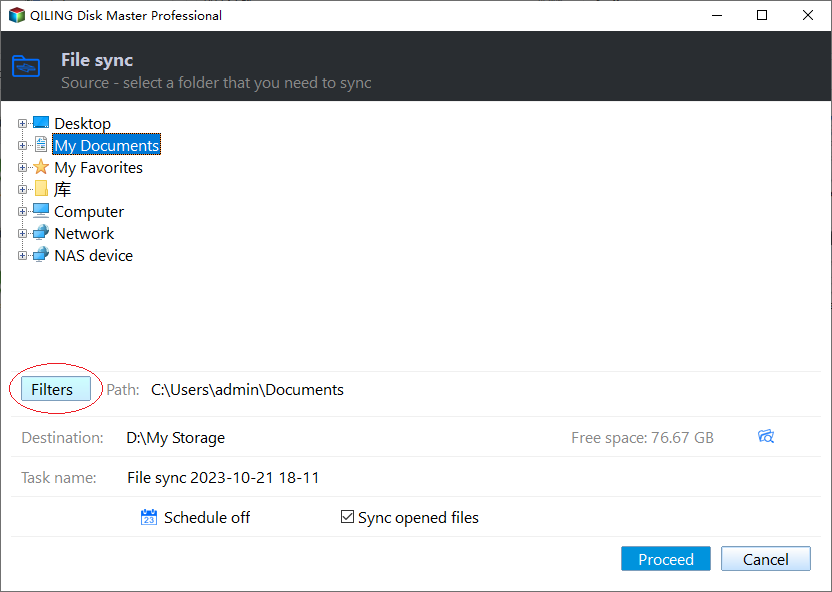
Step 2. Upon selecting File Sync from the Backup and recovery section, the interface will transition to the following screen. To proceed, click on the Folder option, which will allow you to choose the specific folder you wish to synchronize. This is a crucial step in defining the scope of your file synchronization task.
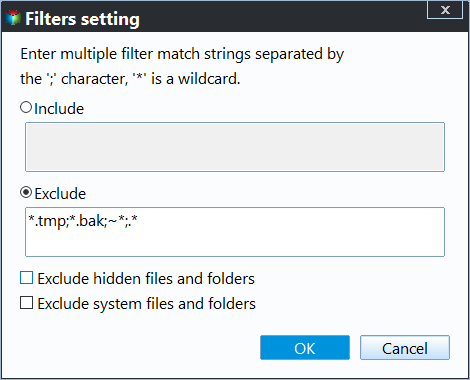
In advanced versions, you can further refine your file selection by clicking on the "Filter settings" option. This allows you to specify the file extensions you want to include or exclude from the backup. You can either select from the provided drop-down menu or manually type in the desired file extensions in the bar. Once you've set your filter preferences, click the "OK" button to confirm your selections.
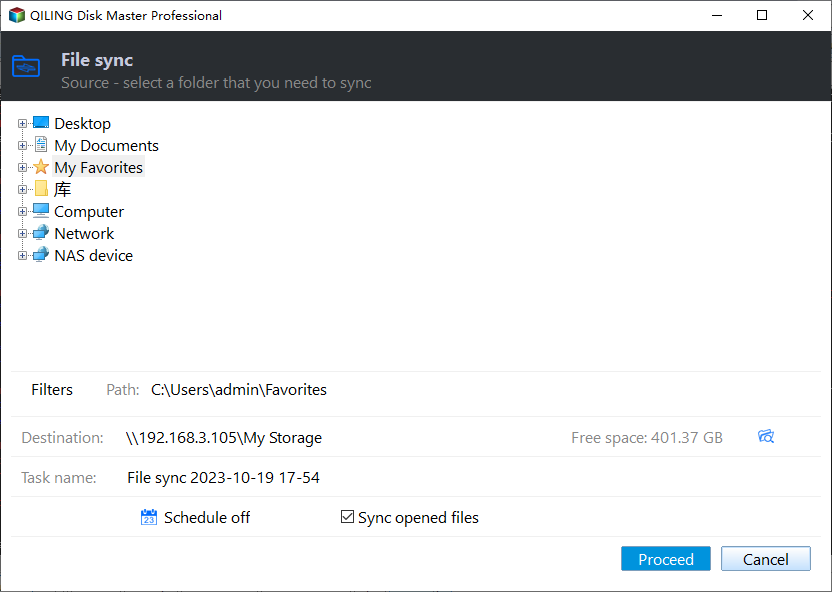
Step 3. Following the previous step, you'll need to choose a location to store the synced folder. To do this, select the second bar and click on "Add Share or NAS Devices" to add a network drive or NAS device. This will enable you to access the synced files on another computer. Additionally, you can set up an automatic sync by clicking on "Schedule Sync".
Step 4. Once you've completed all the settings, click on Proceed to initiate the syncing process. Once the process is complete, click on Finish to conclude and exit the setup. This will finalize the syncing process and ensure that your files are synchronized across all devices.
Notes:
- To sync changed files from the source directory to the destination directory in real-time, consider upgrading to a paid edition that offers File Sync functionality. This feature allows for automatic and continuous syncing of updated files between the two directories, ensuring that both locations have the most up-to-date content.
- Files/folders cannot be synchronized to CD-ROM/DVD/Blue-Ray.
- Due to file size limitations, files larger than 4 GB cannot be synchronized to FAT/FAT32 partitions, as these file systems only support file sizes up to 4 GB. This restriction applies to files that exceed the 4 GB threshold.
Conclusion
With Qiling Disk Master, you've mastered the art of syncing files between two computers. But that's not all - this powerful tool also offers backup, restore, and clone features. You can use it to clone an SSD to a larger SSD in Windows 10, seamlessly transferring your OS and applications without the hassle of reinstalling. Take advantage of its capabilities and experience the convenience for yourself!
Related Articles
- How to Sync Folders over Network?
You will learn how to sync folders between 2 computers over network, whether it's on the same LAN or not, and there are 3 methods in total. - How to Sync Files and Folders in Windows 7 Computer
Files sync can help people make a copy of needed files so that the files can be used in different places. Here you can learn how to synchronize files in Windows 7 computer in two different ways. - 3 Ways to Make Windows Sync Folders between Computers
How to sync folders between computers in Windows 7/10/11? Read this guide to get 3 practical methods. - Prime USB Drive Sync Software for USB Auto Sync in Windows
This tutorial introduces the best USB drive sync software for Windows and shows detailed steps to auto sync a USB drive when plugged in.


