How to Sync Files and Folders in Windows 7 Computer?
Scenario
How do I sync files in Windows 7?
You can use Windows 7's built-in Sync Center to sync a folder with another computer on your network. To do this, go to Start > Control Panel > Sync Center, then click "Add a folder to sync" and select the folder you want to sync. You can then choose the computer you want to sync with and the folder you want to sync to. Windows 7 will handle the syncing process for you.
- Question from Sevenforums.com
What Is File Sync?
Sync, short for synchronization, is an operation that keeps files in multiple locations up-to-date by transferring newly-created or updated files and folders from the source directory to the target directory.
File sync can be considered a form of file backup, where synchronizing files or folders to another location allows for easy recovery in case of data corruption or system crash. This way, when the source data is damaged, the copies can be retrieved from the synced location, serving as a backup.
File synchronization allows files to be synced to a local space or different PCs via a network, a process known as single file synchronization or remote file synchronization. When syncing files, the process scans both source and target directories to identify changed files, then transmits the necessary files or deletes unnecessary ones to ensure the files in different locations are identical.
Set up File Sync with Windows 7 Built-in Tool
In Windows 7, syncing files is easier than in earlier versions, thanks to the Sync Center feature. This allows you to synchronize files on a network drive to your local computer, making them accessible even when you're offline or the server is down. With Sync Center, you can work with network files as if they were local, making it a convenient and reliable solution for file synchronization.
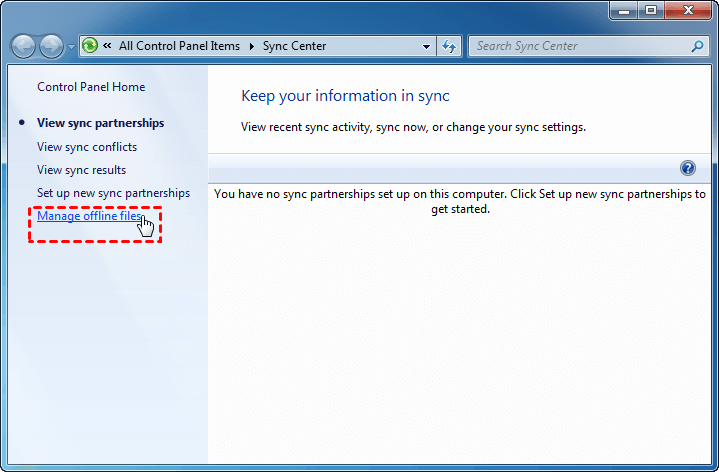
1. To open the Sync Center, click the Start button, then select All Programs, Accessories, and Sync Center. From the Sync Center, click Manage offline files on the left panel.
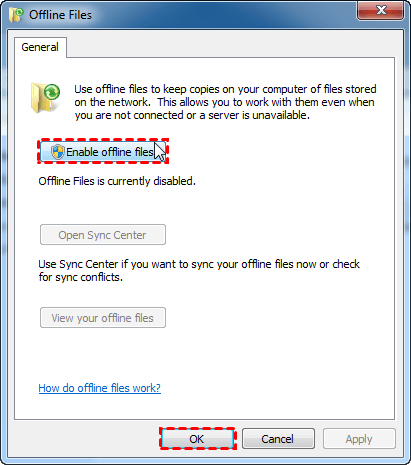
2. In the pop-up window, click "Enable offline files" and "OK", and then restart your computer to make the changes take effect.
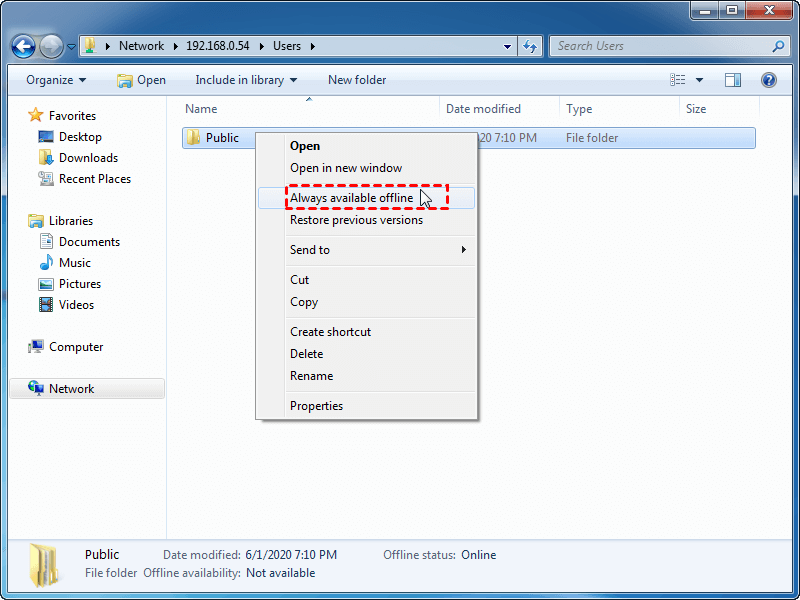
3. To sync a folder or file, search for the network drive by typing "\\IP address" or "\\hostname" in the Start menu, and then all shared folders will be displayed. Right-click on the desired folder or file and select "Always available offline" from the context menu. This will allow you to access the selected item offline.
4. After the sync process is complete, the folder or file will have a sync overlay icon, indicating it has been synced. Additionally, you can view sync results in Sync Center.
In Windows 7, Sync Center is primarily used for syncing files with network locations. If you're looking to sync a mobile device with your computer, you have other options. However, some users encounter issues with Sync Center, such as "Offline Files cannot be activated in Windows" and "Access is denied". A superior sync tool is available to help sync files in Windows.
Synchronize Files in Windows 7 with Qiling Disk Master
Qiling Disk Master Standard is a free file sync software that offers multiple powerful functions, allowing for efficient file management and synchronization.
- The File Sync feature allows you to synchronize files from one folder/disk/computer to another, making it easy to transfer files between PCs.
- Qiling Disk Master supports most commonly used cloud drives, including Google Drive, Dropbox, OneDrive, Box, SugarSync, hubiC, and Cloudme, allowing users to sync local folders to cloud and vice versa.
- The Schedule feature allows you to set up automatic syncs based on daily, weekly, or monthly modes, making it easier to keep your data up-to-date.
Qiling Disk Master supports all Windows PC operating systems, allowing you to sync files in Windows 10/8.1/8/7/Vista/XP. The process is even easier than using the built-in tool in Windows 7, making it a convenient option for syncing files.
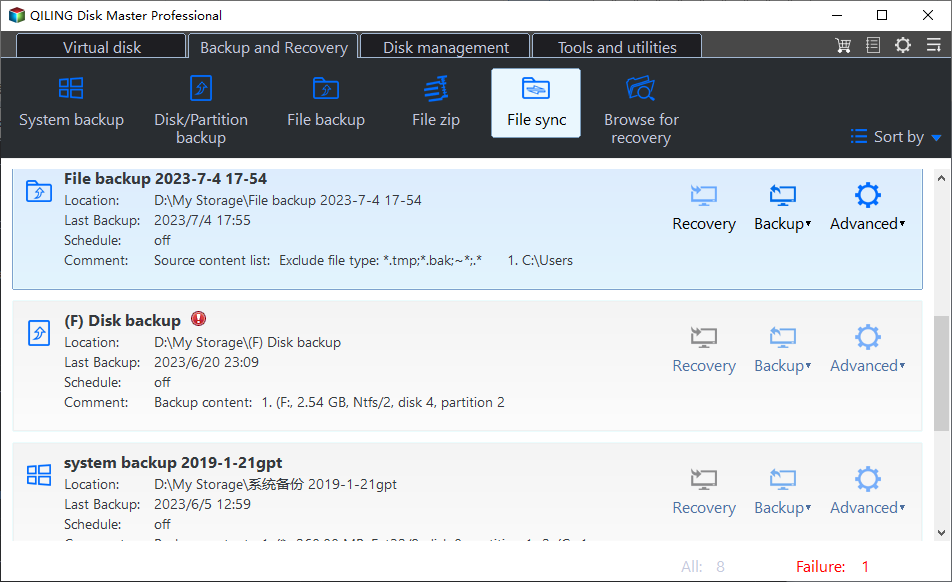
Step 1. Download, install, and launch Qiling Disk Master Standard edition, then navigate to the "Backup and recovery" section and select the "File Sync" option.
Step 2. After selecting the folder, you will go to the next interface where you can click "Folder" to choose the specific folder you want to synchronize.
Step 3. To set up a new project in Visual Studio, first choose the target directory where you would like to put the folder in. This is where the project files will be stored.
Step 4. Click the "Proceed" button to proceeding.
>> Options: You can add a comment to this sync task to make it stand out from other tasks, and also set up email notifications to keep you informed of the sync results.
>> Schedule: You can schedule the sync task to run daily, weekly, or monthly, but for more advanced schedule modes like Event triggers or USB plug in, you might need to upgrade to �iling Disk Master Professional.Qiling Disk Master Professional.
Notes:
- It cannot synchronize files or folders to CD/DVD/Blue-Ray.
- The software cannot synchronize a single file larger than 4 GB to a FAT/FAT32 system because FAT/FAT32 only supports single file sizes up to 4 GB.
- File Sync performs one-This software performs one-way file sync, meaning changes made in the source can be reflected in the destination, but not the other way around. If you need a two-way sync, you may want to consider a higher edition.
Summary
You can sync files in Windows 7 using Sync Center to sync a network drive to your local drive, or Qiling Disk Master, which supports various sync locations and also offers backup and restore features. This allows you to easily manage your files and data, and even backup your Windows 10 system to a NAS drive. Give it a try!
Related Articles
- Top Two Ways to Set up One-way File Sync in Windows 7/8/10
This article will show you what is the best free one-way file sync software and how to sync files in Windows 7, 8, 10, 11. - Best Free Folder Sync Software in Windows 7/8/10
Qiling Disk Master Standard is the best folder sync software for Windows 10, you can use it to perform folder sync on a regular basis or in real-time. Learn more about it below and the detailed steps! - Sync Folders between Drives in Windows 10/8/7 (with Video)
This article will provide you with 2 reliable sync tool and illustrate how to sync folder between drives in Windows 7, 8, 10, 11 automatically. - 6 Ways to Fix Windows 7/10 Sync Center Problems [2022Guide]
Encounter Windows 7 sync center problems? Don't worry about it much, you can easily fix it with 8 solutions below, or sync network files offline with another powerful software.


