Synology Sync Folders to External USB Drive with 4 Steps
Quick Navigation:
- Can I Sync Synology NAS to External Devices?
- Synology Sync to External Drive with USB Copy
- Synology External USB Drive Not Detected - Fixed
- Easier Way to Perform Synology Sync Folder to External Drive
- Summing It Up
Can I Sync Synology NAS to External Devices?
You have a "Pictures" folder on your NAS with subfolders for sorted and unsorted photos from different years. You want to sync the entire "Pictures" folder to a USB drive, so that when you move photos from the unsorted year folders to the "Sorted" folder, the changes are reflected on the USB drive. Is that correct?
You're looking for a program to sync your Synology NAS to an external USB drive. A simple solution is to use the built-in "File Station" app on your Synology NAS, which allows you to sync files to an external drive. Alternatively, you can use a third-party program like "Synology Drive" or "Resilio Sync" (formerly BitTorrent Sync) to sync your NAS to the external drive. These programs are designed to be used on the NAS itself, eliminating the need for a computer to act as a middleman.
Synology Sync to External Drive with USB Copy
Synology NAS allows syncing folders to external hard drives via USB copy, but only with devices having file systems like Btrfs, ext3, ext4, FAT, FAT32, exFAT, HFS, HFS Plus, and NTFS.
To export data from a Synology NAS, it is necessary for the NAS to support the HFS+ file system. If this is the case, you can proceed with the export process. To confirm, check the hardware specifications of your Synology NAS. Once confirmed, follow the necessary steps.
1. 1. Insert an external USB or SD storage device into your Synology NAS. 2.
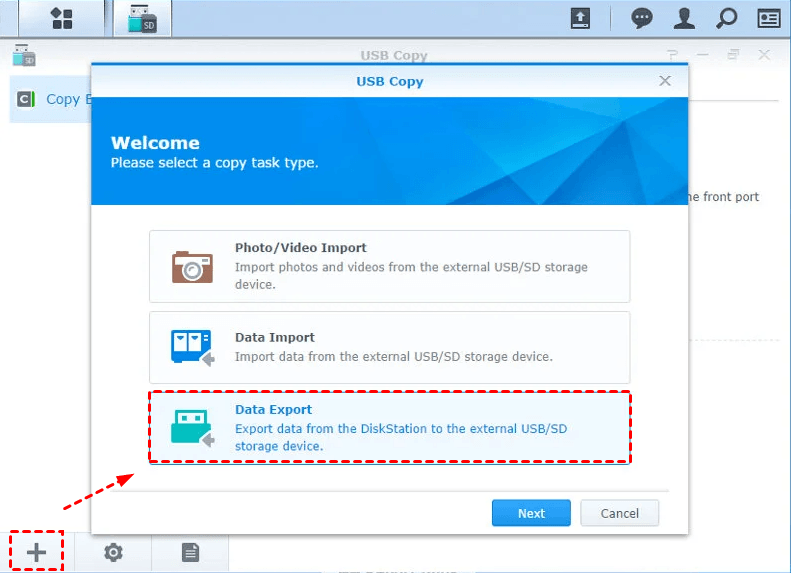
2. To export data from your DiskStation to an external USB or SD storage device, install the USB Copy app at the Package Center and run it. Then, click the "Create icon (+)" at the lower left corner and select the "Data Export" task type, which will help you export data from the DiskStation to the external storage device.
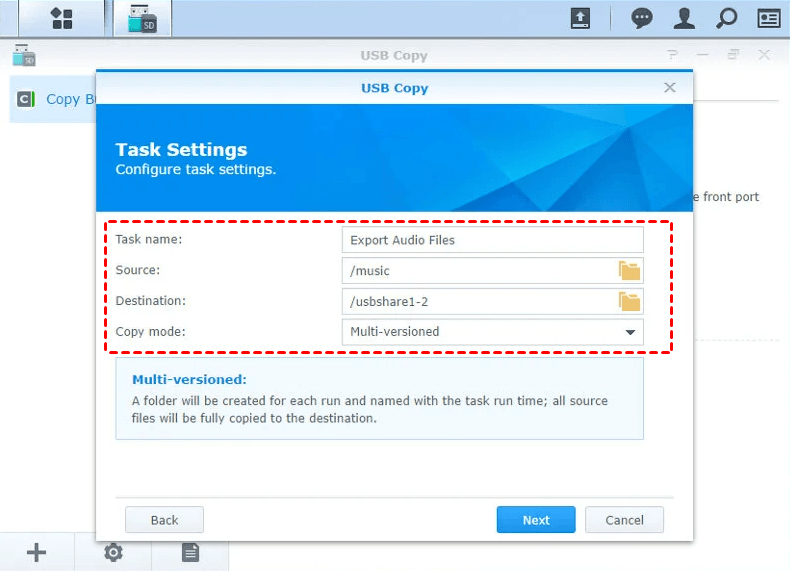
3. To accomplish this task, you need to specify the task name, choose the source folder on your Synology NAS, and select the destination folder on your external drive. Next, select a copy mode, such as "Copy" or "Sync", and configure the corresponding settings, like the file filter and overwrite options, to ensure the task is performed according to your preferences.
- Multi-versioned(default): This mode will create a new folder for each run, with the folder name being the run time, and all source files will be fully copied to the destination.
- Mirroring: This mode creates a complete copy of the source folder, with all changes replicated to the destination.
- Incremental:This mode copies newly added and modified source files every time this task runs.
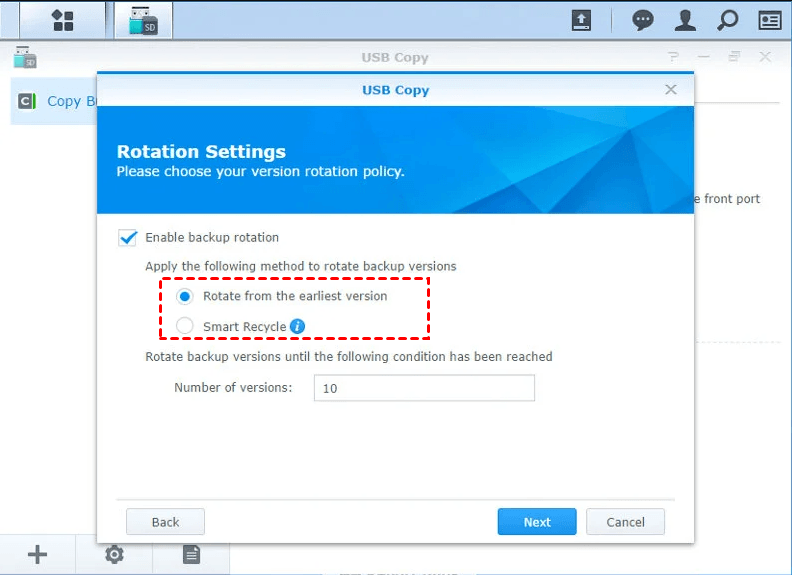
For the Multi-In versioned mode, you can rotate backup versions, starting from the earliest version, using smart recycle, or specifying the rotation number.
- Rotate from the earliest version: The system will automatically rotate backup versions when the number of stored versions exceeds the maximum limit, ensuring that only the most recent versions are kept.
- Smart Recycle: The system will keep hourly versions for 24 hours, daily versions for 1 day to 1 month, and weekly versions older than 1 month. If there are too many versions, it will delete the oldest ones first.
- Number of versions: The system supports up to 1-65535 versions to be stored, and once the maximum number is reached, it will automatically delete the oldest versions to make room for new ones.
4. To set the trigger time, plug in the USB, eject when copy completes, or enable schedule on daily or other frequencies, select the desired option from the list provided. This will allow you to customize the timing and behavior of the USB drive's actions.
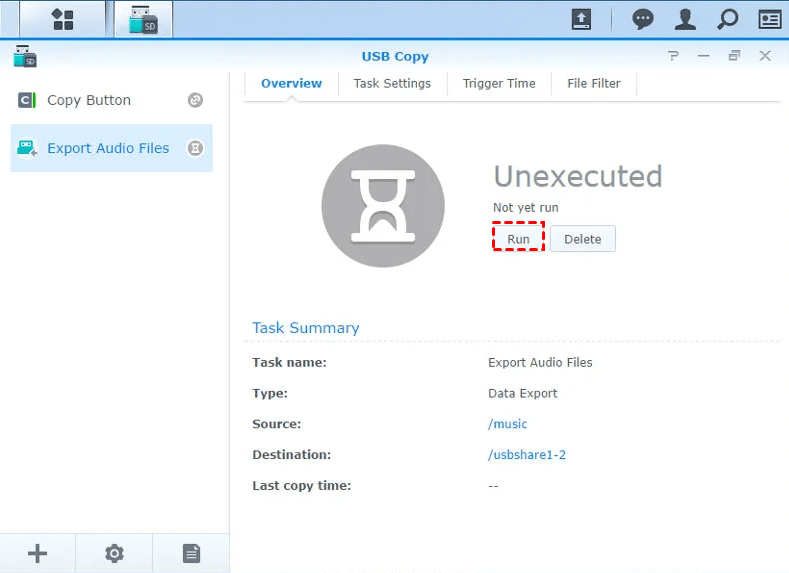
To copy folders from your Synology NAS to an external drive, select the file types you want to copy by ticking them, or type in the filenames or extensions of other file types you want to sync. Once you've made your selection, click "Apply" and then "Run" to initiate the copy process.
Synology External USB Drive Not Detected - Fixed
Here are the tips to make an external USB drive detected: Sometimes, you may find the external USB drive not detected, but don't know how to make it detected. To resolve this issue, try unplugging the USB drive and plugging it back in, checking the USB port for any debris or dust, checking the USB drive for any physical damage, checking the USB cable for any damage, and ensuring the USB drive is formatted in a compatible file system. Additionally, you can try using a different USB port, checking the device manager for any issues, and updating the USB drivers.
# 1. Reboot Synology NAS. To reset your NAS, turn it off, unplug the power cord for 1 minute, remove any connected USB devices, and then plug the power cord back in and reconnect the USB devices in reverse order.
# 2: Check the Compatibility. Not all external hard drives are compatible with Synology NAS, so it's essential to check the compatibility list for external hard disks, USB drives, or other devices to ensure they work seamlessly with your Synology NAS.
# 3. Verify External hard drive. If the external drive isn't being detected by your Synology NAS, try connecting it to a different USB port, either USB 2.0 or 3.0, to see if it's recognized. Alternatively, you can try replacing the external drive with another one to rule out any issues with the original drive.
# 4: Check the file system on external drive. Synology NAS currently supports file systems such as Btrfs, ext3, ext4, FAT, FAT32, exFAT, HFS, HFS Plus, and NTFS, but other file systems may require formatting before use.
👉 To format external USB drive:
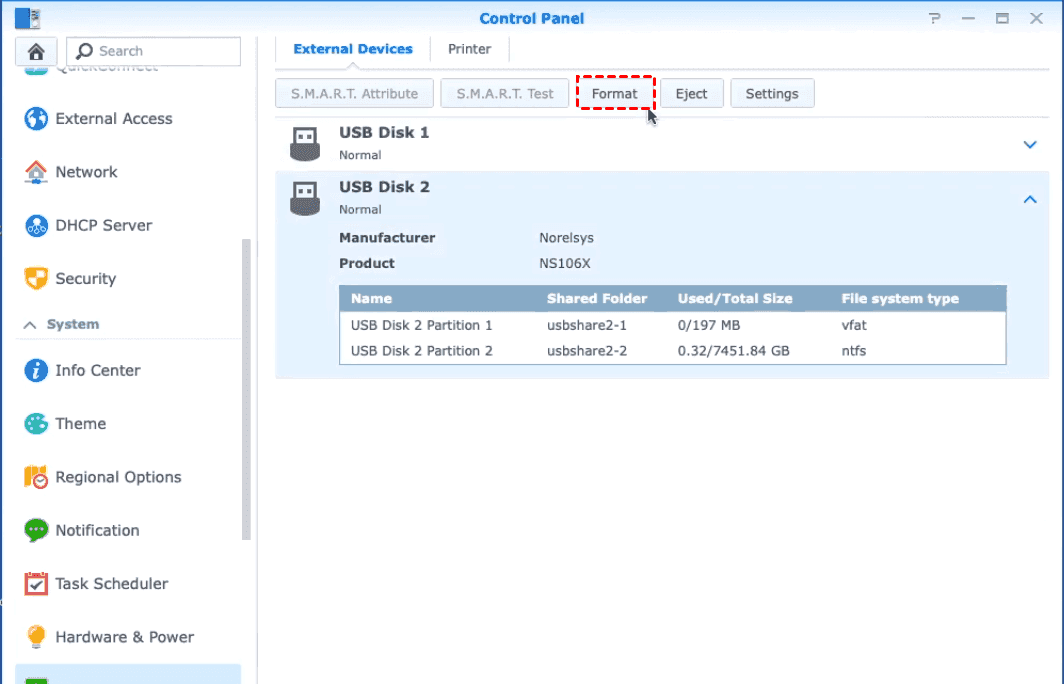
To format an unrecognized external drive, go to System > Control Panel > External Devices, select the drive, click Format, and choose the format options (entire disk or selected partition, and file system type) to start the formatting process.
Easier Way to Perform Synology Sync Folder to External Drive
The USB Copy feature on Synology can be helpful for syncing folders to external drives, but it has its limitations, such as not supporting all NAS modules with HFS+ file systems, or not detecting Synology external USB drives. To avoid these issues, consider using a more powerful NAS synchronization software like Qiling Disk Master Professional.
You can easily sync folders on your Synology NAS in Windows XP, Vista, 7, 8, 8.1, 10, 11 (32-bit and 64-bit) with this tool, as long as your Synology NAS is on and you know its address, username, and password. This allows you to enjoy various advantages.
- Rich sync methods: There are four types of sync methods: Basic Sync, Real-Time Sync, Mirror Sync, and Two-Way Sync. The first three, Basic Sync, Real-Time Sync, and Mirror Sync, are one-way file sync methods that focus on different aspects, with the differences between them explained in more detail at the provided link.
- Set up a schedule sync task to automatically run, The app allows users to set various triggers for automatic folder syncing, including daily, weekly, and monthly intervals. Additionally, it can be set to sync folders when specific events occur, such as when a user logs in or out, or when a USB device is plugged in.
- Sync folders on multiple locations, You can store your files on various devices, such as a Synology NAS or QNAP NAS, a network drive, an external hard drive (HDD or SSD), a USB flash drive, or even a CD/DVD.
To sync a folder from a Synology NAS to an external hard drive, download and install Qiling Disk Master Professional. For server users, try Qiling Disk Master Server instead.
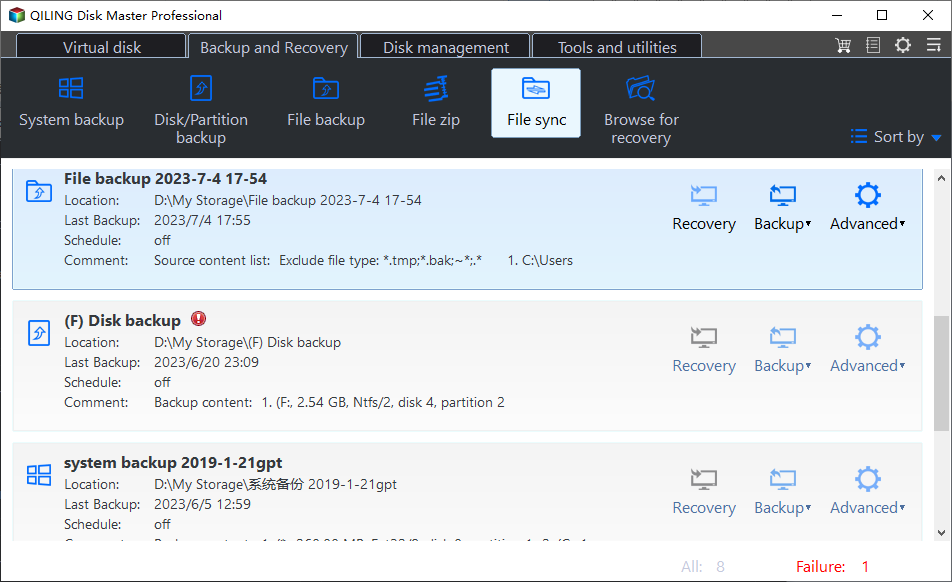
1. After installing Launch Qiling Disk Master Standard, click on "Backup and recovery" followed by "File Sync".
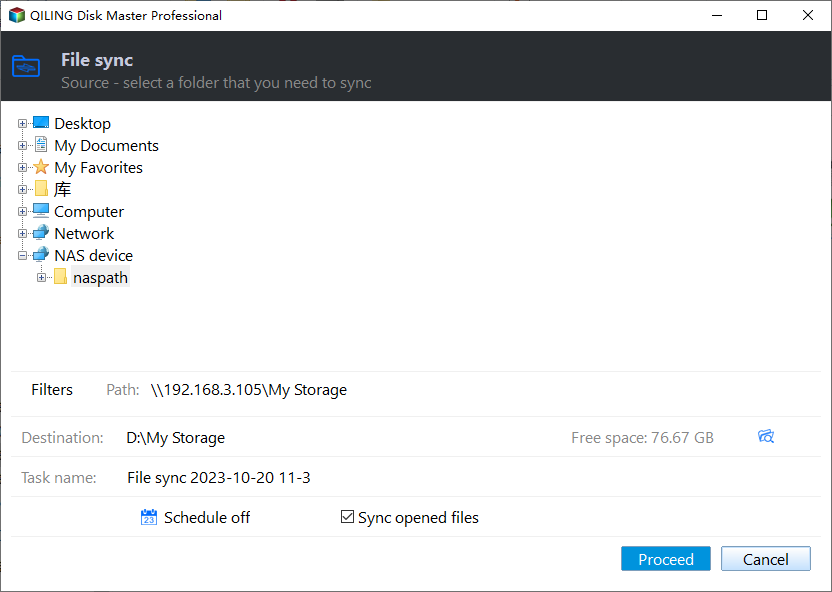
2. Add Synology NAS and select the shared folder on it by clicking "Folder" > "Share/NAS" > "Add Share or NAS Devices", then input the network path, username, and password, and click "OK".
3. Connect the external USB drive to your computer and select it as the destination to save the folders from your Synology NAS. This will allow you to transfer the data to the external drive, freeing up space on your NAS.
4. To schedule a Synology Sync, click Schedule Sync, enable it, and select your preferred schedule settings. You can also customize the sync task by commenting on it, enabling email or SMS notifications, and verifying file integrity during synchronization. Once you're done, click Proceed to initiate the sync process.
- Daily, Weekly, Monthly: The sync schedule is to run every hour from 1 to 6 hours in a day, with additional options for weekly and monthly syncs.
- Event triggers: It allows you to sync files at specific events, such as system startup, shutdown, user logon, or user logoff.
- USB Plug in: The device is able to automatically copy files when a USB drive is plugged in.
Your folders in Synology NAS will be synced immediately, and you can also sync an external hard drive to the NAS.
Summing It Up
You can easily sync your Synology data to an external drive using Qiling Disk Master. This tool also offers advanced sync options, including mirror sync, real time sync, and Two Way sync, which are available in the Qiling Disk Master Professional version.
To protect your Windows operating system and hard disk from threats such as viruses, ransomware, hardware failure, and system crashes, consider creating a system image on an external hard drive, migrating Windows 10 to an SSD, creating WinPE bootable media, or cloning your HDD to an SSD without losing data.
Related Articles
- How to Backup Synology NAS to External USB Drive in Windows
- Automatically Mirror Folders to Synology NAS | 2 Simple Ways
- How to Create a NAS Mirror Backup Using File Sync
- Perform Synology NAS to NAS Sync with 4 Steps | 2020 Guide
