Solved | Windows 10 File Sharing Not Working (6 Fixes)
- Windows 10 network sharing not working and its reasons
- Sharing files with the best alternative - free and easy
- File sharing not working in Windows 10/11? Try these 6 solutions
- Solution 1. Configure advanced sharing settings🔥
- Solution 2. Turn password protection off🔥
- Solution 3. Check for the Computer Browser service
- Solution 4. Add a Windows Credential
- Solution 5. Enable SMB 1.0 in Windows Feature🔥
- Solution 6. Disable IPv6
- FAQs about Windows 10 file sharing
- Summary
Windows 10 network sharing not working and its reasons
The file sharing feature in Windows 10 is praised for its convenience and safety in sharing files between computers in the same LAN, but some users have reported issues with it not working after updates 1803, 1809, or 1903, resulting in an error message in File Explorer.
🚫You do not have permission to access \\...
⛔You can't access this shared folder because your organization's security policies block unauthenticated guest access.
🔎Check the spelling of the name. Otherwise, there might be a problem with your network.
Windows 10 and Windows 11 users may experience network sharing issues, and besides the former, the latter may also encounter problems. The reasons for Windows 10/11 file sharing not working are often related to various factors, including issues with the operating system itself, problems with the network configuration, or conflicts with other software and hardware.
- The file sharing settings are incorrect.
- You don't have a credential.
- The file sharing connection is not compatible.
- The antivirus software prevents Windows file sharing.
- The SMB 1.0 is disabled in Windows 10 Update.
- Windows Update has bugs.
If file sharing isn't working, you can try using a free and fast file transfer software or use the solutions to fix Windows 10 file sharing directly.
Sharing files with the best alternative - free and easy
You can try using a third-party file manager app, such as ES File Explorer or Solid Explorer, to access shared files. Alternatively, you can try using the built-in Windows feature, "Quick Access" in File Explorer, to access frequently used files and folders, including shared ones.
- #1: Access shared folder through command prompt: net use [devicename]: \\[server name]\[sharename]
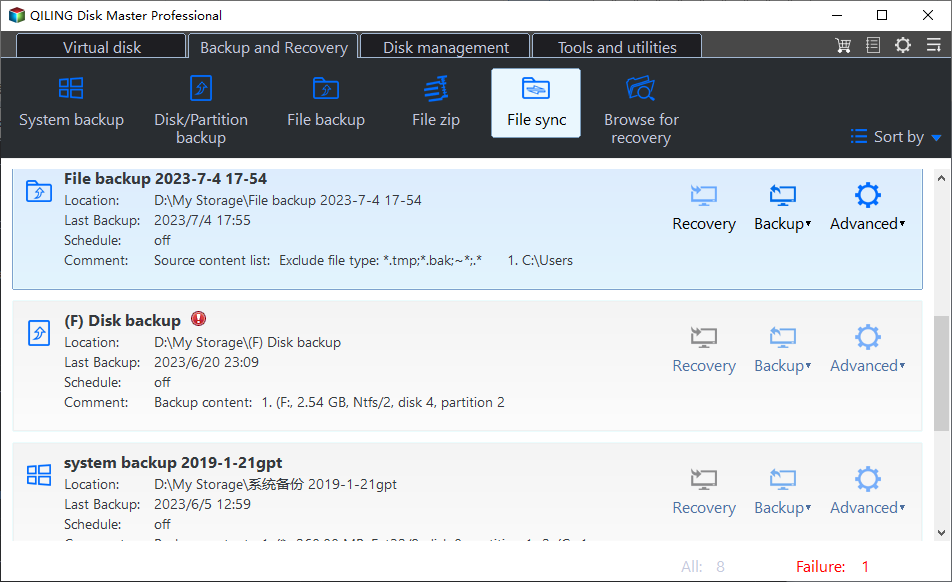
- #2: Use file sync software for help: Sync folders to a network drive with different storage devices, such as your computer, external hard drive, or USB flash drive. You can also set automatic sync options, like daily, weekly, or monthly, to ensure your important data is backed up regularly.
To share files over a network, you can use Qiling Disk Master Standard, a free file transfer tool. Simply open command prompt and type the command above, or use Qiling Disk Master Standard for a more detailed and professional process. This tool can also serve as a long-term data protection solution.
- Seamlessly sync files across computers, external drives, NAS, and cloud storage, ensuring data consistency and accessibility.
- Automate data synchronization on a daily, weekly, or monthly basis as required, ensuring no changes are missed.
- This software can be used on a wide range of Windows operating systems, including Windows 11, 10, 8.1, 8, 7, XP, and Vista, to enable file sharing across multiple devices.
If you're experiencing file sharing issues on Windows Server, you can try using Qiling Disk Master Server to resolve the problem. This server system can help resolve file sharing issues on Windows Server 2019, 2016, and other versions.
1. Download, install and run the software. Click on the Backup tab, then select File Sync from the options.
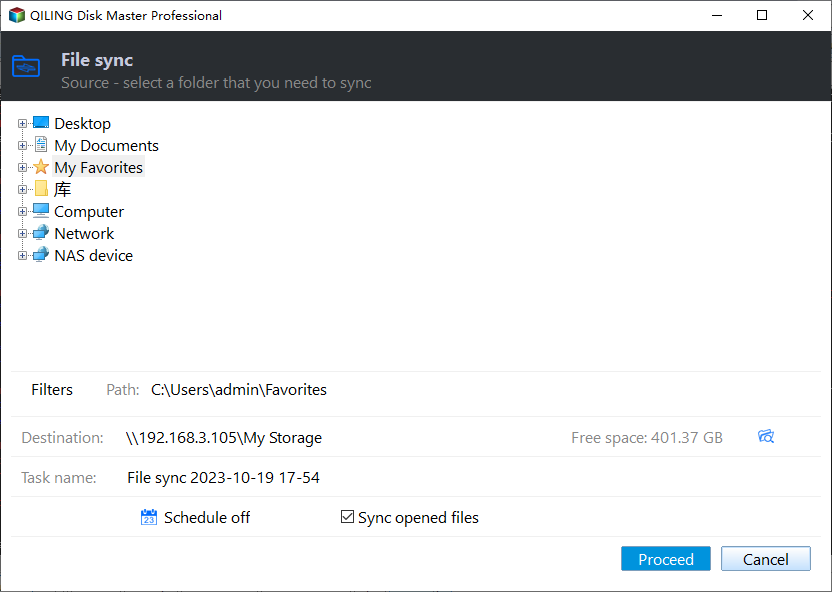
2. The Task Name can be modified according to your needs. To proceed, click on the Folder option to select the folder containing the files you wish to sync.
3. Click the inverted triangle and select Add Share or NAS Device.
4. To share a folder, first, click on the "Share" option, then type the network path or name in the next window, and you will see all shared folders. Select one folder as the destination path and click OK.
5. To schedule a sync task, click Schedule Sync, enable it, and select daily, weekly, and monthly sync options. You can also add a comment to distinguish this task from others. Then, click Proceed to share your files over a network.
- Notes:✎...
- After upgrading to the Professional version, you can use other sync options, such as File Sync, to better meet your sync needs.
- The program will automatically install a service to run scheduled tasks and run missed sync at the next system startup, ensuring that newly added files or folders are synced, even if the daily/weekly/monthly sync task is set to run at specific intervals.
- Except for daily, weekly, and monthly, you can use the Event triggers and USB plug in features. The last one is recommended if you want to copy files automatically when USB connected, instead of connecting external devices manually before this task starts.
- Do not change the folder name of your source, otherwise Qiling Disk Master will not be able to sync it anymore.
- Besides network path, you can also sync folders to cloud drives like OneDrive. For free users with limited cloud storage, Qiling Cloud offers 1TB of free storage for 15 days after signing up.
File sharing not working in Windows 10/11? Try these 6 solutions
The issue of network sharing not working in Windows 10/11 can be frustrating, but there are some workable ways to fix the problem. Users can try troubleshooting the network sharing issue by checking the network settings, restarting the network sharing service, and verifying the network connection. Additionally, users can also try to reset the network sharing settings, update the network drivers, and check for any conflicts with other network devices.
To resolve the Windows issue, try a simple system restart, which often fixes the problem. If that doesn't work, disabling antivirus software may also help. If the issue persists, consider trying the following six methods.
👉 Solution 1. Configure advanced sharing settings🔥
👉 Solution 2. Turn password protection off🔥
👉 Solution 3. Check for the Computer Browser service
👉 Solution 4. Add a Windows Credential
👉 Solution 5. Enable SMB 1.0 in Windows Feature🔥
👉 Solution 6. Disable IPv6
Solution 1. Configure advanced sharing settings🔥
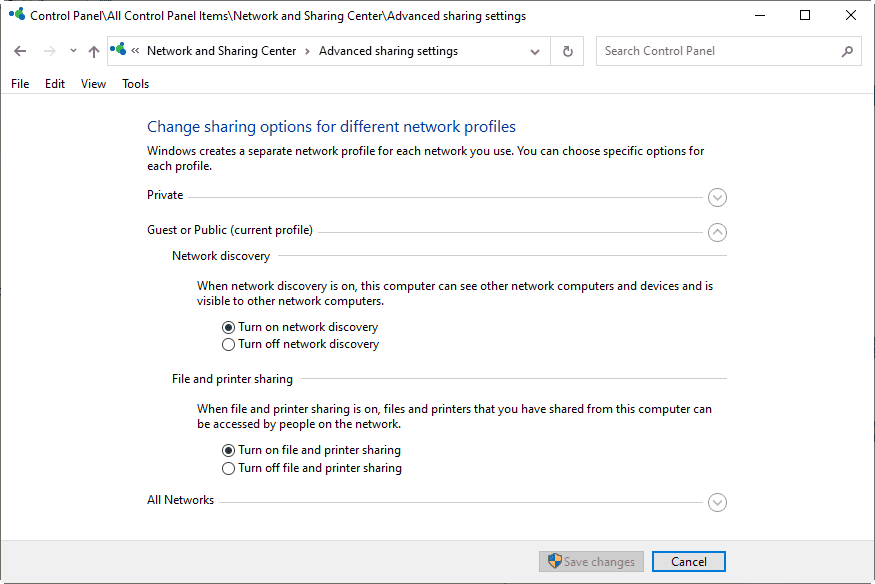
To configure the advanced sharing settings correctly, first, go to Start and select Settings. Then, click on the "Network & Internet" option and choose "Advanced sharing settings" from the left menu. Next, toggle the switch next to "Network discovery" to the "On" position and also toggle the switch next to "File and printer sharing" to the "On" position.
1. To access advanced sharing settings, go to Start, then click on Control Panel, followed by Network and Sharing Center, and finally, select Change advanced sharing settings.
2. To enable network discovery and file sharing, select the options to turn on network discovery and file and printer sharing.
3. Click Save changes to confirm.
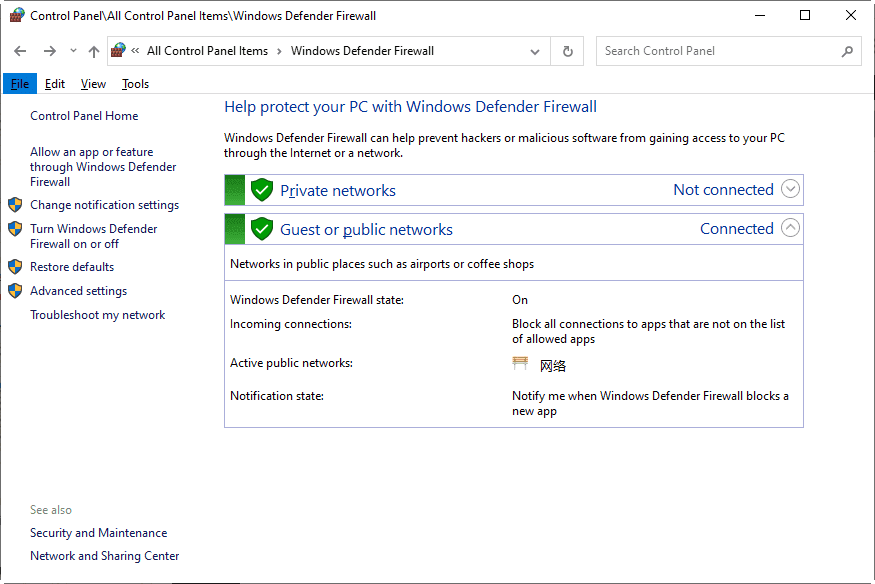
To ensure file and printer sharing is working properly, make sure Windows Firewall is not blocking it. This can be checked by going to the Control Panel, clicking on Windows Defender Firewall, then clicking on the "Turn Windows Defender Firewall on or off" option.
1. Go to Start > Control Panel > Windows Defender Firewall.
2. Select Allow an app or feature through Windows Defender Firewall.
3. Select File and Printer Sharing in the apps and features list, then click OK.
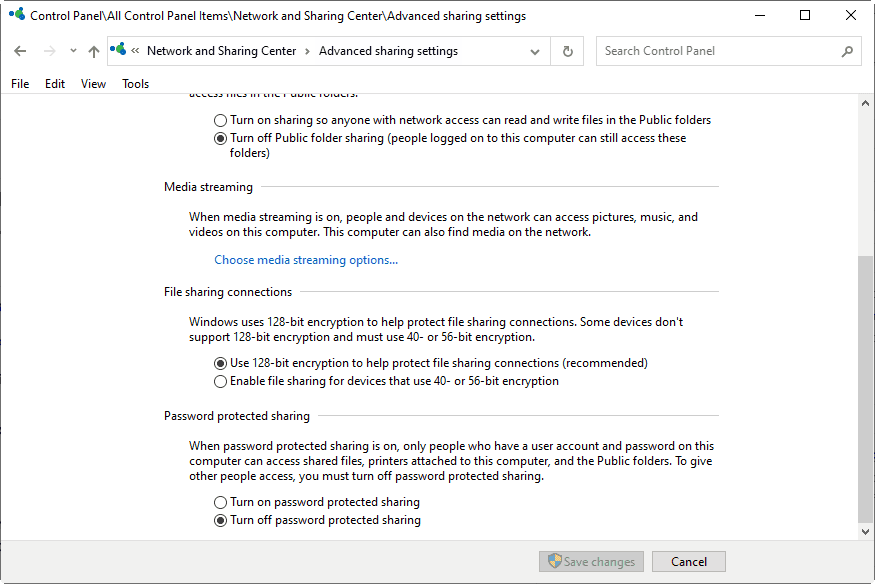
Solution 2. Turn password protection off🔥
Windows file sharing not working may be due to password-protected sharing, requiring a user account on the PC or username and password to access the shared folder, prompting some users to disable password protection.
1. To access advanced sharing settings, go to Start, then select Control Panel, followed by Network and Sharing Center, and finally Change advanced sharing settings.
2. To turn off password protected sharing, click on "Password protected sharing" and select "Turn off password protected sharing".
3. Click Save changes to confirm.
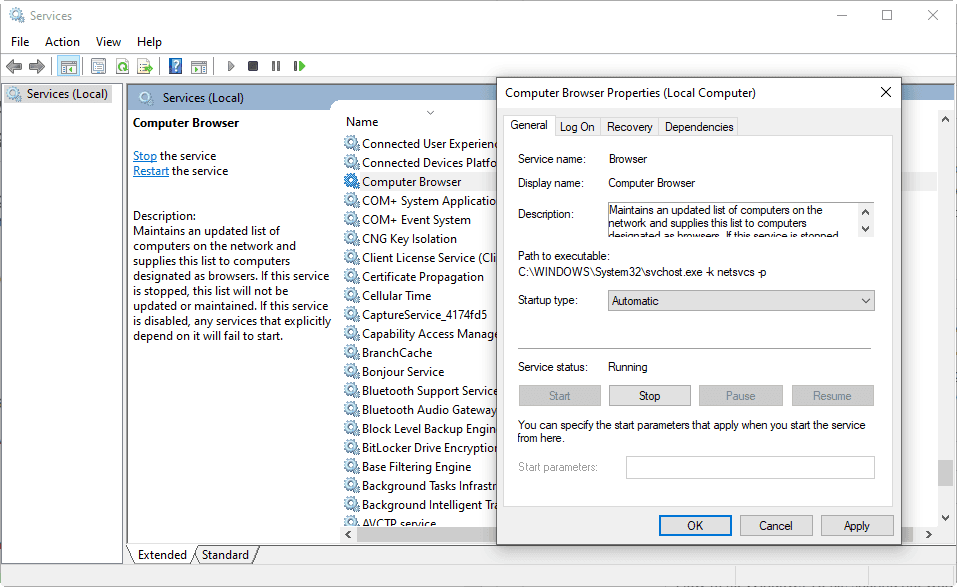
Solution 3. Check for the Computer Browser service
The Computer Browser service in Microsoft Windows allows users to easily browse and locate shared resources on neighboring computers. It can be checked if it's running in the Services.
1. Go to Start and type services.msc in Start Search.
2. To check if the Computer Browser is started, right-click on it, select Properties, and verify that it is running.
3. If the service is stopped, select Start or Restart. Ensure the startup type is set to Automatic, and then click Apply and OK to complete the process.
In addition to the file sharing service, there are other services required for file sharing that need to be checked to ensure they are started and set to automatic startup.
- Function Discovery Provider Host
- Function Discovery Resource Publication
- SSDP Discovery
- UPnP Device Host
Solution 4. Add a Windows Credential
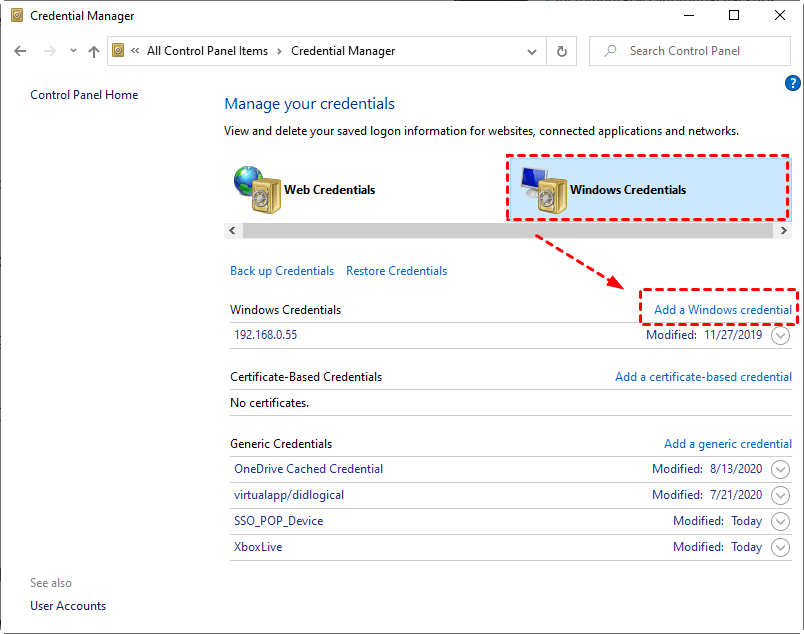
To access shared folders on a remote server from a Windows computer, you need to provide a Windows credential if you don't have one, create it first, then try again. You'll also need to know the server's IP address, your username, and password.
1. Open Control Panel, and click on Credentials Manager.
Select Windows Credentials and click Add a Windows credential.
3. Enter the IP address, username, and password in the respective boxes and click Save to save the changes.
Solution 5. Enable SMB 1.0 in Windows Feature🔥
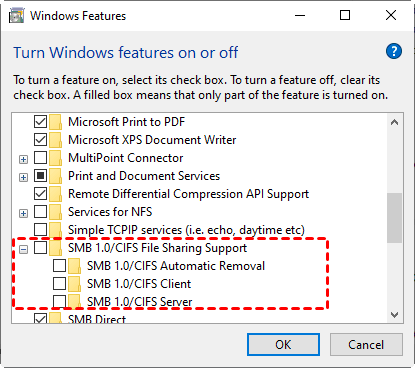
Microsoft has disabled the SMB1.0/CIFS setting in the latest Windows Update, but it's essential for file sharing. To enable it, go to Windows Features and turn it back on.
Step 1. Go to Control Panel > Programs and Features > Turn Windows features on or off in order.
Step 2. Tick SMB 1.0/CIFS File Sharing Support and click OK.
3. To resolve the issue, simply restart your computer. If the problem persists, update Windows 10 to its latest version.
Solution 6. Disable IPv6
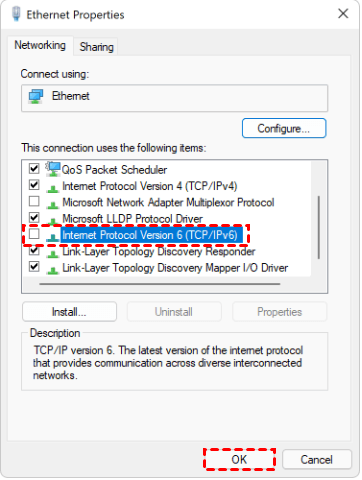
Disabling IPv6 connectivity on the systems is also an effective solution to fix the Windows 11/10 File Sharing not working issue. To do this, follow these steps:
1. To access the Network Connections window, press the Windows + R keys to open the Run dialogue box, then type `ncpa.cpl` and press Enter. This will open the Network Connections window, where you can manage your network connections.
2. Right-click on your connected network and choose Properties.
3. To disable IPv6, uncheck the box next to "Internet Protocol Version 6" and click OK to save the change.
FAQs about Windows 10 file sharing
To turn on file sharing in Windows 10, go to Settings > Network & Internet > Advanced options, and toggle the switch under "File sharing" to "On". Alternatively, you can also go to File Explorer, click on "This PC" or "Computer", right-click on the device name, and select "Properties".
To troubleshoot file sharing issues on a Windows 10 home network, start by checking the network connection and ensuring that both the computer and the network are functioning properly. Next, check the file sharing settings on the computer, making sure that the "File and printer sharing" option is enabled.
To troubleshoot Windows 10 file sharing not working after an update, check the Network and Sharing Center for any issues, and ensure the File and Printer Sharing service is running. Also, check for any firewall rules blocking file sharing, and try restarting the Windows File Explorer.
Summary
To fix Windows 10 file sharing not working problem, you can try the solutions stated in this article, which include checking the network settings, restarting the Windows 10 computer, checking for Windows updates, resetting the file sharing settings, checking the firewall settings, and using the Network and Sharing Center to troubleshoot the issue.
| 🔧Configure advanced sharing settings | To set up file sharing, go to settings, then accounts, then sync your content, then advanced sharing settings. From there, you can choose to share your files with others. |
| 🔐Turn password protection off | The Windows file sharing not working issue may be caused by password protected sharing, which can be resolved by disabling the feature. |
| 📂Check for Computer Browser service | Computer Browser service is a feature of Microsoft Windows to let users easily browse and locate shared resources in neighboring computers. |
| 📍Add a Windows Credential | To access shared folders on a remote server, a Windows credential is required. |
| 📜Enable SMB 1.0 | Microsoft Windows Update disables the SMB1.0/CIFS setting, which is necessary for file sharing, so it needs to be enabled manually. |
| ⚙Disable IPv6 | IPv6 connectivity issues may cause compatibility problems with certain devices on your network. |
To resolve network sharing issues, consider using Qiling Disk Master to synchronize two folders on the same computer, or to automatically sync files to an external hard drive or a network drive.
This software offers various features, including cloning files to an external hard drive, backing up files, and restoring files from a backup image. These functions can help prevent file loss, making it a useful tool for users. Users can try it out themselves to explore its capabilities further.
Related Articles
- How to Sync Files & Folders in Real-Time in Windows 10/8/7
Perform real time sync with the best software to keep all files and folders always up to date, no delay at all. Find the step-by-step guide in this article. - How to Sync Any Local Folder to OneDrive in Windows 10/8/7
OneDrive is free online storage that comes with your Microsoft account. Learn how to sync local folders to OneDrive easily from this page. - Dropbox Not Syncing in Windows 10 - How to Fix and Sync Files
Dropbox not working in Windows 10? You can fix this issue with 6 solutions below or directly sync files with an easier way. - File Transfer Stops/Freezes in Windows 10 | Solved
Are you confronted with the problem that file transfer freezes in Windows 10? Don't worry! Read this article patiently to get four effective solutions and a free file transfer tool to help you.

