Migrate Windows OS from Physical Computer to Virtual Machine
- Is it necessary to migrate OS to virtual machine?
- Need a professional backup and restore software
- How to migrate OS P2V and boot successfully
- Part 1: Create system image of physical computer
- Part 2: Export ISO image file of physical computer
- Part 3: Transfer OS to virtual machine and boot from it
- Written in the end
Is it necessary to migrate OS to virtual machine?
"I have Windows Server 2003 installed on my server. I'd really like to be running it via VMWare EXSi as a virtual machine, but I don't know what have to reconfigure the whole deal. Is there a relatively painless way to move it to a virtual machine? It will be staying on the same box with the exact same hardware... nothing changes."
Like this user, there are a lot of users also want to move operating systems to virtual machine. But some of them may have a similar question: is it necessary to migrate OS P2V? I can do anything on my physical computer, why do I need to use a virtual machine? It occupies much disk space and my computer may run out of space sooner or later.
Yes, virtual machine takes up much space. But you can enjoy many advantages in virtual machine that physical computer does not have. Here, I’ll explain in details.
- The most obvious advantages is that you can do any risky operation (eg: test software, do uncertain operation like reinstalling Windows) on virtual machine and it does not damage your physical machine. Even if your virtual machine is damaged, you can restore it with system backup or disk backup.
- Virtual machine allows you to copy and paste data from virtual machine to physical machine as long as you install the VM Tools in virtual machine. Thus, if you copy and paste data to physical compute before the virtual machine is damaged, you will not lose data.
Need a professional backup and restore software
Like restoring image to a different computer, you may encounter boot failure because of hardware issue if you want to transfer OS from physical computer to virtual machine. Because the hardware of virtual machine is determined by the physical computer.
So, you need to use a professional backup and restore software that can solve dissimilar hardware issue. Here, I highly recommend you Qiling Disk Master Server. It has 2 magic features you may need.
- Create Bootable Media: With this feature, you can create a bootable media to boot from physical computer or virtual machine. It has 3 options, including USB bot device drive, Burn to CD/DVD, or Export ISO file. You can select one of them according to your needs.
- Universal Restore: This feature is designed for users who want to restore virtual machine on a computer with different CPU, motherboard, etc. And its aim is to ensure secure boot after restoration.
How to migrate OS P2V and boot successfully
Whether your virtual machine is on the same computer or different computer, you can use Qiling Disk Master Server. And all the steps are very similar, so you can use the following steps as a reference.
The entire process are divided into 3 parts, including create system image backup, export ISO image file, restore virtual machine with ISO file. Now, let’s start to move OS to virtual machine.
Part 1: Create system image of physical computer
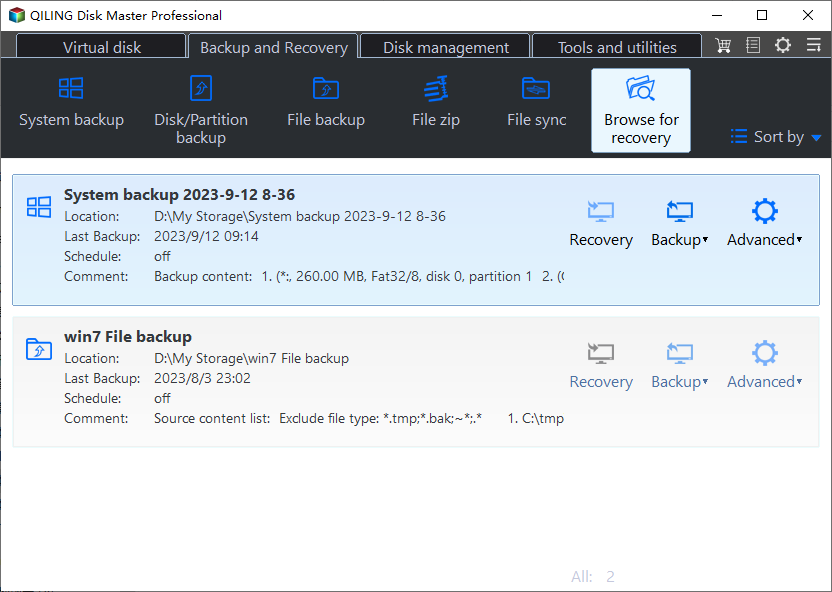
To backup system, you need to use “System Backup” in Qiling Disk Master Server. Just Download Qiling Disk Master > select “System Backup” in the main page >choose destination path for your backup and click “Proceed”. For destination path, you can backup to external hard drive, USB drive, cloud drive, NAS, etc as long as your computer can recognize it.
Part 2: Export ISO image file of physical computer
To export ISO file, you will use “Create Bootable Media” of Qiling Disk Master. Open this software, go to “Tools” > “Create bootable media” > select bootable disc type and PE boot mode > then tick “Export ISO file” in the “Select Bootable Media” window and click “Next”. After that, save the ISO image file to USB drive.
Part 3: Transfer OS to virtual machine and boot from it
Step 1. Download the latest version of VMware, install and launch it.
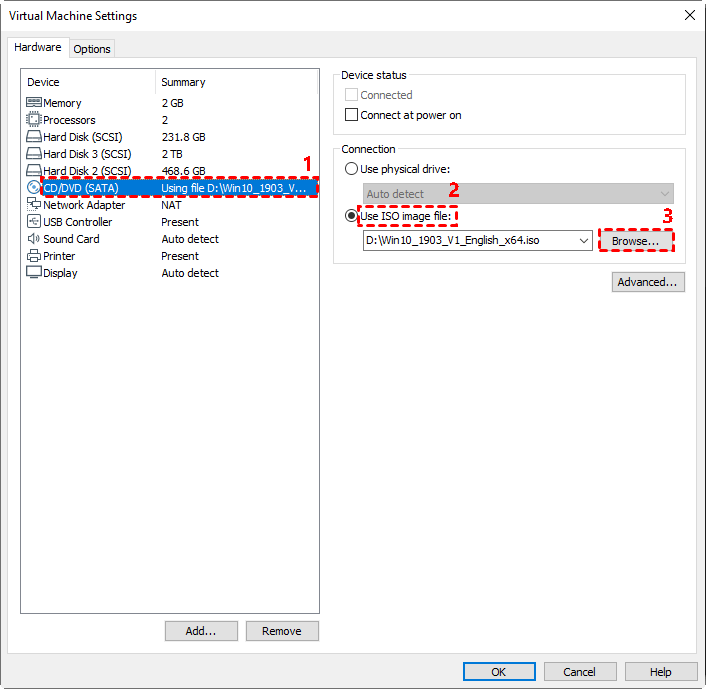
Step 2. Change the connection of virtual machine. Open a virtual machine using VMware, go to “VM” and “Settings”, then select “CD/DVD” and “Use ISO image file”, click “Browse” to find the image file on your USB and hit “OK” to save the changes.
Step 3. Boot from the ISO image file created by Qiling Disk Master. Go to “Power” option, select “Power On to Firmware”, go to the “Boot” tab and use “+” to move CD/DVD as the first boot option, then press “F10” to save changes and boot from the image file. A few seconds later, you will see the main page of Qiling Disk Master.
Step 4. In the main page of Qiling Disk Master, click “Restore” and “Select Image File”.
Step 5. Tick “Restore this system backup” and click “Next”.
Step 6. Select a destination path for your backup and click Next.
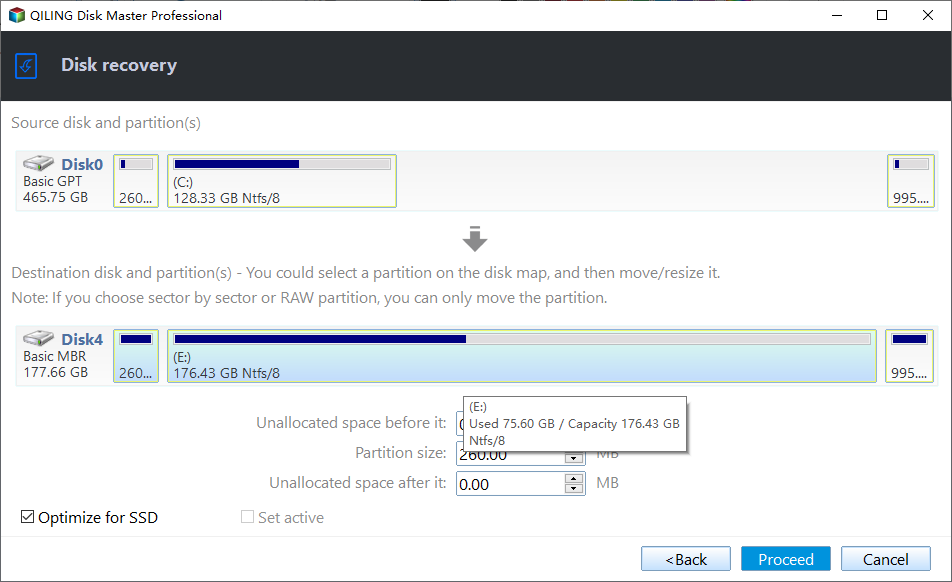
Step 7. If your virtual machine is on a computer with different hardware, the “Universal Restore” feature will be checked by default. If not, just ignore it. Then, click “Proceed”.
Tips:
• There’s another way to replace bootable ISO file called PXE Boot Tool. Using PXE Boot Tool to do universal restoration.
• Besides migrating OS to VMware, Qiling Disk Master also supports migrating OS from virtual machine to physical computer (V2P) and from VM to VM (V2V).
• There are several editions of Qiling Disk Master. You should go to edition comparison and choose the right one according to your situation and needs. Usually, FREE Standard edition is recommended; However, if you need advanced features, you should try Qiling Disk Master Professional or other advanced version.
Written in the end
Migrating OS from physical computer to virtual machine is very similar to migrate computer to another one. You can use backup and restore feature to achieve this goal. During the restoration process, the most important part is to tick “Universal Restore” feature if your computer has different hardware.
By the way, in virtual machine, using ISO image file is more convenient than USB device or CD/DVD. So, you’d better tick “Export ISO file” in the “Select Bootable Media” window.
Related Articles
- How to Migrate Physical PC to Virtual Machine in Windows 10/8/7
Physical PC to virtual machine migration is very helpful for users to do operations that may do harm to physical computer. Qiling Disk Master is a good software to convert physical PC to virtual machine. - 3 Best Practices for P2V (Physical to Virtual) Migration
Need to migrate Windows system from physical to virtual machine? Learn 3 best practices for P2V migration from this page. - Convert Virtual Machine to Physical with Qiling Disk Master
Converting a virtual machine to a physical computer is more widely used than ever. The universal restore function in Qiling Disk Master supports to do it with simple operations. - How to Backup Alienware Laptop on Windows 7/8/10?
Find the best way to backup Alienware laptop in Windows 10, 8, 7 in case of data loss due to hardware failure, system crashes, etc.


