Windows Server 2012 Wbadmin Backup and Restore Tutorial
📖 Quick Navigation:
- Overview of Wbadmin commands
- How to use Wbadmin in Windows Server 2012
- Easier way to perform Windows Server 2012 backup and restore
- Wrapping things up
Overview of Wbadmin commands
Wbadmin is a powerful command-line tool for Windows operating systems, allowing users to backup and recover operating system, drive volumes, computer files and folders, and apps. This guide will walk you through the process of using Wbadmin to perform these tasks.
Wbadmin, a built-in command-line tool for Windows, creates backup files in the form of Microsoft's Virtual Hard Disk (.VHD) files, accompanied by .xml configuration files. These backup files can be mounted in Windows Disk Manager, allowing for easy recovery and verification of the backed-up data.
Specifically, with the help of Wbadmin, you can enable, create, restore, disable, stop, delete backup, and get information of backup and its content. For the detailed WBadmin syntax and explanation, you can refer to the Microsoft TechNet website.
How to use Wbadmin in Windows Server 2012
Wbadmin, a powerful command-line tool, enables users to manage backups and recoveries in Windows Server 2012 and later operating systems. This includes Windows Server 2012, 2012 R2, 2016, 2019, and 2022. To use Wbadmin, Windows Server Backup must be installed on the server computer.
Install Windows Server Backup before using Wbadmin
1. Open Server Manager, and select Manage > Add Roles and Features.
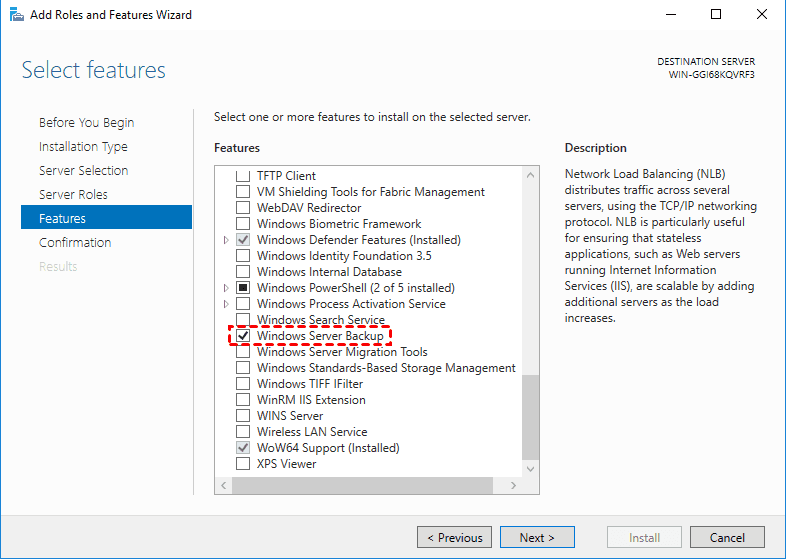
2. Choose the default settings until go to the Select Features window, scroll down and select Windows Server Backup, and click Next.
3. Press Install, and it will start to install this feature automatically. After this process completes, just close this window.
Run Wbadmin to backup Windows Server 2012
Here you will see four examples to backup Windows Server 2012 with Wbadmin, including bare metal backup, backup to network share, hyper-v backup and Wbadmin scheduled backup Server 2012. Let's get it on.
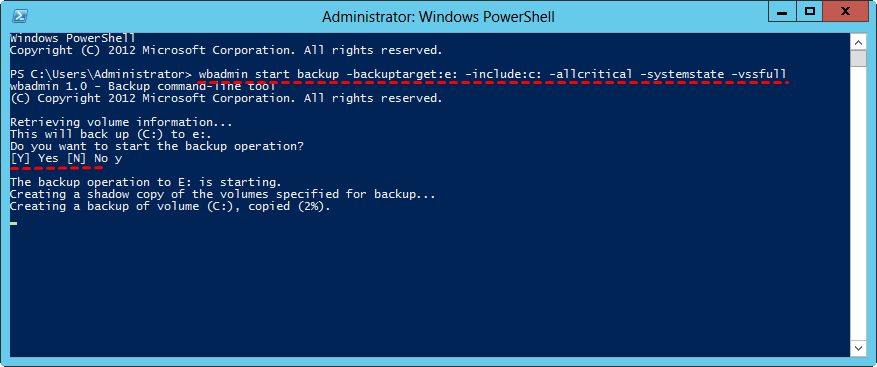
💙 Example 1: To perform a bare metal backup of your Windows Server 2012 system to the E: drive, you can use the following command in the Command Prompt:
wbadmin Proceed -backuptarget:e: –include:c: -allcritical -systemstate -vssfull
Note: The -allcritical switch will include all items for a bare metal recovery. Whether you add -systemstate switch or not, it makes no difference to what will be included in the backup, leaving you the option to run a system state recovery without restoring the whole server.
💙 Example 2: To create a backup that includes the C: drive and the Video folder on the D: drive to the network drive, you can use the following command in the Command Prompt:
wbadmin Proceed -include:c:,d:\video -backuptarget:\\192.168.1.222\backup -user:1 -password:1 -quiet
Notes:
✔ When you specify more than one item with -include: switch, use commas to separate them without space.
✔ The -user and -password switch is needed when specifying a network location as the backup target.
✔ The -quiet switch means this backup will run without prompting you.
✔ You can also specify more than one time of a day to run the backup.
💙 Example 3: To create a backup of a Windows Server 2012 Hyper-V virtual machine and save it to the C: drive, you can use the following command in the Command Prompt:
wbadmin Proceed –backuptarget:c: –hyperv: "Server 1"
💙 Example 4: To create a daily scheduled system state backup to the G: drive, you can use the Task Scheduler in Windows Server 2012. Here's how to do it:
wbadmin enable backup -addtarget:g: -systemstate -schedule:06:44
Note: The -schedule switch is to specify the time to run the WBadmin scheduled backup.
Wbadmin restore backup in Windows Server 2012
Like the backup operations, here are 4 examples to restore backup with Windows Server 2012 Wbadmin. To perform bare metal recovery, you need to boot into Windows Recovery Environment and open command prompt.
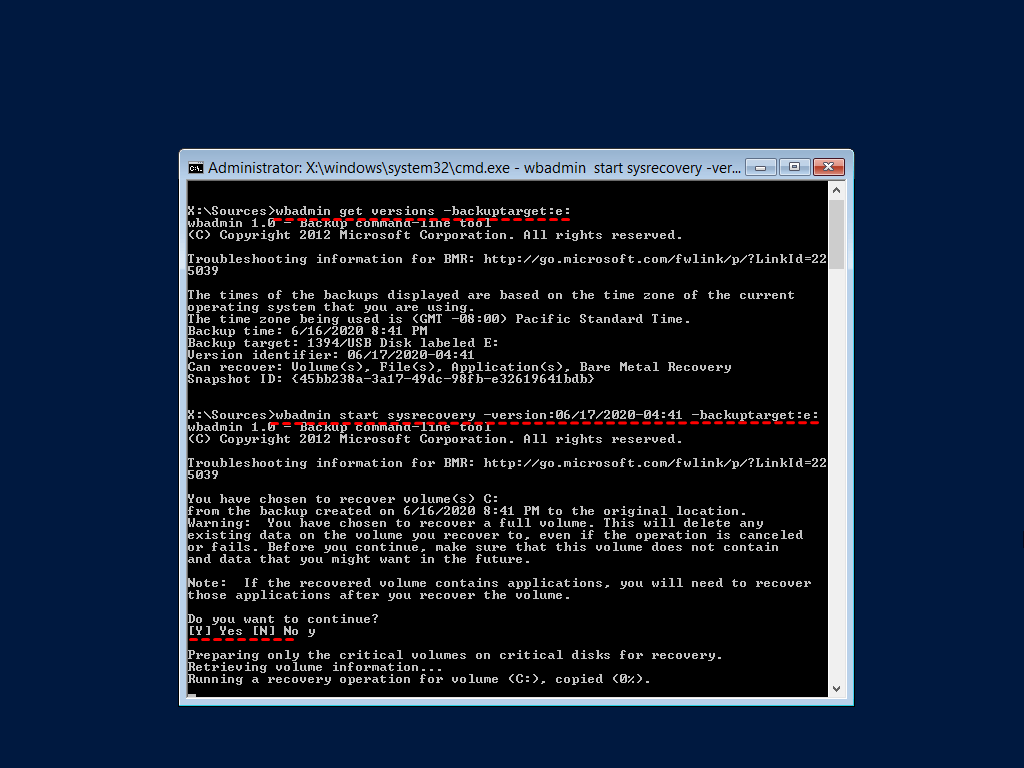
💙 Example 1: To restore a backup created on June 17, 2020 at 04:41, and saved on E drive, type as follows.
wbadmin start sysrecovery –version: 06/17/2020-04:41 –backuptarget:e: -machine: Server 1
Notes:
✔ To restore a backup, you need to type the following commands to get backup version identifier and backup location. Please note the drive letter may change under Windows RE, so GUID-based path will be a better choice.
To find the backup version identifier, you can use the following command:
• To get the volume GUID-based path: mountvol
✔ To list items of a backup, use "wbadmin get items –version: -backuptarget:".
✔ When backing up multiple computers to the same backup target, you can use the `-machine:` parameter to specify the name of the machine being backed up.
💙 Example 2: To restore a backup on network location, run the following command.
wbadmin start recovery –version: 06/17/2020-05:33 –backuptarget: \\192.168.1.222\backup -machine: Server 1
💙 Example 3: To restore hyper-v backup created on June 17, 2020 at 06:28, and the backup location is E: drive, type as the following command.
wbadmin start recovery –version:06/17/2020-06:28 –itemtype:hyperv –items:"Server 1" -backuptarget:e:
💙 Example 4: To restore a system state backup created on June 17, 2020, at 06:44, and saved on E drive, type the following commands.
wbadmin start systemstaterecovery -version:06/17/2020-06:44 –backuptarget:e:
Note: If you want to specify the backup location, you can add the `--backuptarget` parameter to the command.
Delete Windows Server 2012 backup with Wbadmin
As the number of backups increases, your backup disk will eventually become full. To manage your backup disk space, deleting old backup files on Windows Server 2012 is essential. Here are three parameters you can use to delete backup files, whether they're system state backups or non-system state backups.
- [-version]: to delete specific version(s)
- [-keepVersions]: to delete all backups but the specified versions
- [-deleteOldest]: to delete the oldest backup
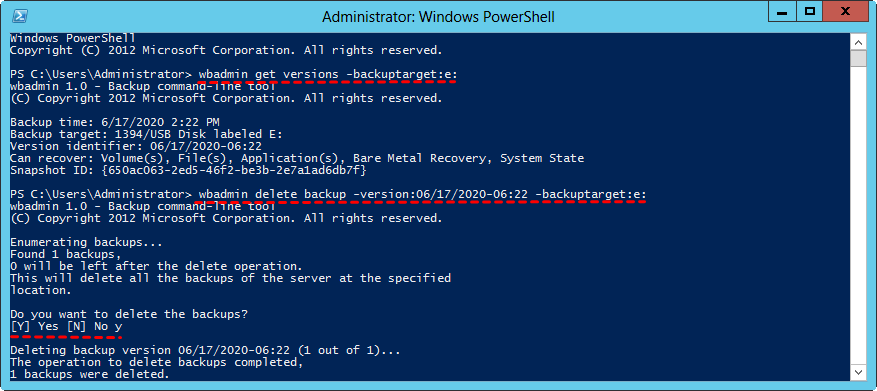
💙 Example 1: To delete non-system state backup taken on June 17, 2020 at 06:22, and saved to E drive, copy and paste the command below.
wbadmin delete backup -version: 06/17/2020-06:22 -backupTarget:e:
💙 Example 2: To delete all system state backup on E drive except the latest three versions, run the command below.
wbadmin delete systemstatebackup -keepVersions:3 -backupTarget:e:
Note: In Windows Server 2008 R2 and other previous versions of Windows Server, the Windows Server Backup (WSB) tool does not allow you to directly delete non-system state backups. However, you can delete the corresponding shadow copy on the backup target location as a workaround.
If you're familiar with the Wbadmin syntax and parameters, you can easily backup, restore, and manage backups in Windows Server 2012. However, if you're not familiar with it, you may find it challenging. You'll need to learn the syntax and parameters, and even a small error can cause the operation to fail.
And it still has some limitations, for example, it only works for partition formatted with the NTFS file system, you can only create one schedule backup, etc. Thus, you may want an easier way to backup and restore Windows Server 2012. You could use a professional server backup software.
Easier way to perform Windows Server 2012 backup and restore
Except for Wbadmin, you can still use a third-party server backup software with graphic user interface. Qiling Disk Master Server is a great option, widely used in all the Windows opeating systems, including 2003/2008 (R2)/2012 (R2)/2016 (R2)/2019/2022 and Windows XP/Vista/7/8/8.1/10/11.
★You can set the backup frequency you want, such as daily/weekly/monthly schedule backup.
★ You can also backup at a specific event with event triggers or use dedicated storage device for backup, backup computer to USB flash drive automatically with USB plug in feature, for example.
★ You can choose to backup only changed files with incremental and differential backup instead of backup everything.
★ You can also set how to delete old backups, such as by quantity, by time, by daily/weekly/monthly and by space.
Besides these features, it still works well in any detected storage by Windows, for example, internal/external hard disks, solid-state drives (SSD), USB flash drives/pen drives, hardware RAID array, dynamic disk, and network share. And it supports partitions or disks formatted with all file system, not just NTFS, such as FAT32, FAT16, EXT2, and EXT3.
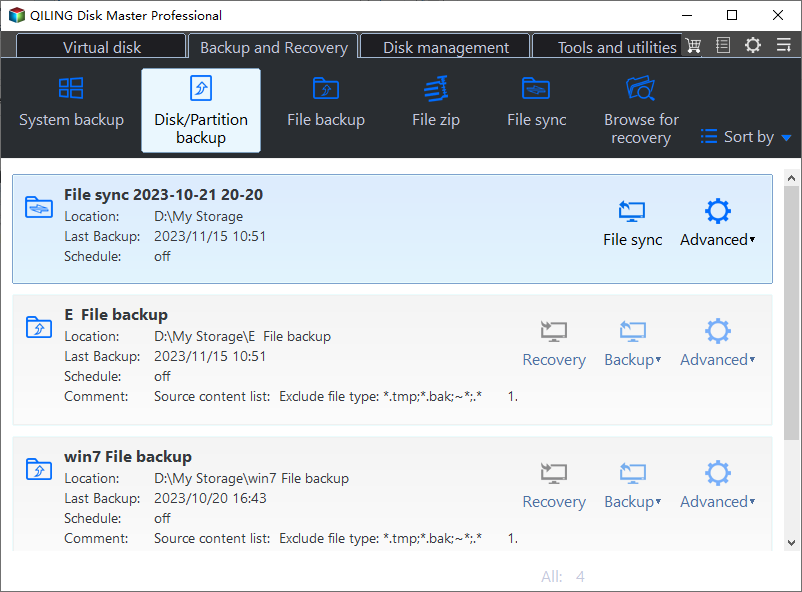
In this section, we will explore how to perform Windows Server 2012 backup and restore using Qiling Disk Master Server as an alternative to Wbadmin.
Backup Windows Server 2012 with Qiling Disk Master Server
To create a disk backup using Qiling Disk Master Server, follow these steps:
Note: If you want to create system backup, partition backup or file backup, click the corresponding backup type and follow its on-screen instructions.
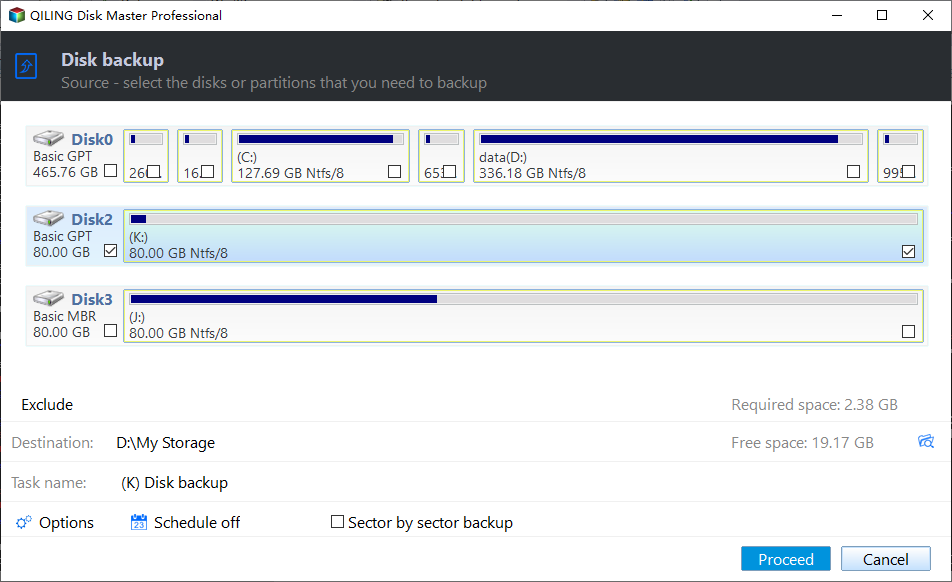
Then, you will see the Disk Backup page, click "Disks" to select the disk you want to backup. To add multiple disks, select disk one by one.
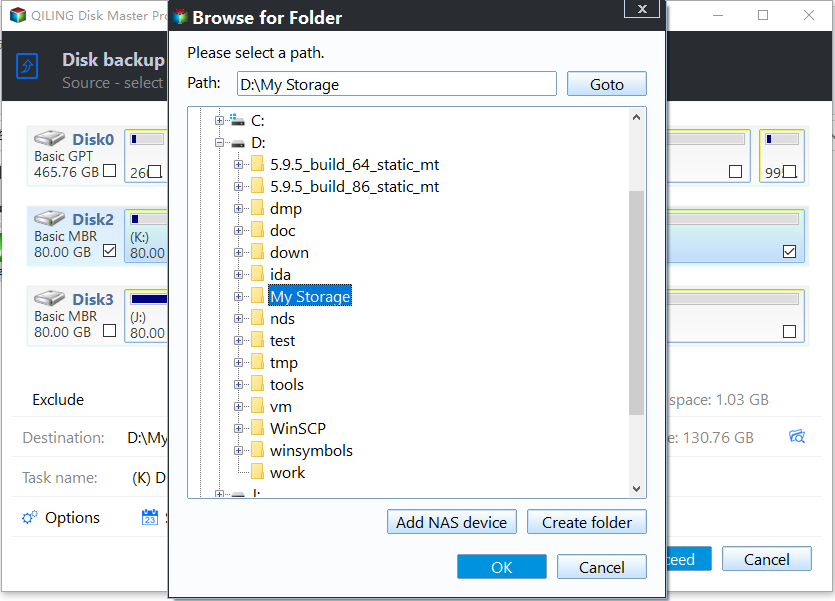
To select a destination for your backup using Qiling Disk Master Server, follow these steps:
- Select a local path: It helps you to backup Windows Server 2012 to external hard drive (HDD or SSD) and USB drive.
- Add Share or NAS Devices: Qiling Disk Master Server is a powerful tool that enables you to backup your Windows Server 2012 system to a network drive or NAS device. Here's how you can use it:
Qiling Disk Master Server is a powerful tool that enables you to backup your Windows Server 2012 system to a network drive or NAS device. Here's how you can use it:
If you want to make the backup task more flexible, you need to add some backup settings in the "Options", "Schedule Backup", and "Backup Scheme".
- For backup options: You can enable email notification, encryption, compression, comment, pre/post-command, etc.
- For schedule backup frequencies: To set up automatic backups with Qiling Disk Master Server, you can follow these steps:
- For specific events or devices: To automate Server 2012 backups, you can use Event Triggers or USB plug-in triggers. Here's how:
- For backup methods: To optimize Server 2012 backups, it's highly recommended to use incremental or differential backup methods. These methods allow you to backup only changed files, significantly reducing backup time and disk space usage.
- For cleanup methods: To optimize backup management in Server 2012, you can configure backup retention rules. These rules allow you to automatically delete or retain backup sets based on specific criteria, such as the number of backup sets or exceeding days.
Tip: To efficiently backup multiple servers, it's recommended to create a portable version of the software, specifically the Technician or TechPlus edition. This approach enables you to use the software on any PC without the need for reinstallation, making it a convenient and time-saving solution.
Restore Windows Server 2012 with Qiling Disk Master Server
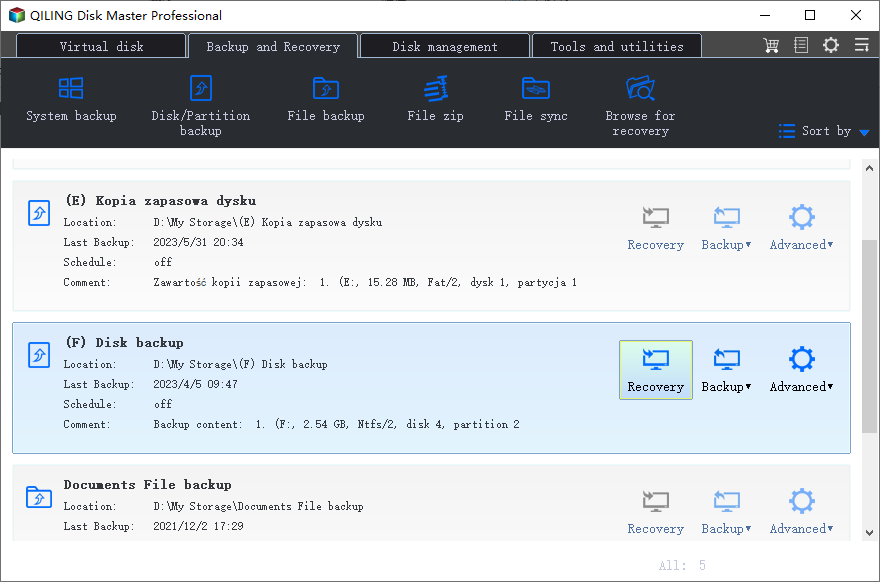
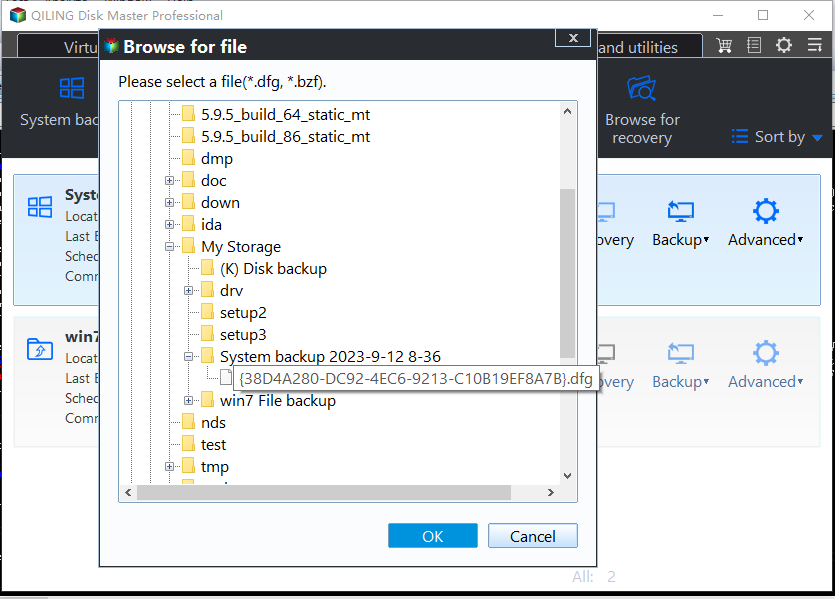
To restore backup created by Qiling Disk Master Server, go to the "Restore" tab and then choose "Select Task" or "Select Image File", depending on if your backup can be recognized directly.
Note: If your computer is unbootable, you'll need to create a recovery disk on a working computer first. This disk will contain the necessary tools to restore your failing computer. Here's how to create a Windows Server 2012 recovery disk:
If you choose "Select Task", you will be asked to select the backup image you want to restore. If you choose "Select Image File", please directly go to the next step.
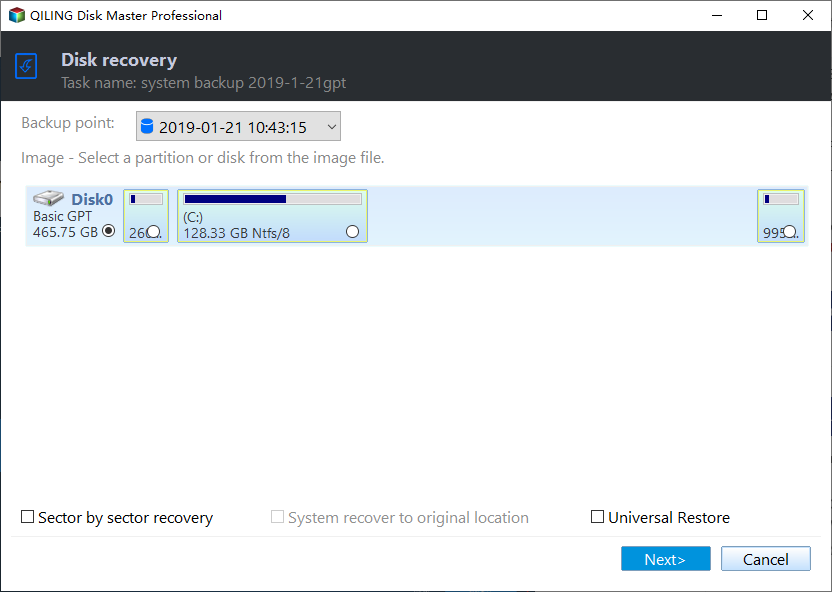
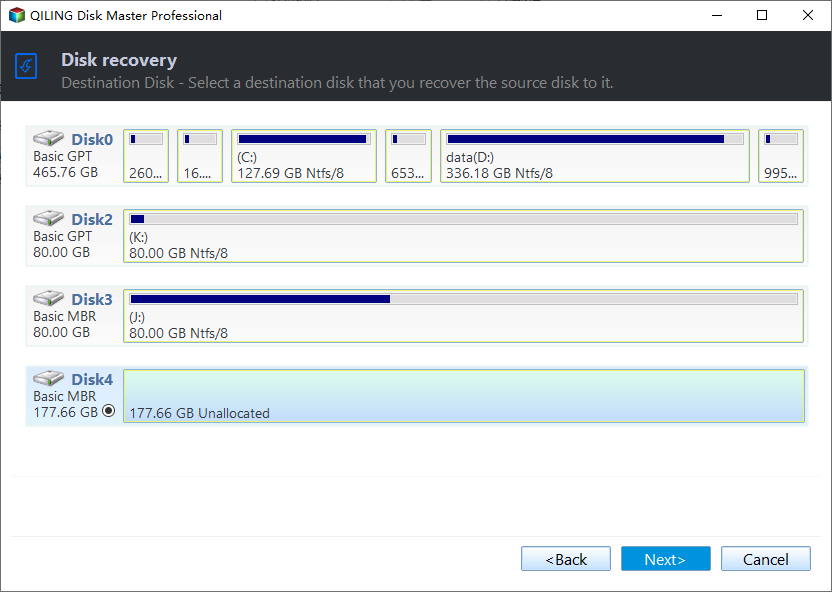
Then, you need to select the items you want to restore. Don't select "System recovery to original location" if you want to restore everything from this backup and click "Next".
If you've created a Windows Server 2012 recovery disk, you can use it to restore a backup image of your computer. Here's how to do it:
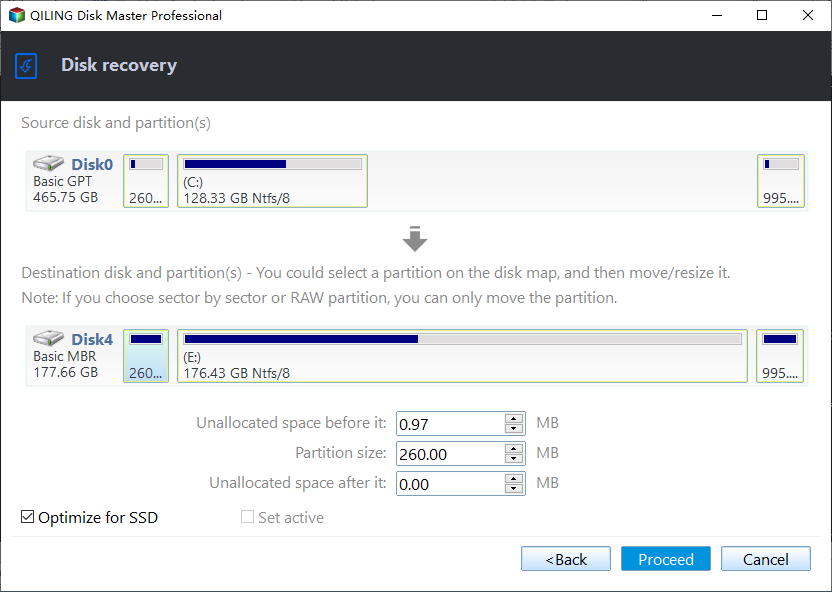
Now, you need to confirm the restore info and click "Proceed" to restore Windows Server 2012.
👉 Other options you may need:
- "SSD Alignment": When restoring Windows Server 2012 to an SSD disk, you can enable the "Accelerate SSD" feature to improve its reading and writing speed. This feature can help to:
- "Edit Partitions": When restoring Windows Server 2012 to a destination disk that is larger than the source disk, you need to adjust the partition size of the destination disk to ensure it shows its full capacity. If the partition size is not adjusted, the destination disk may not show its full capacity, which can lead to issues with storage and data management.
- "Universal Restore": When restoring a disk image to a new computer with dissimilar hardware, you may encounter driver compatibility issues. To resolve this, you can enable the "Driver Signature Verification" feature, which allows the system to load drivers that are not digitally signed.
- Qiling Image Deploy is a powerful tool that enables you to deploy backup images to multiple computers, even an unlimited number, as long as your computer supports booting from PXE or network. This feature is available in the Technician or TechPlus edition.
Wrapping things up
Windows Server 2012 Wbadmin commands provide a powerful way to manage backups, restores, and deletions of images on your server. In this guide, we will walk you through the process of using Wbadmin commands to backup, restore, and delete images.
Are you looking for a reliable and efficient way to backup your data? Look no further than Qiling Disk Master Server, a powerful disk backup software that makes it easy to schedule backups and restore data in case of loss or corruption.
Related Articles
- Create Backups with Windows Server Backup Command Line
You will learn how to use Windows Server Backup command line with Wbadmin or third-party tool. Besides, you can use the GUI version of backup software if you want a simpler way. - Step-by-step to Create Incremental Backup with WBADMIN Tool
If you don't clearly know Wbadmin incremental backup, keep reading this article, it helps you save much time and disk space, especially in a scheduled task. - Create Files and Folders Backup with Wbadmin Command Line
Learn how to use Wbadmin command line to backup files and folders in a different system and restore files if needed. The easier way is included. - How Can I Restore Windows System Image to a Smaller Disk?
Restoring system image to a smaller disk can be easily achieved as long as you seek help from the right software. You could rely on Qiling Disk Master.
