Backup and Restore with Windows Server 2016 Wbadmin
What Is the Wbadmin command line?
WBAdmin is a command line tool in Windows Vista, 7, 8, 10, and 11, Windows Server 2008 (R2), Server 2012, Server 2016, Server 2019, Server 2022 to backup and restore Windows opreating systems, drive volumes, files, folders, and installed programs, etc. Automatic backup is supported.
And it's a disk-based backup system. You can use it to create a bare metal backup for similar or dissimilar hardware restore, this is very useful when your computer runs into serious issues. The backup file(s) are created in form of virtual hard disk (.vhd) files with some accompanying .XML configuration files, and you can view content by mounting it in Windows Disk Manager.
It replaced the previous NT backup that is used to create backups in Windows NT4.0, Windows 2000, Windows XP, and Windows Server 2003.
Learn Wbadmin Syntax in Server 2016
The wbadmin command-line tool is used in Windows Server 2016 to backup and restore system and data. Before you use this tool, it's essential to understand its syntax and some necessary commands.
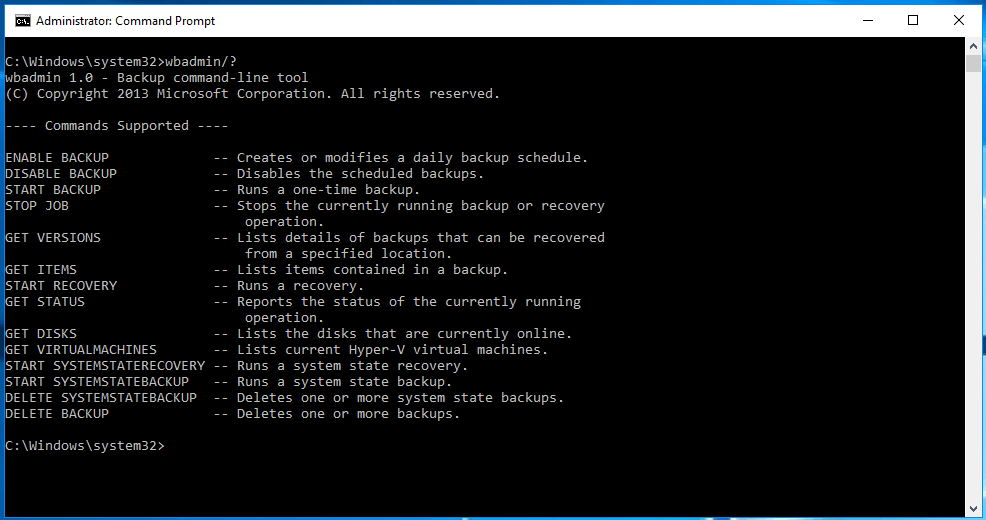
Input cmd in Windows Server 2016 search box, choose command prompt and select Run as administrator. Then, type Wbadmin/?, wait for a moment, and you will see all the WBAdmin commands.
|
Wbadmin enable backup |
Create or modifies a daily backup schedule. |
|
Wbadmin disable backup |
Disables the scheduled backups. |
|
Wbadmin Proceed |
Runs a one-time backup. |
|
Wbadmin stop job |
Stops the currently running backup or recovery operation. |
|
Wbadmin get versions |
Lists details of backups that can be recovered from a specified location. |
|
Wbadmin get items |
Lists the items included in a backup. |
|
Wbadmin start recovery |
Runs a recovery. |
|
Wbadmin get status |
Shows the status of the currently running operation. |
|
Wbadmin get disks |
Lists disks that are currently online. |
|
Wbadmin get virtualmachines |
Lists current Hyper-V virtual machines |
|
Wbadmin start systemstaterecovery |
Runs a system state recovery. |
|
Wbadmin start systemstatebackup |
Runs a system state backup. |
|
Wbadmin delete systemstatebackup |
Deletes one or more system state backups. |
|
Wbadmin delete backup |
Deletes one or more backups. |
How to Use Wbadmin in Windows Server 2016
To use the `wbadmin.exe` in Windows Server 2016 to create backups and restore data, follow these steps and learn the command line carefully to avoid errors.
Prepare for the use of Wbadmin
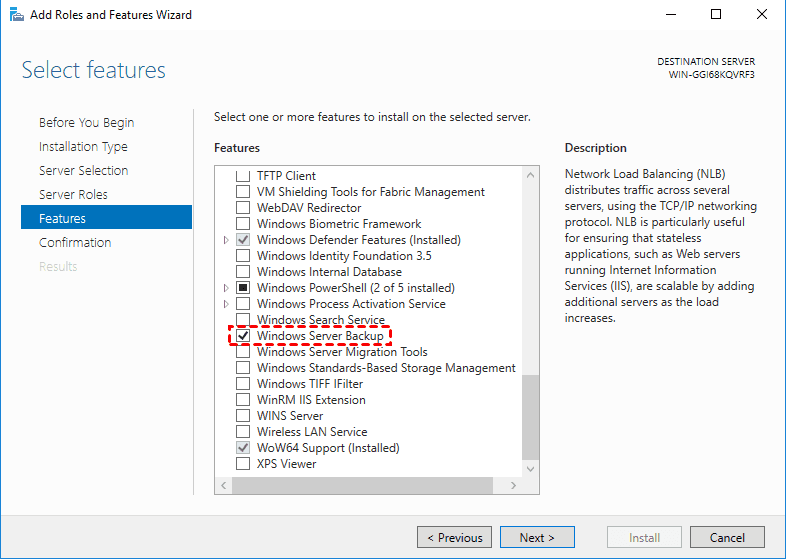
Some users may receive the Windows Server 2016 WBAdmin.msc is missing error during the use of backup, that's because you may not install Windows Server Backup, or Network Load Balancing (NLB). If you still don't install them, please follow the steps below.
▆ To install Windows Server Backup:
1. Open Server Manager, and select Manage > Add Roles and Features.
2. Choose the default settings until go to the Select Features window, scroll down and select Windows Server Backup, and click Next.
3. Press Install.
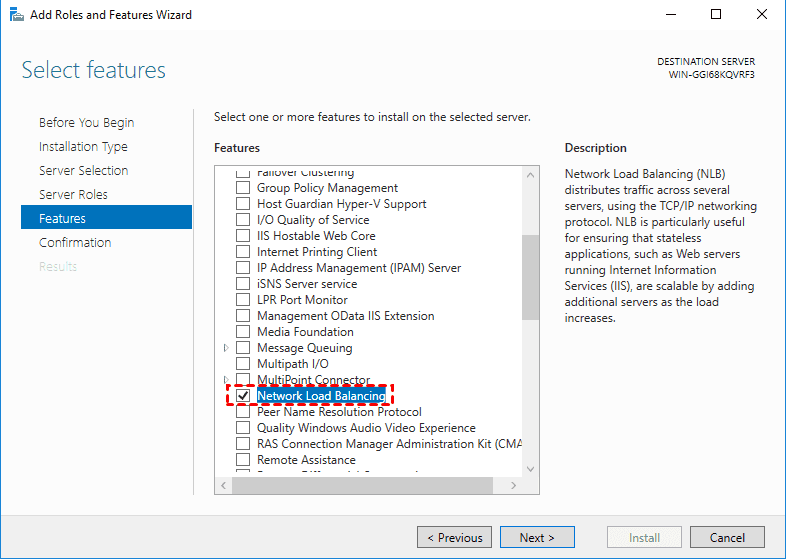
▆ To install Network Load Balancing:
If you installed Windows Server Backup and run as administrator and the WBAdmin.msc still missing, please uninstall Windows Server Backup, restart the server, and install the Network Load Balancing (NLB) along with the Windows Server Backup.
Create Backups with WBAdmin
▆ To create a system state backup, use the command: Wbadmin start systemstatebackup –backuptarget:[backup location] [-quiet]
- When using Windows Server Backup, it's essential to set the correct backup location to ensure that your backups are stored safely and can be restored when needed. The backup location should be a drive letter, volume GUID, or network address.
- The switch "–quiet" means to execute the backup without prompt.
For example: WBAdmin start systemstatebackup –backuptarget: E: -quiet
▆ To create a bare metal backup To configure bare metal backup in Windows Server 2016 using the WBAdmin command line, follow these steps:
To create a bare metal backup in Windows Server 2016 using the WBAdmin command line, follow these steps:
wbadmin Proceed -backupTarget:E: -allcritical –systemstate -vssfull
- -vssfull: Performs a full backup using the Volume Shadow Copy Service (VSS)
- -allCritical: Specifies that all critical volumes (volumes that contain operating system's state) be included in the backups. This parameter is useful if you're creating a backup for bare metal recovery.
- -systemState: Creates a backup that includes the system state.
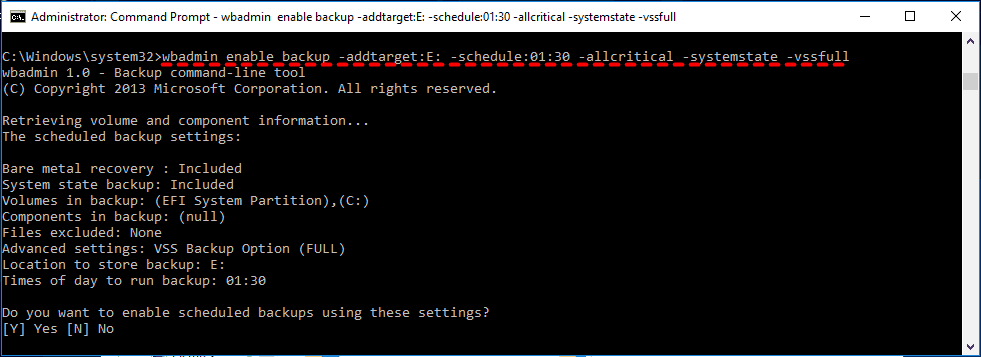
▆ To create a schedule daily backup in Windows Server 2016, use the wbadmin enable backup.
For example: wbadmin enable backup -addtarget:E: -schedule:01:30 -allcritical -systemstate -vssfull
Besides, you might want to create a WBAdmin incremental backup.
Notes:
- To create a bare metal backup in Windows Server 2016, follow these steps:
- If you're not comfortable with using the wbadmin command in Windows Server 2016, you can also create a bare metal backup using the built-in Windows Backup feature. Here's how:
Perform Wbadmin system state recovery
If your Windows Server 2016 system is not functioning properly due to incorrect changes in system settings, you can recover the system state to restore normal functionality. System state recovery allows you to revert to a previous system state, effectively undoing any changes made since the last backup.
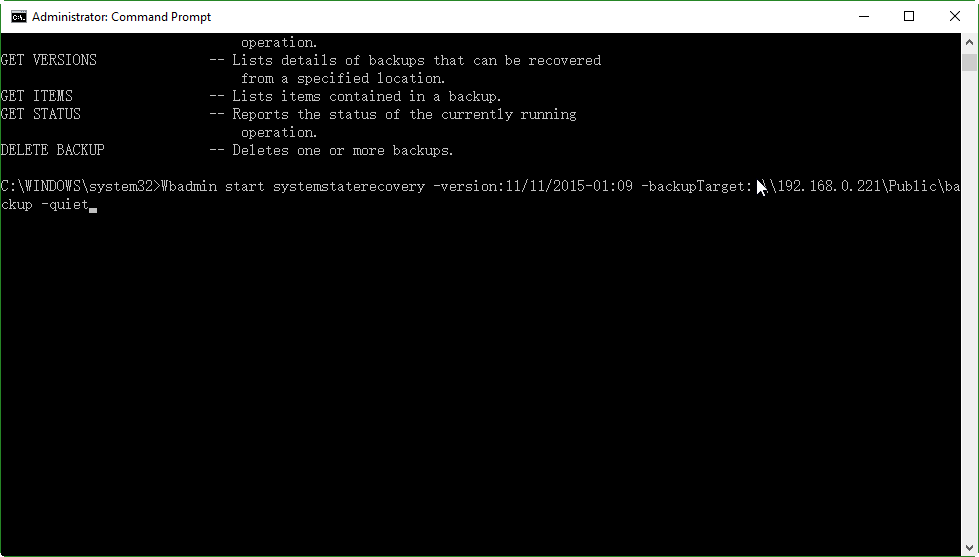
To perform a system state recovery from a network shared folder, use the following command:
Wbadmin start systemstaterecovery -version:11/11/2015-01:09 -backupTarget: \\192.168.0.221\Public\backup -quiet
Note: If you're unsure which backups are available for recovery, you can use the `wbadmin get versions` command to list all the available backup versions. This command will provide you with a list of all the backups that have been made, along with their corresponding version identifiers.
Windows Server 2016 WBAdmin Backup Limitations
However, the WBadmin utility does have its limitations:
- Only volumes formatted with NTFS can be protected.
- Only one backup on a network while using WBAdmin.
- You can only create one scheduled backup job.
- A system state backup, created using the `wbadmin` tool, does not include the operating system and other boot files required to start a computer. This type of backup focuses on the system's configuration and settings, but does not capture the actual operating system and boot files.
- The wbadmin does not delete old backups automatically.
Easier way to create a system image for Windows Server 2016
Given the limitations of the `wbadmin` tool, a more comprehensive and user-friendly solution is the Qiling Disk Master Server. This alternative offers a graphical user interface, eliminating the need to learn complex parameters and syntax.
- It not only supports creating a system backup but also disk backup, partition backup, file backup and cloud backup. So you can choose to backup any items you want in simple steps.
- It lets you schedule backup Windows Server 2016, and you have 5 options, including Daily, Weekly, Monthly, Event triggers, and USB plug in.
- It enables you to manage backup disk effectively with different features. You can compress or split backup image to smaller, backup only changed files with incremental or differential backup, delete old backup regularly by quantity, time or daily/weekly/monthly, etc.
In addition to its backup capabilities, the Qiling Disk Master Server also offers a powerful restoration feature. With this tool, you can restore system images or disk images to your server computer, even if the hardware is dissimilar.
If your computer is experiencing boot issues, you can create a Windows Server 2016 recovery disk on a working computer. This recovery disk can be used to boot the computer with the boot issue, allowing you to troubleshoot and potentially resolve the problem.
Are you looking to try out the features of Windows Server or deploy system images on Windows PCs? Look no further! You can download a 30-day free trial to have a try.
Create a System Image for Windows Server 2016
1. To perform a system backup using Qiling Disk Master Server, follow these steps:
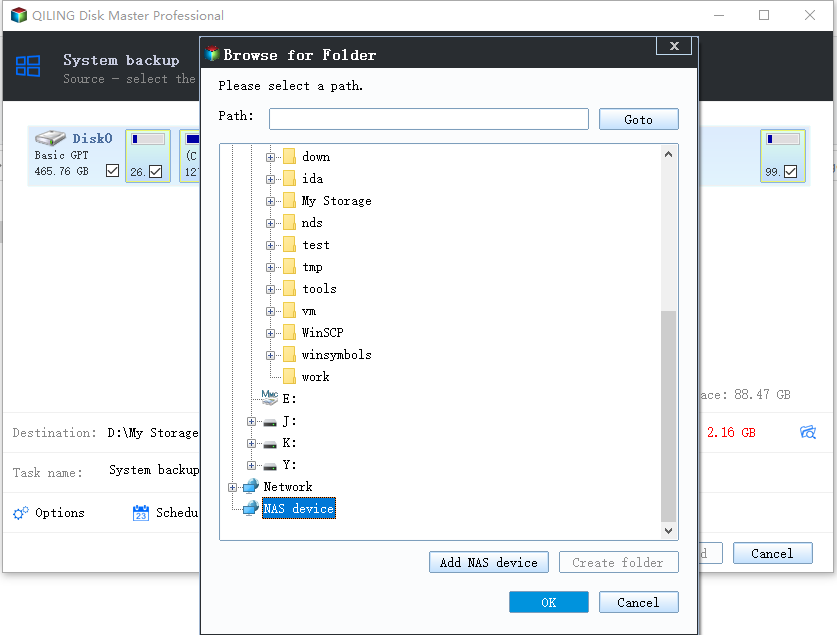
2. Select a destination to save the Windows Server 2016 system image backup file. You can backup Windows Server 2016 to external hard drive, USB flash drive, network drive or NAS, cloud drives like Google Drive, etc.
3. If you want to schedule the backup of your Windows Server 2016 system, you can do so by ticking the "Schedule Backup" option. This will allow you to choose a frequency for the backup, such as daily, weekly, or monthly. You can also choose to trigger the backup based on specific events, such as when a USB drive is plugged in.
Notes:
- Incremental backup and differential backup are different backup methods in this software, which backup only changed files to save backup time and disk space. The biggest difference is all the incremental backups in a scheduled task are linked while the differential backups are independent.
- To avoid backup disk full due to accumulated backups and limited space, you can enable automatic backup cleanup under the Backup Scheme and delete old backup automatically.
4. Click Proceed > Add the schedule only or Add the schedule and run backup now to create a system image for Windows Server 2016.
Restore Windows Server 2016 system image
To restore a Windows Server 2016 system image, follow these steps:
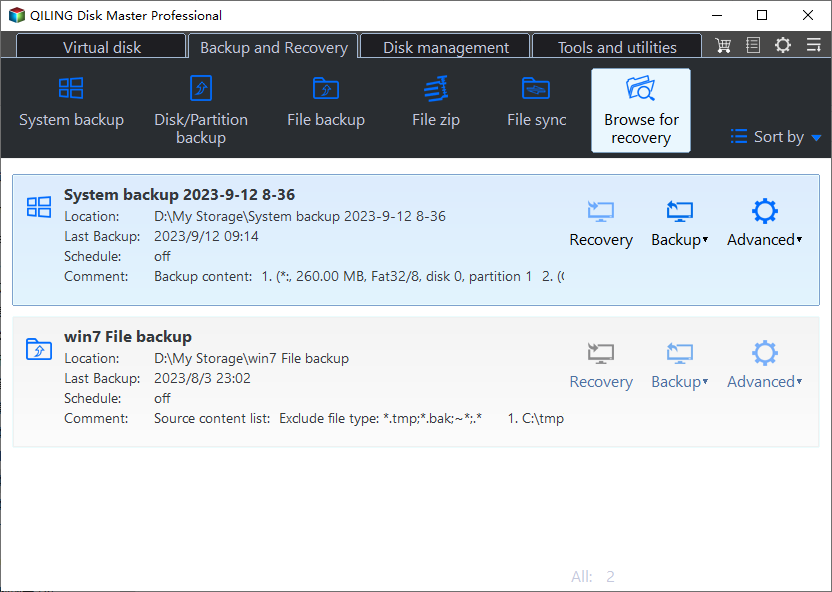
✔ If your server is still bootable, you can directly go to the Restore tab and select the backup image you want to restore. However, if your server is not bootable, you will need to use a bootable media, such as a USB drive or CD/DVD, to access the restore process.
✔ If you've found your Windows Server 2016 unbootable, you'll need to create bootable media to access the restore process. This can be a USB drive or a CD/DVD.
✔ If you want to restore a system image to multiple computers, you'll need to use the Qiling Image Deploy tool, which is available in the advanced edition. This tool allows you to deploy the system image to multiple computers over a network.
If you're facing issues with your Server 2016 and need to restore it, follow these steps to get back up and running:
1. If you're facing issues with your Server 2016 and need to restore it, follow these steps to get back up and running:
Note: If you don't connect the disk containing a backup image, please connect it and reload this software.
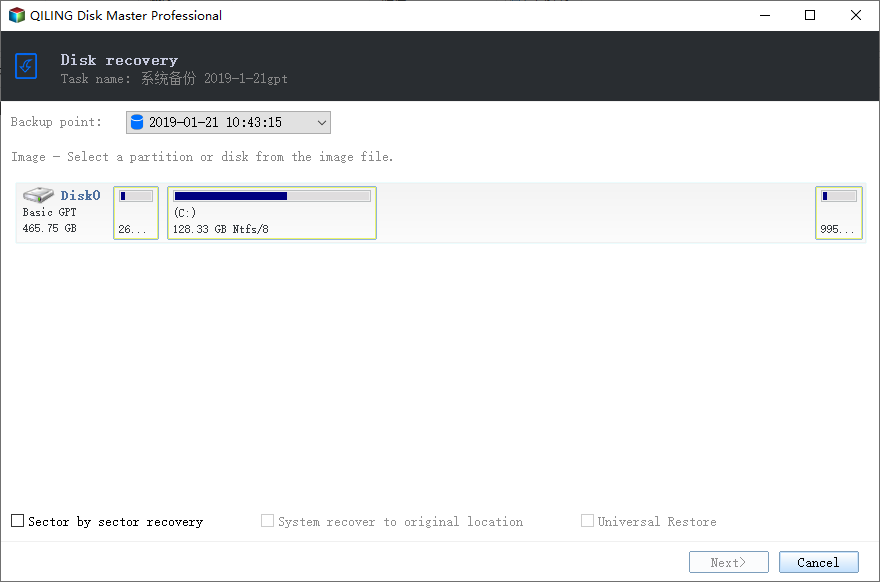
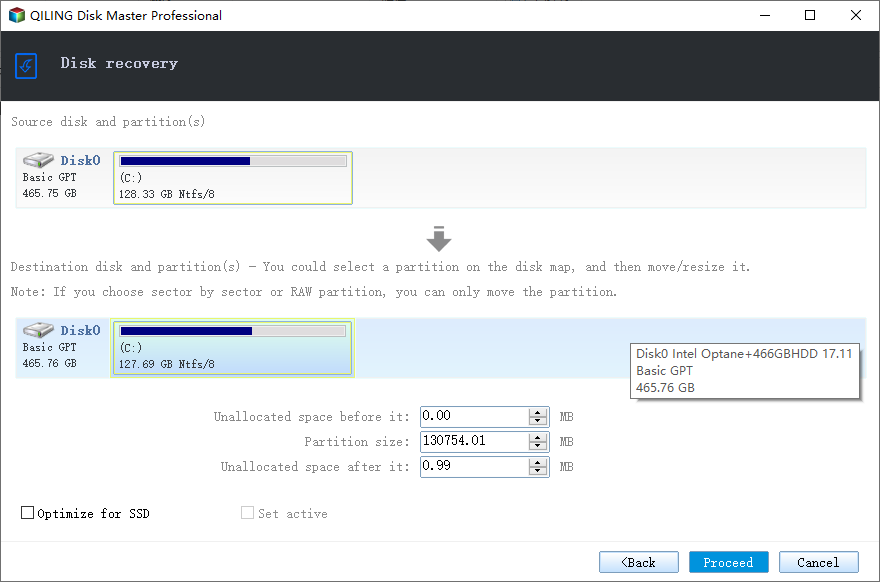
2. Tick Restore this system backup, and press Next >>.
Tip: If your hard drive has bad sectors or is experiencing a SMART failure, you can restore your system image to a new hard drive. Here's how:
3. Before proceeding with the restoration, take a moment to review the operation summary. This will ensure that you're aware of the steps involved and the expected outcome.
Tip: When restoring Windows Server 2016 to a new computer with dissimilar hardware, the Universal Restore feature will be automatically enabled by default. This feature plays a crucial role in ensuring a secure boot after the restoration process.
The Epilogue
You will learn Windows Server 2016 wbadmin syntask and how to create system state backup, bare mental backup, etc. If you are not familiar with the command line or want an easier way, try the best server backup software - Qiling Disk Master Server.
It not only helps you backup Windows Server 2016 automatically but also manages the backup disk effectively with different features, such as incremental backup, differential backup, automatic backup cleanup, etc. To create backups for multiple computers without effort, try the centralized backup software.
Also, it is capable of restoring system images in different situations, whether your computer has similar or dissimilar hardware, bootable or not, even to multiple computers. To unlock more advanced features, please check the edition comparison page.
Related Articles
- Create Backups with Windows Server Backup Command Line
You will learn how to use Windows Server Backup command line with Wbadmin or third-party tool. Besides, you can use the GUI version of backup software if you want a simpler way. - Wbadmin Delete Backup for Windows Server 2016/2012/2008
Learn how to use "wbadmin delete backup" command to remove backups created by Windows Server Backup in Windows Server 2016/2012/2008 so as to save backup disk space. - How to Create Bare Metal Backup with Wbadmin(3 Ways included)
You will learn 3 ways to create bare metal backup to protect data and system, namely, Wbadmin command line, Qiling.exe and GUI-based backup software. - Powerful Samsung SSD Image Software to Protect Data
Are you looking for Samsung SSD image software to backup Samsung SSD? Qiling Disk Master will be a great choice, which allows you to make disk image automatically and regularly.
