2 Ways | Backup Windows 10 PC to Synology NAS Safely
- Why Backup Windows 10 to Synology NAS?
- How to Backup Windows 10 to Synology NAS?
- Before You Backup
- Backup Windows 10 to Synology NAS with Qiling Disk Master
- Backup Windows 10 to Synology NAS with Backup and Restore
- Wrapping things up
Why Backup Windows 10 to Synology NAS?
I recently had a major issue with my 5-year-old computer that I couldn't boot up, so I had to seek help from a friend who's a technician. He diagnosed that my Windows 10 system was corrupted and needed to be reinstalled. Thankfully, he was able to assist me in reinstalling the system, and my computer is now working again. However, the process wiped out all the applications I had installed previously, which I had to reinstall, taking up a lot of time.
To free up disk space and ensure system recovery, I recommend backing up data to a Synology NAS, which will remain unaffected even if the computer crashes or is corrupted, allowing for a safe and effective system restore. This will also help declutter the hard disk and make more space available.
To protect important data, it's ideal to perform Synology backup in Windows 10, which can safeguard against problems caused by virus attacks, misoperations, improper installations, Windows 10 updates, and other issues.
How to Backup Windows 10 to Synology NAS
To backup your Windows 10 PC to a Synology NAS, there are two ways to achieve this.
- To backup your Windows 10 computer, use the built-in backup program called Backup and Restore (Windows 7).
- You can try the free Synology backup software, Qiling Disk Master Standard, for a hassle-free experience.
I prefer using Synology's built-in backup software because Qiling Disk Master Standard is more efficient than Windows' built-in Backup program, and it's the easiest way to backup data to my Synology NAS. Additionally, Qiling Disk Master Standard is a free software that supports various backup operations, cloning, and restoring features.
Before You Backup
To backup Windows 10 PC to Synology NAS, make sure you have:
- Make sure your Synology NAS software and hardware installed.
- Confirm Synology NAS can work.
- Create a shared folder on the Synology NAS.
- Please ensure your computer and Synology NAS within the same Intranet.
- Download Qiling Disk Master Standard.
Backup Windows 10 to Synology NAS with Qiling Disk Master
To create a Windows 10 backup to a Synology NAS, such as DiskStation, using Qiling Disk Master is a straightforward process. See details and follow the guidance to easily and safely back up your system.
Step 1. Launch the Qiling Disk Master program. On the main console, select "Backup" and then "System Backup".
Step 2. I've renamed the task to System Backup 1. What would you like to do next?
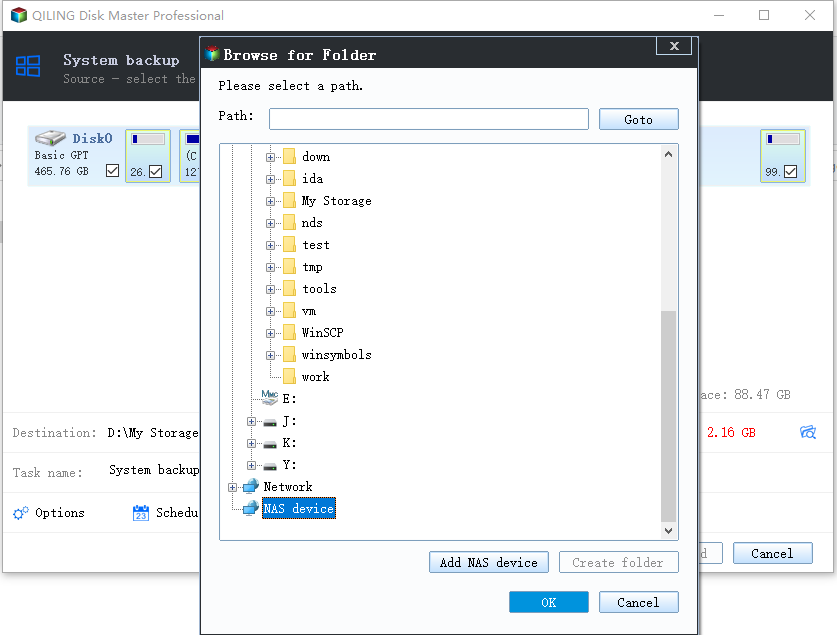
Step 3. To set up Synology NAS as a network location, select "Share/NAS" and click "Add Network Location". Then, give the location a display name and enter the Synology NAS path. Finally, click "OK".
✍ Tips: The Qiling Disk Master program automatically selects the partition associated with system files, including the system partition and system reserved partition, so manual selection is not required.
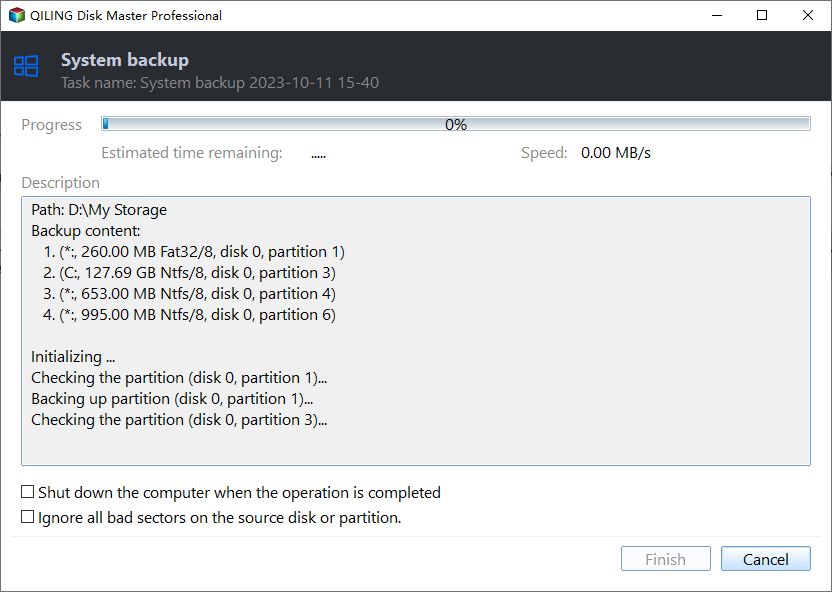
Step 4. To backup your Windows 10 PC to your Synology NAS, press the "Proceed" button.
✍ Tips:
♧ If you want to customize more detailed operation on the image file, you can check the Options.
♧ To automatically backup Windows 10, check the Schedule option, which allows you to backup via Daily, Weekly, or Monthly intervals, or trigger backups by events or when a USB device is plugged in (available in Qiling Disk Master Professional or higher). Qiling Disk Master also offers various backup options, including full, incremental, or differential backups.
After following this guidance, Windows 10 backup to Synology NAS was successful. You can check on Synology if there is a system image. To backup the entire disk, run Disk Backup with Qiling Disk Master, choosing Disk Backup instead of System Backup.
Backup Windows 10 to Synology NAS with Backup and Restore
To backup your Synology NAS, you can also use the built-in Windows backup software, Backup and Restore, which was first introduced in Windows 7 and carried over to Windows 8, 8.1, 10, and 11.
To backup a PC to a Synology NAS drive in Windows 10, first, ensure that the Synology drive is connected to your network and accessible. Then, download and install the Synology Drive app from the Microsoft Store or the Synology website.
Step 1. To backup and restore your data, go to the search box and type in "backup and restore" and select it from the result list.
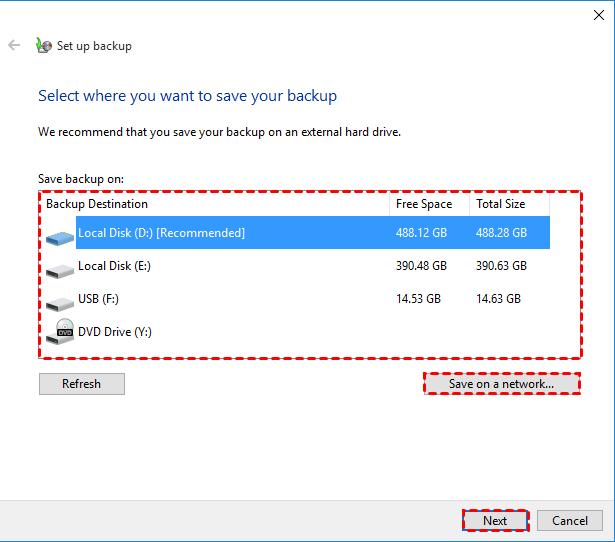
Step 2. Click Set up backup option.
Step 3. To save the settings, click "Save on a network" and input the Synology server name or IP address, name of the shared folder, user name, and password in the next window.
Step 4. Follow the steps on-screen to complete the backup task.
The backup process is complete. You can now check the status of the backup on Synology to confirm its completion.
Users can backup data from Windows computers to Synology NAS using Qiling Disk Master to create a file backup, or File History, which allows adding specific folders for backup in Windows 10.
Wrapping things up
To backup Windows PC to Synology NAS, you can use a third-party backup utility like Qiling Disk Master or the built-in Windows backup utility. This ensures the safety of your computer and allows you to access your files from the NAS.
Personally, I prefer the third-Qiling Disk Master is a party tool that provides an easy-to-use interface, making all steps simpler. It offers various backup solutions, such as Disk Backup, Partition Backup, File Backup, daily and weekly backups, and more. The advanced version, Qiling Disk Master Professional, offers additional features, including USB plug-in and ackup schemes.backup schemes.
If you don't have a backup, you'll need to download Qiling Disk Master and create a backup for your computer.
Related Articles
- Steps to Backup NAS to External Hard Drive
- How to Backup Synology NAS to External USB Drive in Windows
- Best Way to Backup QNAP/Synology NAS to PC
- Fixed: "Windows Cannot Be Installed to This Disk MBR" on Windows 11
This article provides two solutions to the error of 'Windows cannot be installed to this disk MBR' on Windows 11, and you can also find the best backup software there.


