Top 3 Ways to Backup Windows 10/11 to Network Drive or NAS
What is Network Drive?
A network drive is a storage device on a local access network (LAN) within a business or home.
- Within a business, data is usually stored on a server computer or a network-attached storage (NAS) device.
- In a home setting, a network-attached storage (NAS) device or an external hard drive can serve as a dedicated server for a home network, providing access to shared files and folders. This setup allows multiple devices to connect to the storage device, making it a central hub for shared data. However, if the device is turned off or disconnected, access to the shared files is lost.
Users want to backup Windows 10 to a network drive or NAS because it allows them to store files without consuming local disk space on their computer.
How to Perform Windows 10 Backup to Network Drive
To back up Windows 10 to a network drive or NAS, you can use either the built-in tools Backup and Restore (Windows 7) or File History, or the free auto backup software Qiling Disk Master Standard. These options allow you to easily transfer your data to a secure external location, providing a safeguard against potential data loss.
- To backup Windows 10 system to a network drive, including the operating system, system files, applications, and files, you can use the Backup and Restore (Windows 7) method. This allows you to create a system image that includes everything, including the operating system, system files, applications, and personal files, and save it to a network drive.
- To automatically backup files to a network drive in Windows 10, you can use File History. This feature allows you to set up a backup of your files to a network drive, external hard drive, or USB device.
- To avoid Windows 10 backup not working problem, you can use Qiling Disk Master Standard, a third-party software that allows you to schedule backup system, disk, partition, or files on Windows 10 with ease.
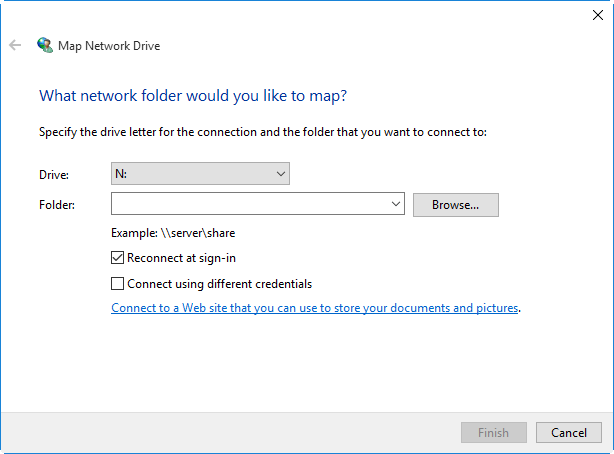
To perform a Windows 10 backup to a network drive or NAS, you'll first need to know how to access your network drive in different methods. This includes using the built-in "Map Network Drive" feature, accessing it through the File Explorer, or using the Command Prompt.
To access a network drive, simply type its IP address into your computer and enter your Windows credentials to gain access.
Map a network drive to access it more conveniently over the network, by specifying the network path and assigning a drive letter.
Method 1: Windows 10 Backup to Network Drive via Backup and Restore
Windows 10's Backup and Restore feature allows you to create a system image and save it on a network location or NAS, which can be used to restore your computer to a previous good status in case of issues. To do this, you can follow the detailed steps, which involve creating a system image and saving it to a designated location, allowing you to restore your computer to a previous state when needed.
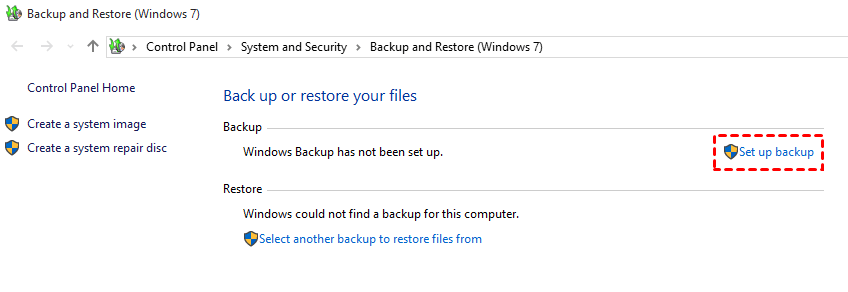
Step 1. Go to Control Panel > System and Security > Backup and Restore (Windows 7).
Step 2. Click Set up backup on the right side.
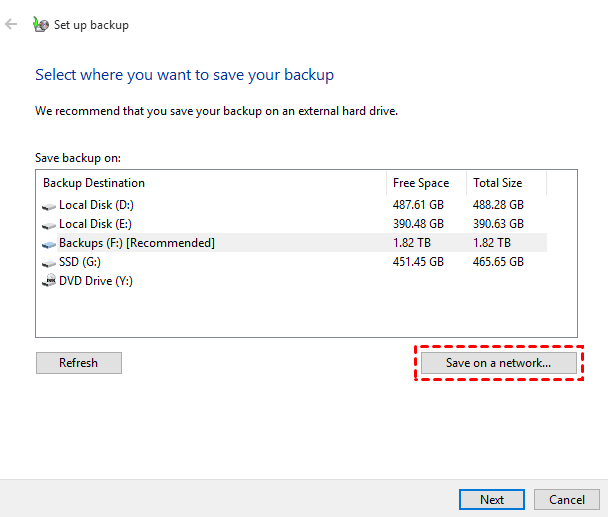
Step 3. Choose Save on a network...
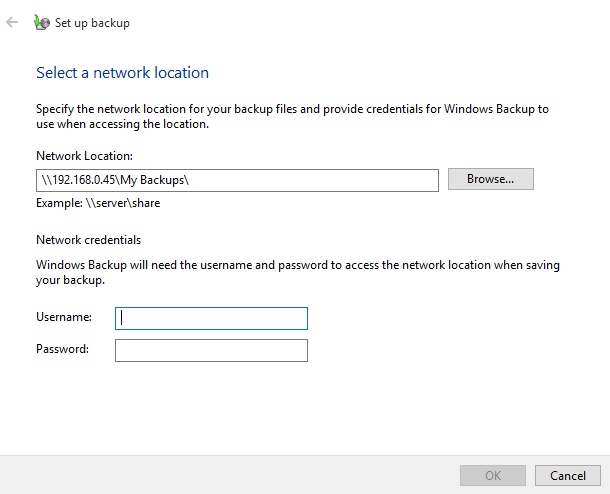
Step 4. To add a network drive or location to store the system image, click "Browse" to select the desired drive or directly type the network location. Then, enter your username and password and confirm by clicking "OK".
Step 5. Click Next to continue.
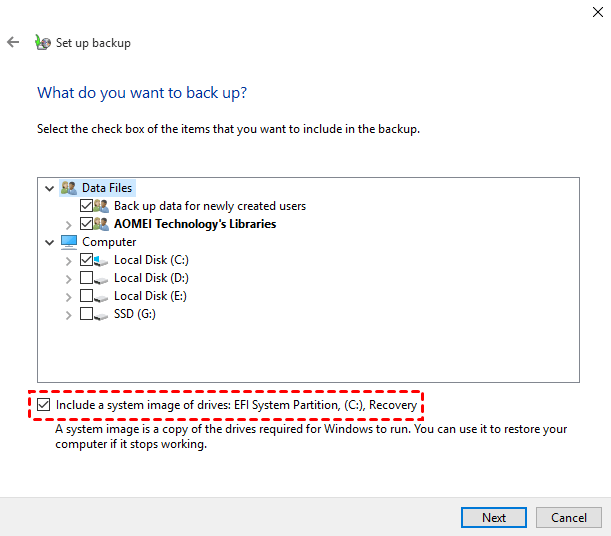
Step 6. If you choose to let Windows handle everything, it will automatically select the correct settings for you. However, if you prefer to have more control, selecting "Let me choose" will allow you to customize the settings to your liking, including the option to include a system image of drives. This gives you more flexibility and control over the recovery process.
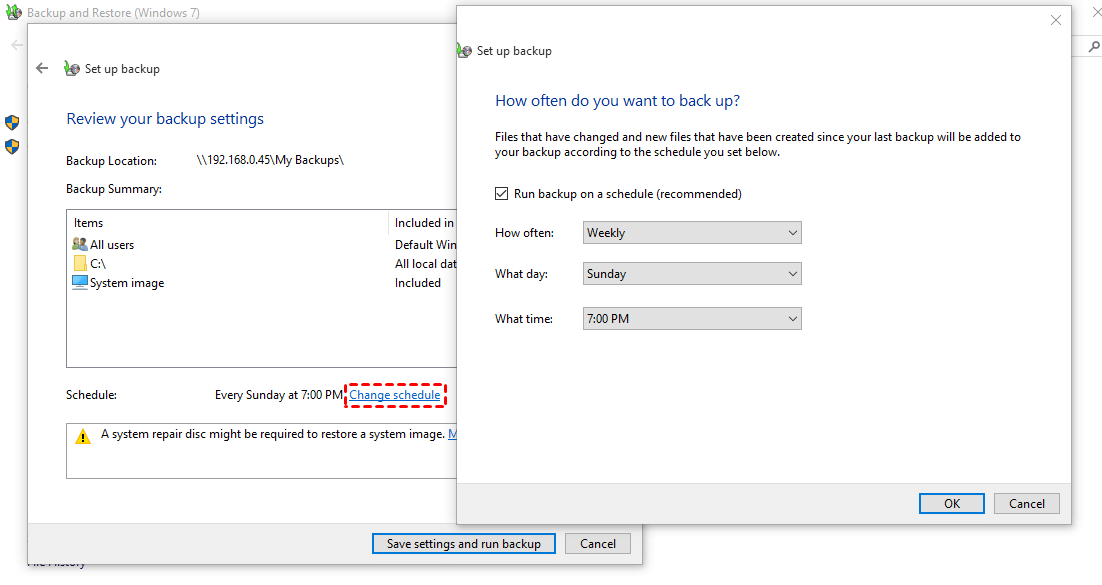
Step 7. At the Review backup settings window, click "Change schedule" to let Windows 10 automatically back up to a network drive or NAS, and then click "Save settings and run the backup".
Windows 10 backup to network drive may fail if you directly input the network path, so you need to map the network drive or NAS to a local computer and assign a drive letter for it.
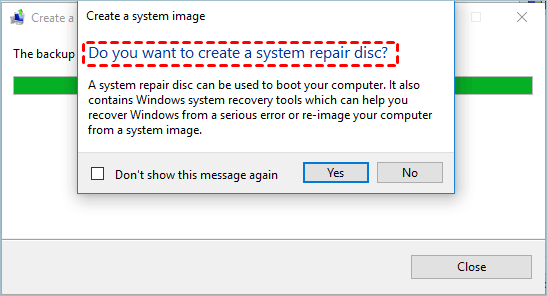
When the process is complete, you will be asked if you want to create a system repair disc, which can help boot your computer. If your computer has an optical drive, you can click Yes to make one. Alternatively, you can create a system repair disk using your USB flash drive.
If your system crashes or your disk is damaged, you can restore your system image to a new hard drive, which can help you recover your data and get back to work quickly. To do this, you'll need to create a system image of your current hard drive using software like Acronis or EaseUS, and then install the new hard drive.
- To access the Windows Recovery Environment, go to Settings, then Update & security, followed by Recovery, Advanced startup, and finally Restart now.
- In the recovery environment, select Troubleshoot > Advanced Options > System image recovery and follow the instructions.
Method 2: Windows 10 Backup to Network Drive via File History
Windows 10's File History software provides default backups of user folders, with the option to save them on a network drive. Additionally, users can manually add specific folders to be backed up using the "Add a folder" option.
Step 1. Click Start > Click Settings option > choose Update & security > Click Backup.
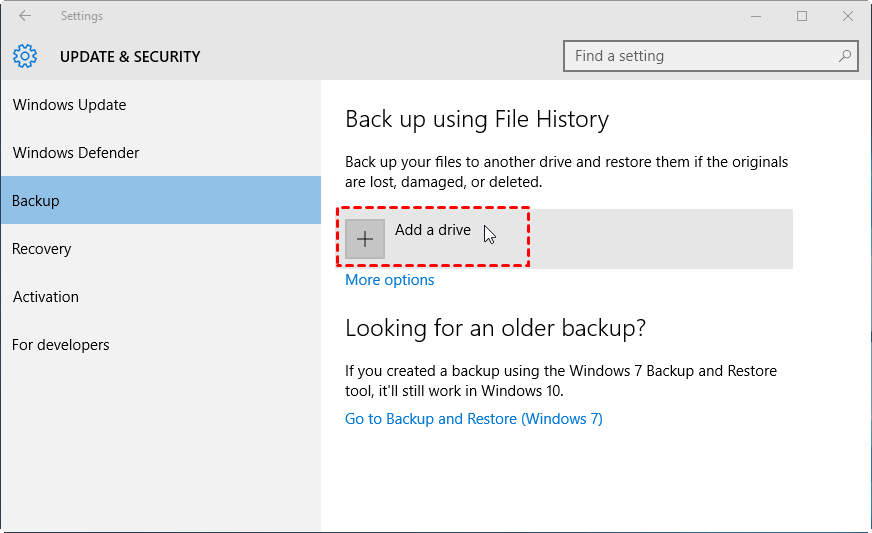
Step 2. Click the "+" next to Add a drive and choose network location to store the backup files.
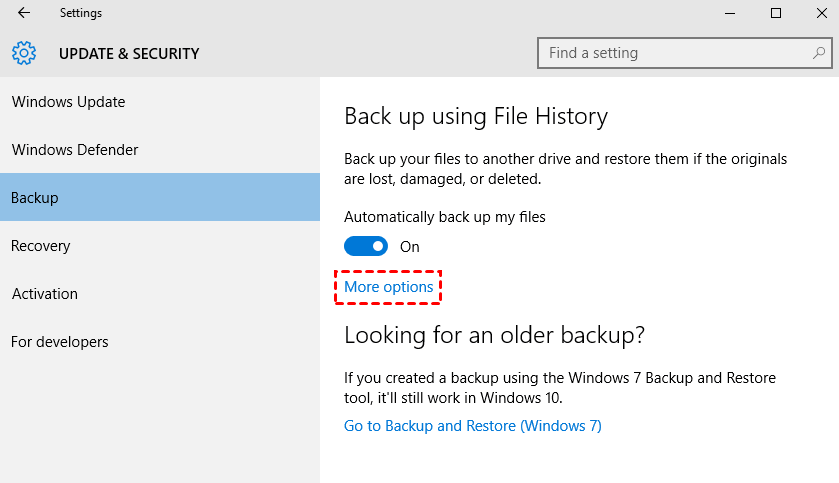
Step 3. Click More options to access the Backup options screen, where you can set the frequency of File History backups, the duration of saved versions, and add additional folders to back up.
You can either use the File History feature in Windows to automatically back up your files to an external drive, or you can manually back up your files to a network location or an external drive, such as a USB drive, using File Explorer. This way, you can easily restore your files or folders if they are deleted or corrupted.
#1: Restore entire files: Go to the Control Panel, then System and Security, then File History, then Restore personal files. Click Browse and find the files you want to restore.
#2: Restore a previous version of a file: Right-click the file, select Properties, go to the Previous Versions tab, choose a restore point, and restore it.
Method 3: Windows 10 Backup to Network Drive via Qiling Disk Master
Qiling Disk Master Standard is a free software that allows users to easily backup their Windows 10 system, disk, partition, or files to a network drive or NAS, and can be set to run automatically.
This software automatically performs a Windows 10 incremental backup to a network drive, compressing backup images to save space and splitting large files to reduce backup time, while only backing up used file systems.
This software allows creating a system image for another computer with different hardware, requiring the Universal Restore feature in the professional version or higher. It can also create a bootable USB or CD/DVD for restoring a non-functional system.
To backup Windows 10 to a network drive, download, install, and launch the free network or NAS backup software, then follow these steps.
Note: This version only supports Windows 11/10/8/7/XP/Vista. To perform a Windows Server backup to a network drive, consider using Qiling Disk Master Server, which can simplify the process.
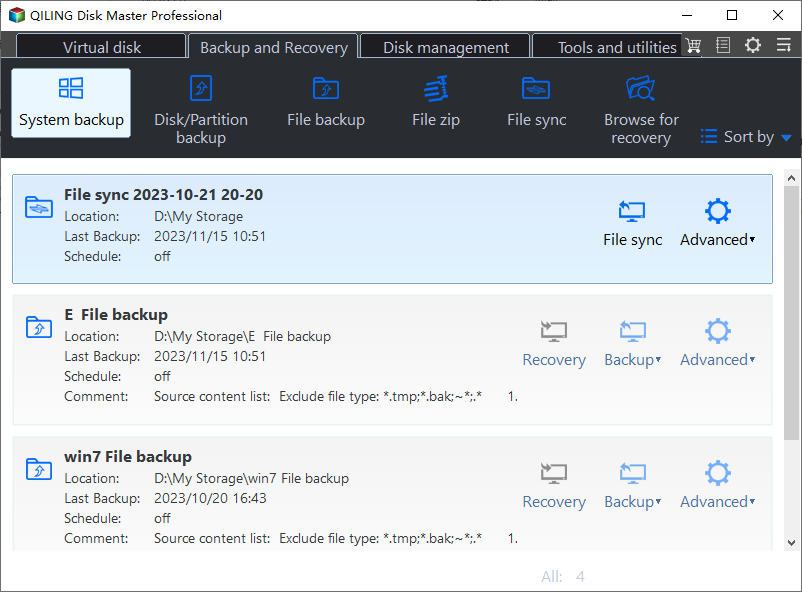
Step 1. Click System Backup under the Backup tab.
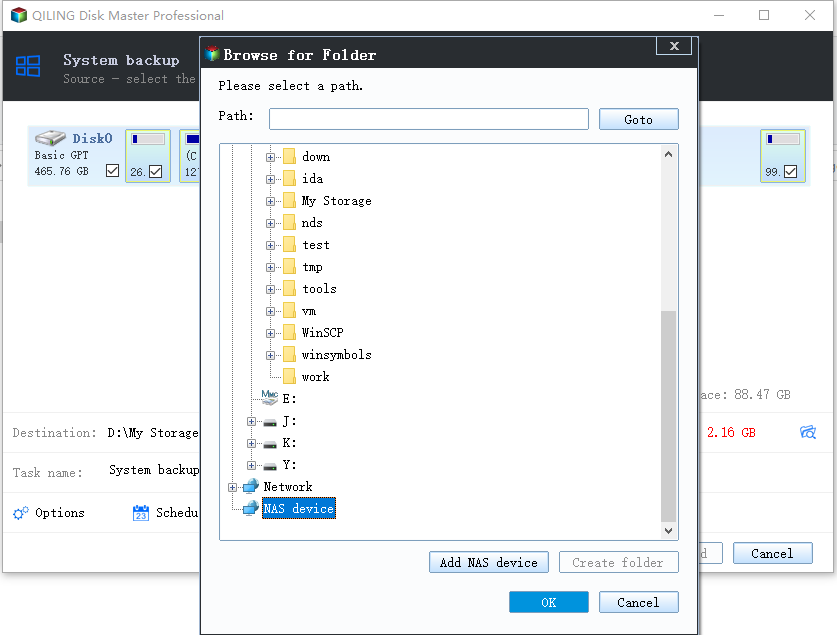
Step 2. The software will automatically select the boot partitions to be backed up, ensuring the computer remains bootable after restoration, especially beneficial for those who are new to this process. To do this, you would click the inverted triangle, then select "Add Share or NAS Devices" and enter the network path of the network drive.
Tip: If you have mapped the network drive on your computer, it will work like a local drive and you can select it by clicking "Select a local path".
Step 3. Click Proceed and the program will start to backup Windows 10 to a network drive or NAS. To ensure continuous data protection, you may still need to set options, schedule a backup, and optionally choose a backup scheme.
- Click Options, you can write a comment, set the compression level, enable email notification, etc. On the professional version, it's able to enable passwords for a backup task.
- To schedule a backup, click on "Schedule Backup" and enable it. This allows you to set up automatic backups to run daily, weekly, or monthly at a specific time and date, or at set intervals. It's also recommended to use the USB plug-in feature to create a system image on a USB drive in Windows 10.
- Optionally, On the professional version, you can modify the backup method to differential backup and enable automatic backup cleanup methods, which is the most thorough way to manage disk space and ensure there is always space for new backups.
Restoring Windows 10 to its original state can be a lifesaver when your computer is acting up. There are three possible scenarios you might encounter: you may need to restore Windows 10 to its original state after a system crash, you may want to go back to a previous version of Windows 10 after installing a problematic update, or you may need to restore Windows 10 to its original state after a malware infection. In each case, restoring the Windows 10 image can help bring your computer back to normal.
#1: Restore Windows image to new hard drive. To restore the backup image, switch to the Restore tab, select either Task or Image File to locate the backup image, then choose Restore entire image and select a different location, and finally click Proceed.
#2: Move Windows 10 to a new computer with dissimilar hardware. The steps are almost the same as in the previous situation, except for the last step, where the Universal Restore feature is checked instead.
#3: Deploy images to multiple computers at a time. It requires a system image and Qiling Image Deploy to boot multiple computers over a network.
How to Perform Windows 11 Backup to Network Drive
To backup Windows 11 to a network drive or NAS, you can use built-in tools like Backup and Restore (Windows 7), File History, or third-party software like Qiling Disk Master. The steps remain the same, with the only difference being the updated location in Windows 11. You can install Qiling Disk Master on Windows 11 and follow the same backup process.
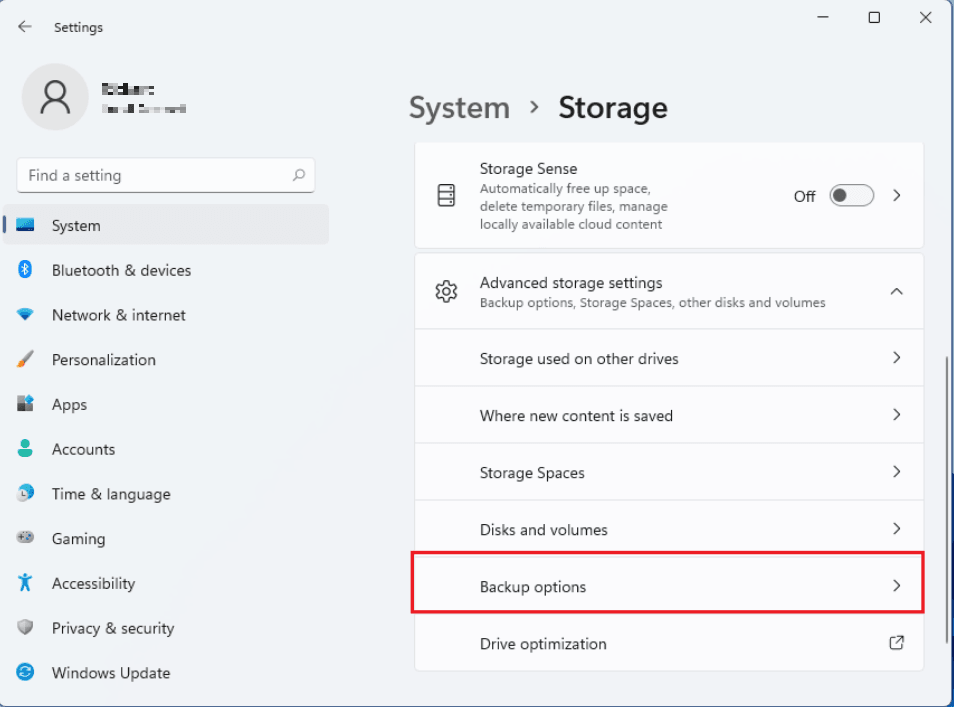
❤ For Backup and Restore (Windows 7): To find the Backup and Restore (Windows 7) tool, go to Start > Settings > System > Storage, scroll down to Storage Management, select Advanced storage settings, then Backup options, and finally Go to Backup and Restore (Windows 7).
❤ For File History: To find the File History settings, go to Start, then Settings, then System, then Storage, scroll down to Storage Management, select Advanced storage settings, and then Backup options, where you'll see Back up with File History.
Conclusion
Now that you know how to let Windows 10/11 backup to a network drive or NAS, you can also use alternative methods like Backup and Restore (Windows 7), File History, or comprehensive software like Qiling Disk Master to automatically backup your system, disk, partition, or selected files to a network drive, and even backup a network drive to Windows 10 or 11.
You can still backup multiple computers over a network using Qiling's centralized backup software, which allows remote monitoring and management of backup tasks from a central console.
Related Articles
- Two Solutions to Backup Windows 10 to QNAP NAS
- How to Automatic Backup to NAS in Windows 10/8/7?
- How to Schedule Automatic Backup in Windows 10 Easily?
- Easiest Way to Backup Network Drive to Local Drive in Windows 10
