Solved: Can't Create Restore Point in Windows 10, 11 | 4 Ways
- Overview of system restore point in Windows 10
- Unable to create system restore point in Windows 10
- Cannot create restore point in Windows 10 or 11? 4 ways to fix it
- Fix 1: Turn on system protection
- Fix 2: Enable system restore via Group Policy Editor
- Fix 3: Start Volume Shadow Copy service
- Fix 4: Run SFC/Scannow command
- Better way to protect your computer continuously
Overview of system restore point in Windows 10
If you're unable to create a restore point in Windows 10 or Windows 11, it's likely because the System Restore service is not running or is disabled. To resolve this issue, try enabling the System Restore service and setting it to Automatic. Additionally, ensure that the Windows Update service is running and set to Automatic, as pending updates may be interfering with the restore point creation process. If you're still facing problems, you can try disabling and re-enabling the System Restore service. In some cases, the issue may be caused by a corrupted system file or registry entry, so it's a good idea to run a System File Checker (SFC) scan and check for any corrupted system files.
Unable to create system restore point in Windows 10
Situation 1: It seems like you're trying to create a system restore point in Windows 10, but the "Create" option is grayed out. This can be frustrating! Don't worry, I'm here to help.
Situation 2: I'd be happy to help you troubleshoot the issue with creating a system restore point in Windows 10. The error message "Access is denied. (0x8007005)" suggests that there's a permission issue or a conflict with another process that's preventing the system restore point from being created.
Cannot create restore point in Windows 10 or 11? 4 ways to fix it
I'd be happy to help you troubleshoot the issue with creating a system restore point in Windows 10. Apart from the "Access is denied" error, you may also encounter other errors like "The restore point could not be created for the following reason: The specified object was not found". These errors can be frustrating, especially when system restore points play a crucial role in maintaining system stability and data protection.
Unable to create a restore point in Windows 10 can be caused by various events, and it's great that you're looking for solutions. Here are some troubleshooting steps you can try based on your specific situation:
*The following methods are also available for windows 11.
Fix 1: Turn on system protection
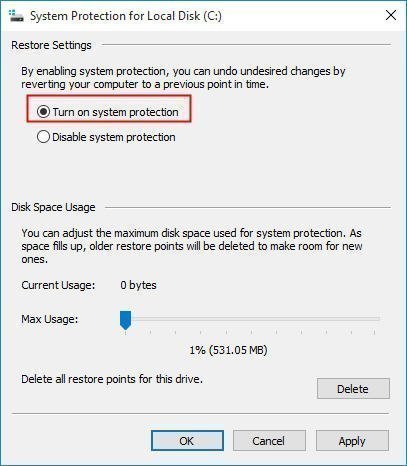
If you turn off the system protection, the option of "Create…" will be grayed out. Do as the following steps to turn on system protection.
1. In System Protection interface, select system drive and click "Configure…" icon.
2. In the pop-up window, choose "Turn on system protection" and click "Ok".
Fix 2: Enable system restore via Group Policy Editor
If the "Create" and "Configure" buttons are grayed out in the System Protection interface, you can resolve this issue by using the Group Policy Editor. To do this:
1. Press Windows + R simultaneously to open Run box.
2. In Run box, type "gpedit.msc" and hit "Enter" to open Group Policy Editor.
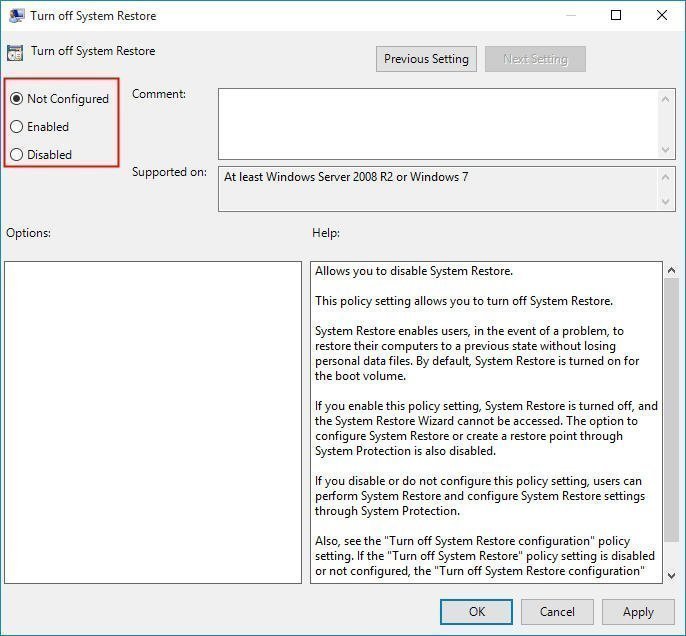
3. Under Computer Configuration, go to "Administrative Templates" > "System" > "System Restore".
4. Then, you can check the state of Turn off Configuration & Turn off System Restore. If any of them is in Enabled State, double click it and choose "Not Configured".
Fix 3: Start Volume Shadow Copy service
If the "Create…" option is available but you're unable to create a restore point and receive an error message, try the following steps:
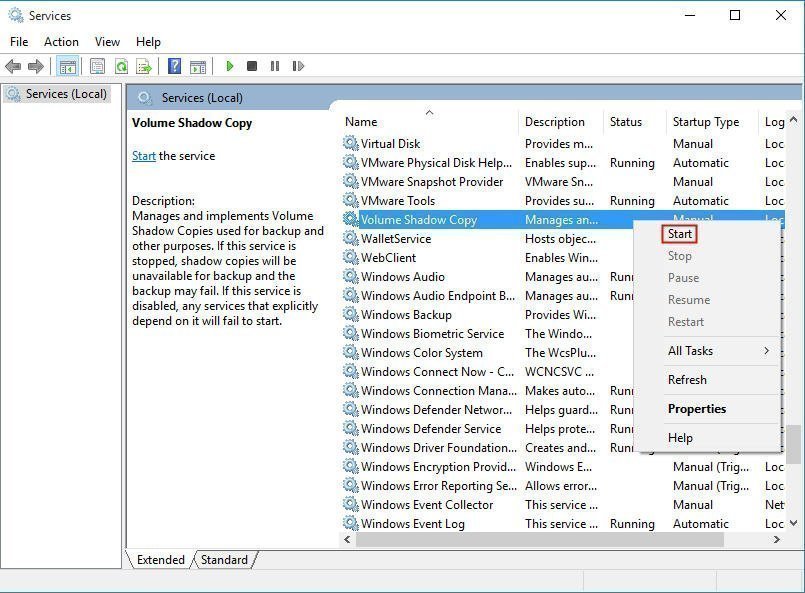
1. Open the Run dialog box by pressing the Windows key + R, then type "services.msc" and press Enter to open the Services window. This will allow you to check the status and settings of various system services, including the System Restore service.
2. In the Services window, scroll down and locate the service named "Volume Shadow Copy Service". If it's not running, click the "Start" button next to it to start it. If it's already running, click the "Stop" button to stop it, and then click the "Restart" button to restart it.
3. Make sure that the Startup type is "Automatic".
Fix 4: Run SFC/Scannow command
To check and fix corrupted system files, you can use the System File Checker (SFC) utility. Here are the steps:
1. In Startup box, type "cmd", right click "Command Prompt" and choose "Run as administrator".
2. In this window, type "sfc /scannow" and press "Enter" key.
Please wait patiently for the System File Checker (SFC) process to complete. This may take a few minutes to finish, depending on the number of system files that need to be checked and replaced.
Besides being unable to create a restore point, you may also encounter the issue of missing system restore points in Windows 10 when you need to restore your computer to an earlier date. This can be frustrating and may be caused by various factors, such as disk space issues, system file corruption, or incorrect system settings.
Better way to protect your computer continuously
System restore points can be a useful tool for reverting your system to a previous state, but they have limitations. For instance, restoring the system may affect certain programs, such as antivirus software, which might need to be reinstalled or reconfigured after the restore process. Additionally, system restore points are not a substitute for virus removal or malware cleanup, as they do not address these issues.
I highly recommend using Qiling Disk Master, a robust and feature-rich backup tool compatible with Windows 11, 10, 8, 7, XP, and Vista. This tool enables you to create a system image backup, which can be restored to a new hard drive if your current drive fails. With three image compression levels to choose from, you can optimize disk space usage. Here's a brief overview of its capabilities:
Step 1. Free download Qiling Disk Master Standard, install and run it.
Step 2. In the main interface, go to "Backup" > "System Backup".
Step 3. This software will choose source partition automatically for you. Select another location as the destination path. Then, select daily/weekly/monthly schedule backup and click Proceed to perform backup task continuously.
Notes:
☞The destination path for backups can be an internal hard drive, external hard drive, or Network-Attached Storage (NAS). It's suggested to store system backups on an external hard drive or NAS for added security and accessibility.
☞To set a scheduled backup, click the "Schedule" button. Options include Daily, Weekly, and Monthly. Additionally, Event Triggers and File Sync are available in the Professional Version, which can be accessed by upgrading.
Related Articles
- How to Perform System Restore in Safe Mode Windows 10
- How to Delete System Restore Points in Windows 7/8/8.1/10
- System Restore Did Not Complete Successfully - Fixed for Windows 10/8/7
- Windows 7 Backup Encryption and Your File Encryption Key
This article introduces you to Windows 7 backup encryption workarounds and 'Back up your file encryption key' solutions.


