How to Change Drive Letter on Windows 10/8/7 without Effort?
Why do you want to change drive letter?
The drive letter of system partition is normally assigned by Windows at installation usually the system drive letter is C. After installation, Windows still assign a drive letter for any of your partitions on hard drive, flash drive, optical drive, USB drive, card reader.
Sometimes, the drive letter will be unavailable owing to some operations and all partitions are shown as Document, Game, Music. Thus, you need to give the partitions a drive letter. Or you just want to change the original drive letter to another one.
Matters need attention to change drive letter
1. The hard drive contains your operating system and boot files will be set as C: drive and all your software will be saved on it by default. Don't try to change it, or you cannot boot your computer.
2. Sometimes, you may find that your computer skip one drive letter and assign another available drive letter for your card reader. Maybe, your card reader with one more slots, so it will have different drive letters.
3. A: drive letter or B: have historically been reserved for floppy drives.
4. If you change the drive letter of a partition or disk with software, it may stop working. You cannot find the path of it. Fortunately, this is not a common question with newer programs and apps. But if you have an old program or you still use the old operating system Windows XP or Windows Vista, this may be a potential problem.
5. The different removable drives will have a different hard drive letter.
How to assign a drive letter on Windows 10/8/7 with Disk Management?
When you encounter partition or disk problems, Windows built-in tool, such as disk management, diskpart will your first choice. Below, I will show you how to assign a drive letter on Windows 10/8/7 with Disk Management.
Step 1. Press “Win + R” to open the “Run” window and type diskmgmt.msc in the box
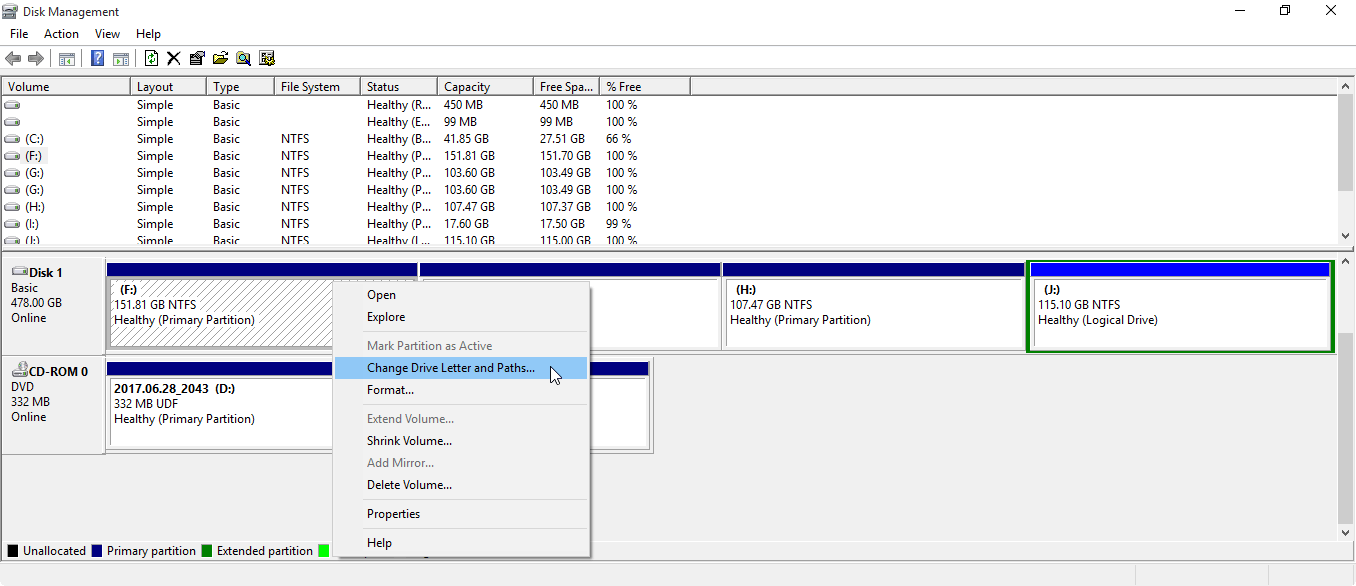
Step 2. Right-click the drive you want to change, and select change Drive Letter and Paths in the pop-up window.
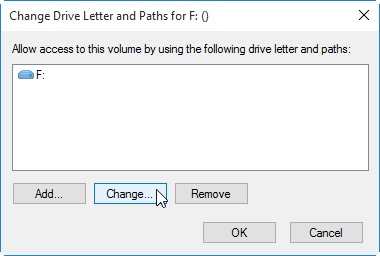
Step 3. Click Change to summon the next window.
Notice: If you want to remove the drive letter of your partition, you can select "Remove" and follow the instructions step by step.
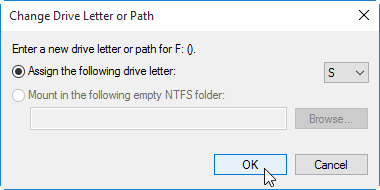
Step 4. Select a drive letter from the drop-down list and clickOK. And you are only allowed to use a drive letter which is still available.
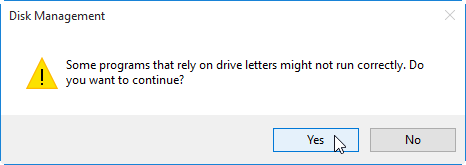
Step 5. Confirm the pending operation and click Yes.
You can change drive letter in disk management. However, it may not work well at any time. For example: when you connect a hard drive to another PC, the disk may not display its drive letter and you cannot add a drive letter to it using Disk Management.
How to change drive letter on Windows 11/10/8/7 effortlessly?
Windows built-in tool can help you change drive letters in Windows. But, it's not perfect.
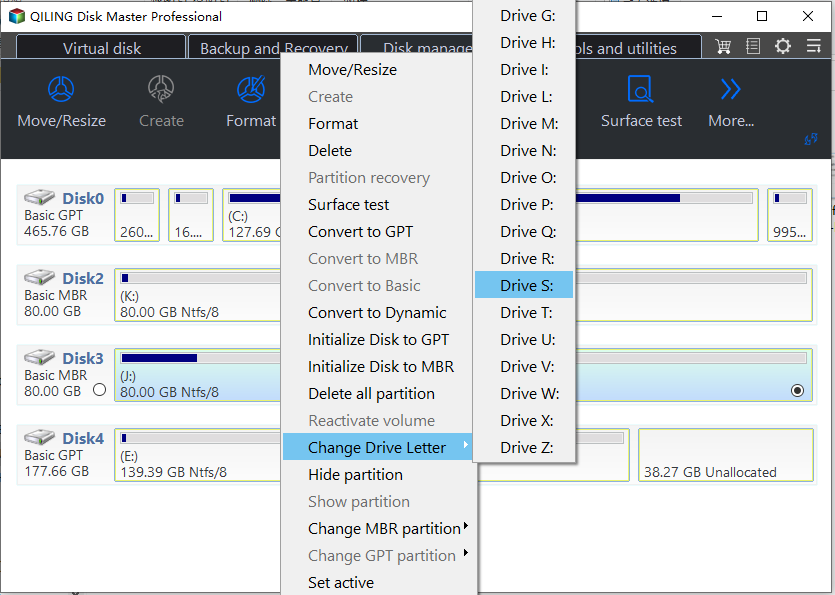
Want to an easier way or more advanced features, you can use free Qiling Disk Master. It contains all the basic features, including Create Partition, Delete Partition, Shrink Partition, etc. Besides, It will offer you more advanced functions like Move Partition, Merge Partition, Convert to Primary Partition, Windows to go creator, etc
Now, coming to our point: how to change drive letter
Step 1. Download Qiling Disk Master, install and launch it.
Step 2. Right-click the partition, then select Advanced > Change Drive Letter on the main page.
Step 3. Confirm the this operations and waiting it operating for a moment.
This article is also applied to change drive letter on Windows XP, external hard drive, card reader, etc.
Summary
Windows built-in tool disk management can help you change drive letter in Windows 10/8/7. But it does not work well all the time. A third-party tool like Qiling Disk Master can be a better choice.
With Qiling Disk Master, All the operation becomes very easy, even for a beginner. Besides, it has more advanced features., including Move Partition, Resize Parttion, Convert GPT to MBR for Windows 11 upgarde, etc. What's more, it can help you fix problems caused by Disk Management or Diskpart, including The volume size is too big, Mark partition as active greyed out, The extend volume is disabled, etc.
Related Articles
- Can I Transfer Game Saves to Another Computer? Yes, Sure!
Do you need to transfer your game saves to another computer? Follow our step-by-step guide and learn how to transfer your game saves to a new computer without reinstallation. - How to Unlock SD Card Without Switch [6 Methods]
Are you having trouble writing to a locked SD card? This post offers 6 ways to gain access to an SD card so you can use it without restrictions. Additionally, it describes how to retrieve data from an encrypted SD card. Deep Data Recovery is a one-stop software to recover different data types from a locked SD card. - How to Successfully Zero Fill Hard Drive from Bootable USB for Free?
Need to zero fill hard drive without booting system? You can download Qiling Disk Master to zero fill hard drive from a bootable USB. - Solved| Windows 10 Update Missing Files 2018 (Version 1809)
Suffering from Windows 10 update missing files? You can recover lost files with 5 given solutions. Don't forget to protect your data after recovering it.
