Enable System Restore in Windows 10 for Quick Recovery
- What does system restore can do for you?
- How to enable system restore in Windows 10
- Way 1: Turn on system restore using System Properties
- Way 2: Enable system restore in Windows 10 using command line
- Way 3: Enable system restore in Windows 10 using GPO
- How to create system restore point in Windows 10
- How to perform Windows 10 system restore to revert changes
- Way 1: Use System Restore in normal mode
- Way 2: Perform system restore in safe mode
- Way 3: Restore system using Advanced startup
- Way 4: Directly reset your computer to fresh version
- Alternative way to enable system restore in Windows 10
- Conclusion
What does system restore can do for you?
System Restore was first introduced in Windows ME and later included in Windows 7/8/8.1/10/11. It tracks software installations, updates, driver changes, and programs, allowing users to restore their computer to an earlier date in case of system crashes or failures due to virus attacks, ransomware, or accidental system file deletions.
Windows automatically creates a record of system changes called a restore point, but you can also create one manually. This record does not back up user data like documents, music, or movies, but rather tracks system or software events that have changed on your computer.
In Windows 10, the system restore feature is disabled, possibly due to concerns about disk space usage and the availability of alternative quick restore features, such as System Image Recovery and Reset this PC.
To enable system restore in Windows 10, follow these steps: Go to the Control Panel, click on System and Security, then click on System. In the left-hand menu, click on System Protection. If System Protection is turned off, click on Configure to turn it on. Select the drive you want to protect and set a disk space percentage for system protection.
- To enable system restore in Windows 10, follow these steps: 1) click on the start menu and type "restore point" in the search bar, 2) click on "Create a restore point" in the search results, 3) click on the "Configure" button, 4) select the radio button next to "Turn on system protection", 5) click on "Apply" and then "OK". Alternatively, you can also enable system restore by going to the "Control Panel", clicking on "System and Security", then "System", and finally clicking on "System Protection" on the left side.
- How to create system restore point in Windows 10
- To perform a Windows 10 system restore, follow these steps:
How to enable system restore in Windows 10
Here you will learn 3 ways to turn on system restore in Windows 10, all of them can help you.
Installing Windows patches and updates can automatically turn off System Restore, so it's a good idea to re-enable it afterwards.
Way 1: Turn on system restore using System Properties
System Restore is hidden in the legacy Control Panel, so you can only access it from there. To turn it on, follow these steps.
Step 1. To access System Protection, go to the Control Panel, select View by Large icons or Small icons, then click on System, and finally click on System Protection.
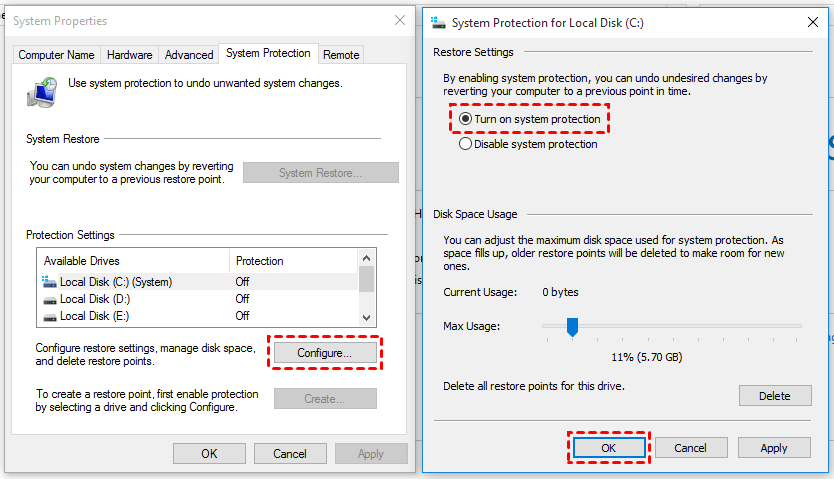
Step 2. Here you will see the System Properties window. Select a local drive and click "Configure".
Step 3. To enable system protection and set a usage limit, go to System Protection in the System Properties window, check the box to turn on system protection, and set the max usage bar to a desired percentage, such as 10%, and then click apply and ok.
Tip:
- If the percentage is too low, the system will delete restore points when there is not enough space, resulting in data loss.
- Please note the importance of saving space for your restore point, user data, and software. This will ensure that you have enough storage capacity to accommodate these essential components, preventing potential issues with your system's performance and functionality.
Step 4. After setting the protection of the selected drive to read-only, you will be taken back to the System Properties window, where you will see that the protection of the selected drive is now set to "ON".
Way 2: Enable system restore in Windows 10 using command line
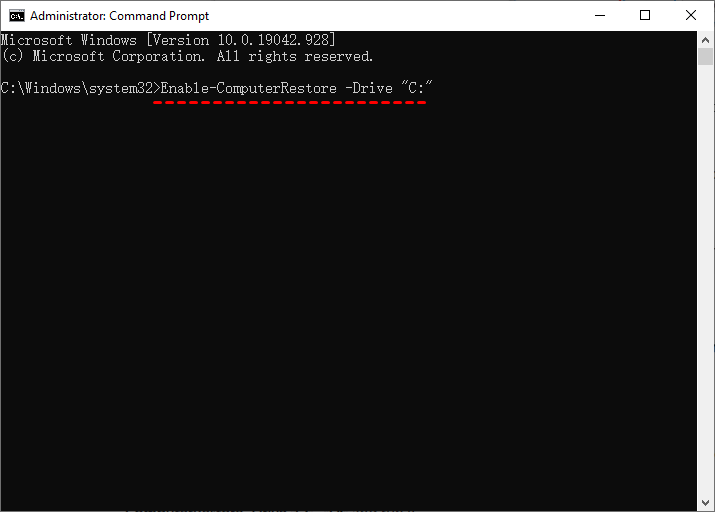
Step 1. Type cmd in the search box, select it and Run as administrator.
Step 2. In the command prompt window, to enable system restore on the C: drive, type Enable-ComputerRestore -Drive "C:" and hit Enter.
The system drive is typically the drive where the operating system is installed. If you're using Windows, it's usually C:. If you're using macOS, it's usually the drive where the operating system is installed, which is usually the startup disk.
Step 3(optional). To enable system restore on multiple drives, you can add the drive letters at the end of the command, separated by commas. For example, to enable system restore on the C: and D: drives, type `Enable-ComputerRestore -Drive "C:", "D:"` and run it.
Way 3: Enable system restore in Windows 10 using GPO
The Group Policy Editor is only available in Windows 10 Pro, Enterprise, and Education editions. If you have one of these versions, you can follow the steps below to enable System Restore in Windows 10.
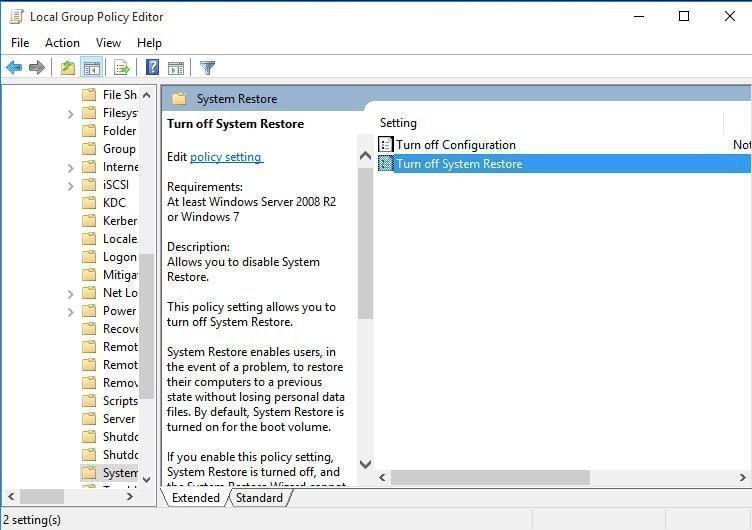
Step 1. Type group policy in the search box and select the "Edit group policy" option.
Step 2. In the left panel, go to the location below.
Computer Configuration\Administrative Templates\System\System Restore
Step 3. To disable System Restore, go to the right panel, double-click on the Turn off System Restore setting, and select either "Not Configured" or "Disabled". Click "Apply" and then "OK".
Step 4. Click "x" to exit the local group policy editor.
How to create system restore point in Windows 10
Windows creates a system restore point automatically when there are updates, driver changes, etc. However, you can also manually create a restore point before making significant changes to the registry or system files. This allows you to revert to a previous state if something goes wrong.
Step 1. Access the System Properties window again.
Step 2. Under the Protection Settings, click "Create".
Step 3. Then, you will be asked to type a description for it, please do so. Then, click "Create" again.
How to perform Windows 10 system restore to revert changes
Before performing system restore, ensure that the partition or volume with the system restore point is functioning properly, as a corrupted partition will invalidate the system restore point. Once confirmed, select one of the methods and initiate the restore process.
Way 1: Use System Restore in normal mode
Step 1. Go to the System Properties window and click "System Restore".
If the system restore is grayed out, it means there are no available restore points, so no changes can be reverted.
Step 2. Click "Next" in the Restore system files and settings window.
Step 3. To proceed, select a restore point from the list of available options and click "Next". It's also recommended to click "Scan for affected programs" to see which programs will be impacted by the restore point.
Step 4. Confirm your restore point and click "Finish" to restore computer an earlier date in Windows 10.
Way 2: Perform system restore in safe mode
If you're unable to access the system restore feature, you can still perform this operation in safe mode, which can be a viable alternative.
A minimal boot allows the operating system to load with a minimal set of drivers and services, bypassing the source of a problem, and only loading the operating system.
Step 1. Press and hold the "Shift" key while click the "Restart" option.
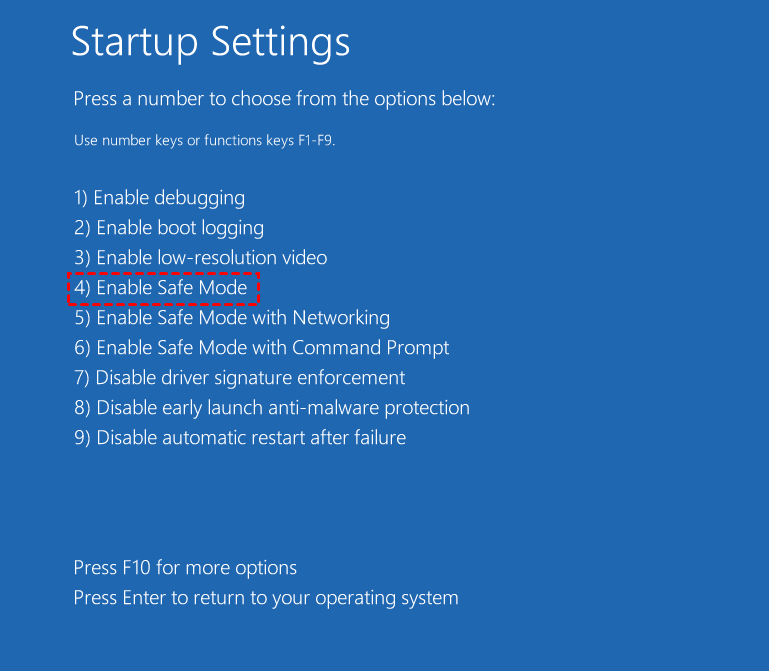
Step 2. Here you will see the Choose an option window, select "Troubleshoot" > "Advanced options" > "Startup Settings" > "Restart".
Step 3. Then, you will see all the startup settings, press "4" or "F4" to enable safe mode.
Step 4. Run system restore as it is in the normal mode.
Way 3: Restore system using Advanced startup
If your computer won't boot, you can try using the advanced startup settings to access System Restore, which can potentially resolve the boot issue by restoring your system to a previous point when it was functioning correctly.
To access the feature, you need to start your computer three times and halt the startup process when you see the Windows logo.
If the method fails, boot from the Windows 10 installation media, click Next, and select Repair your computer.
Then, see steps below to restore system from advanced startup environment.
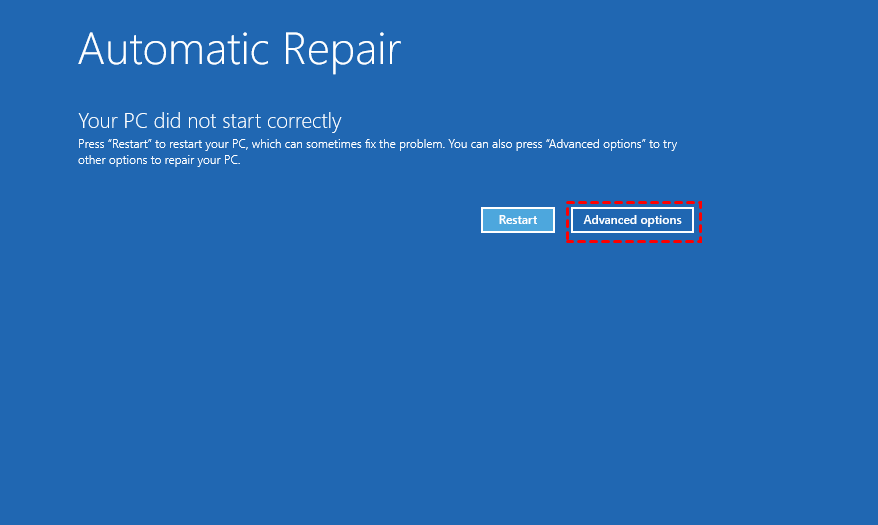
Step 1. In the Automatic Repair window, click the "Advanced option". Then, select "Troubleshoot" > "Advanced options" > "System Restore".
Step 2. To proceed, select your Windows 10 account and enter your password to continue.
Step 3. Select an available restore point and click Next. Then, follow the on-screen instructions.
Way 4: Directly reset your computer to fresh version
If you don't have a working system restore point, you can choose to directly reset your computer to troubleshoot the computer failure. This is a more drastic measure, but it can be effective in resolving the issue. To do this, go to Settings > Update & Security > Recovery, and click on the "Get started" button under the "Reset this PC" section.
To start Reset this PC, you have two ways:
From Windows: To reset your PC, go to Start, then Settings, followed by Update & Security, then Recovery, and finally Reset this PC, after which you can select Get started.
From boot: To reset your Windows 10 computer, start by booting from an installation disc or creating a recovery drive. Then, follow the prompts to enter the Windows Setup window, where you'll click "Next".
Then, follow steps below to reset your PC.
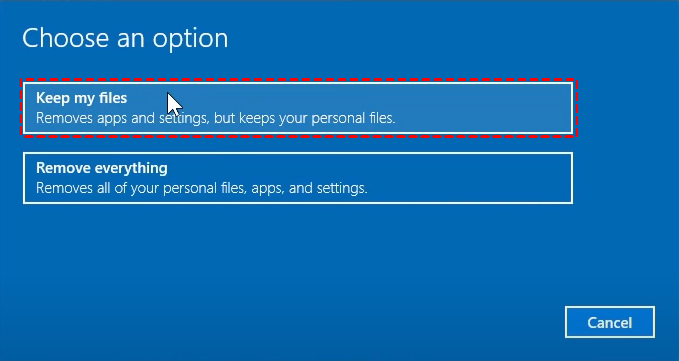
Step 1. In the Choose an option window, select "Keep my files".
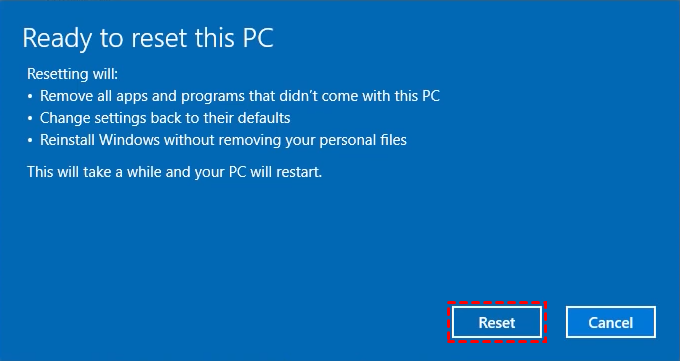
Step 2. Here you will see what changes will be made and click "Reset".
Step 3. Wait untill the process is complete. Access your computer and reinstall the programs you will use in the near future.
Alternative way to enable system restore in Windows 10
System Restore is a feature that allows you to revert your computer to a previous state, usually to fix driver issues or other small problems, but it doesn't work if your system crashes and doesn't backup personal data.
To ensure complete protection of your data and OS, it's recommended to create a backup using a free software like Qiling Disk Master Standard. This allows you to backup your system, disk, partition, or files as needed, and also enables you to �chedule automatic backups to run daily, weekly, monthly, or at incremental or differential intervals, providing continuous protection for your valuable data.schedule automatic backups to run daily, weekly, monthly, or at incremental or differential intervals, providing continuous protection for your valuable data.
This software supports various Windows versions, including Windows 11, 10, 8, 7, XP, and Vista, allowing users to perform system backup and restore operations across different operating systems.
To create a complete system backup with Qiling Disk Master, download and install the software on your computer, and prepare an external hard drive or other storage device to store the image file.
Step 1. In the main page of Qiling Disk Master, click "Backup" and "System Backup" subsequently.
Step 2. The operating system and boot-related partitions are selected by default. Click the folder shapped button to select the backup destination.
Step 3. Click "Options", "Schedule" to set backup settings. Then, confirm all the items you select and click "Proceed".
Normal or high compression level: It allows you to compress backup image to a smaller one, thereby saving disk space, found in the "Options" section.
Daily/weekly/monthlybackup: Backing up your system regularly at a set time ensures you have multiple versions of your data, providing a safety net in case of any system failures or data loss.
Incremental/differential backup allows you to backup only changed files, saving disk space. This feature is available on the professional version or higher edition.
Tip:
- To ensure you can still boot your computer even if it becomes unbootable, it's recommended to create a bootable USB drive or CD/DVD. This way, you'll have a backup boot option available.
- If you don't have extra storage, you can create a Windows 10 Recovery Environment to add the software directly to your computer.
To restore system from backup image, you can use the following steps:
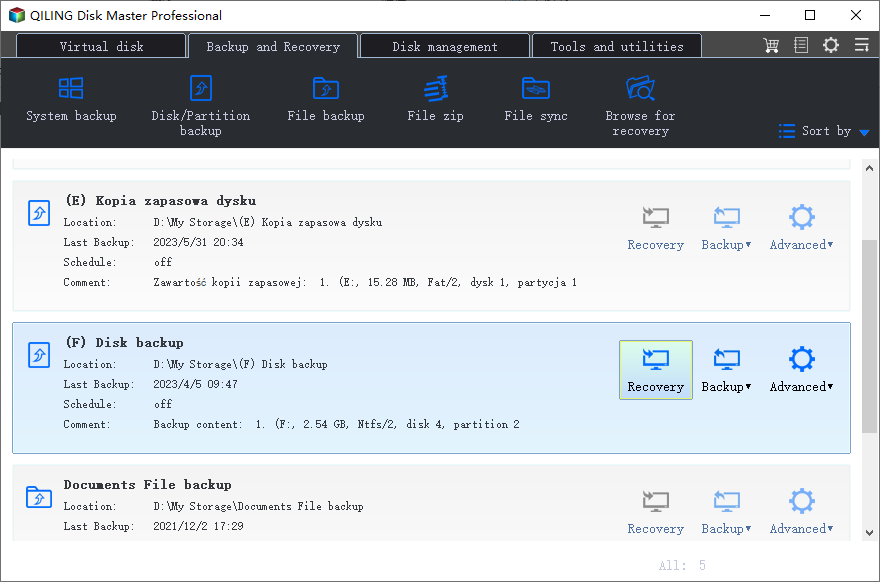
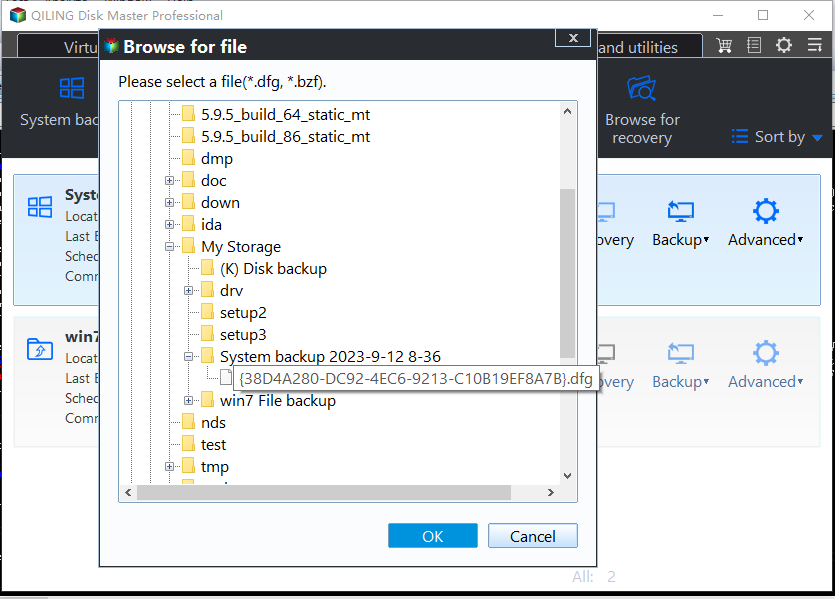
Step 1. Connect the external hard drive containing system backup and ensure it's recognized. Launch Qiling Disk Master Standard, click "Restore" and select either "Select Task" or "Select Image File".
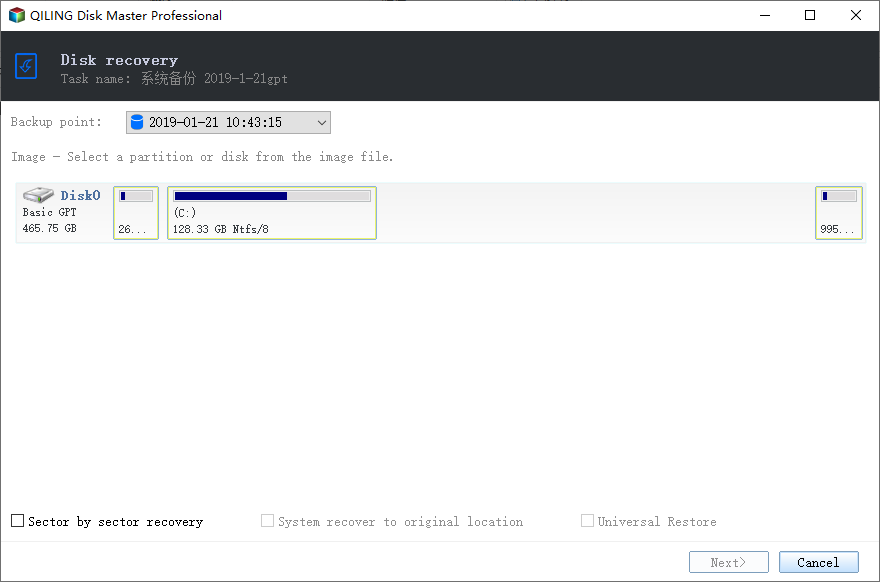
Step 2 Select the system image from the list if you chose "Select Task" in the previous step, then click "Next". If you chose "Select Image File", skip this step.
Step 3. Connect the external hard drive, tick "Restore system to other location" and click "Next".
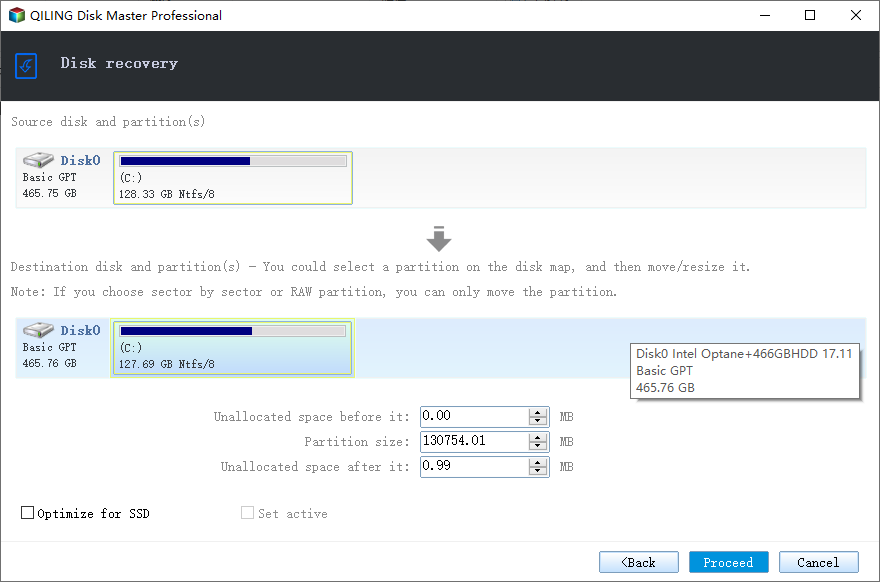
Step 4(optional). To restore the system, select the external hard drive you want to receive the image on, if you've ticked "Restore system to other location" in Step 3.
Step 5. Confirm the operations in the operation summary and click "Proceed" to restore system. Then, you will see the Settings icon, to ensure your data is complete, it's suggested to tick the checkbox before "On completion".
If you don't make a full backup ahead of time, you can create a backup on a working computer and restore system with dissimilar hardware.
Conclusion
Enabling system restore in Windows 10 allows you to restore your computer to an earlier date by undoing changes made during software installation, Windows updates, or other system modifications. This feature can be particularly helpful in reverting your system to a previous state if you encounter any issues or problems after making changes.
To protect your data or OS in a better way, it's suggested to create a complete system backup in Windows 10, allowing you to choose to backup entire disk or specific files.
It is a free disk cloning software that can help you replace a laptop HDD with an SSD, clone a disk to a larger one, or migrate an OS to an SSD. Some features are only available in the professional version, but you can download it to try it out for yourself.
Related Articles
- Restore from a System Restore Point in Windows 10
As long as you have a working restore point, you can restore from system restore point in Windows 10/11 when your computer has problems related to drivers, software or Windows Update. Get specific steps in this article. - Fixed Issue: You must enable System Protection on this drive
You may get the error "You must enable system protection on this drive" when performing system restore in Windows 10/8/7. This page tells why it emerges and how to fix the error via CMD. Better way to protect Windows is provided as well. - System Restore Points Gone in Windows 10 | 5 Fixes
You will learn how to fix Windows 10 system restore points gone error with 5 given solutions in this article. For better protect, it's wise to backup system to external hard drive. - How to Restore Windows 10 Backup to Dissimilar Hardware
This article describes the feasibility and method to restore Windows 10 backup to different hardware. It is also applied to Windows 11 and Windows 7.
