How to Create Windows 10 System Repair Disc Step-by-step?
System Repair Disc vs Recovery Drive in Windows 10
A System Repair Disc and Recovery Drive are two distinct recovery tools embedded in Windows operating systems. Both provide access to Windows' advanced startup options, but they serve different purposes. A System Repair Disc can be used to boot your computer and contains Windows system recovery tools that can help recover Windows from a serious error or restore your computer from a system image. In contrast, a Recovery Drive is typically a last resort, as it will overwrite everything and restore your computer to its state when the recovery drive was created.
In Windows 10, the Backup and Restore function is located in the same place as in Windows 7, where you would create a system disc. To create a Windows 10 system repair disk, you'll need a CD/DVD disc, or alternatively, you can create a recovery drive on a USB drive that's larger than 16 GB. In rare cases, if your computer lacks the necessary files, the program may ask for an installation disc.
When it comes to creating a recovery drive or system repair disc, it's a precautionary measure to fix computer problems and get out of emergencies, such as reinstalling Windows.
How to create Windows 10 system repair disk?
1. Insert a blank CD/DVD in the optical drive of your computer and ensure it is detected by Windows 10.
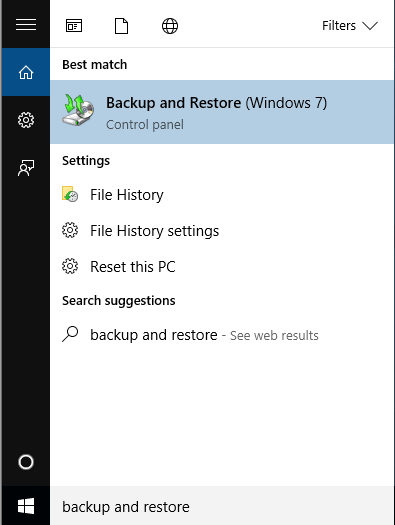
2. To backup and restore your Windows 7 computer, go to the Start menu, type "backup and restore" in the search box, and select "Backup and Restore (Windows 7)".
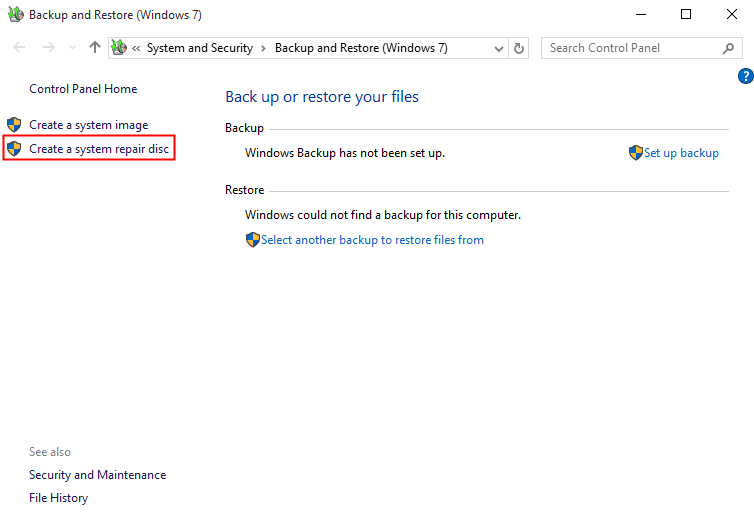
3. Click Create a system repair disc.
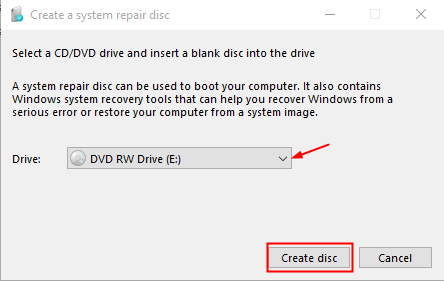
4. The CD/DVD disc is automatically detected by default. If not, manually select it or refresh and try again. After that, click on the "Create disc" option.
5. Windows will start to create disc right after the clicking.
6. When it finishes, a dialog prompts. Read the information and click Close then OK.
🎇 Note: If you're using a used disc, all data on it will be erased and replaced with new data. To avoid losing important files, please make sure to back them up before using the disc.
To create a system repair disk in Windows 10, go to the Start menu, select Settings, and then click on Update & Security. From there, click on the Recovery tab and select "Create a recovery drive" under the "Reset this PC" section. Follow the prompts to create a bootable USB drive or CD/DVD with the recovery tools. This repair disc can be used to troubleshoot and repair issues with your system, and can be used on a computer with a keyboard, mouse, and optical drive, but may require additional setup on a Tablet PC or touch screen device.
Create Windows 10 system repair disk on USB in another manner
If you're having trouble creating a system repair disc, you can also use free backup and restore software as an alternative to protect and recover your computer.
You can create a bootable rescue drive, such as a CD/DVD or USB flash drive, to recover your system in case of a failure. Additionally, you can create backups of your boot disk or system drive in Windows 10, which can be set to automatically and schedule updates. When needed, you can simply perform a �isk restore or system restore using the latest backups.disk restore or system restore using the latest backups.
Step 1: Connect a USB drive to your computer, download and install Qiling Disk Master, and then launch the software.
Step 2: Click Create Bootable Media under Tools tab.
Step 3: Select boot mode for Windows PE.
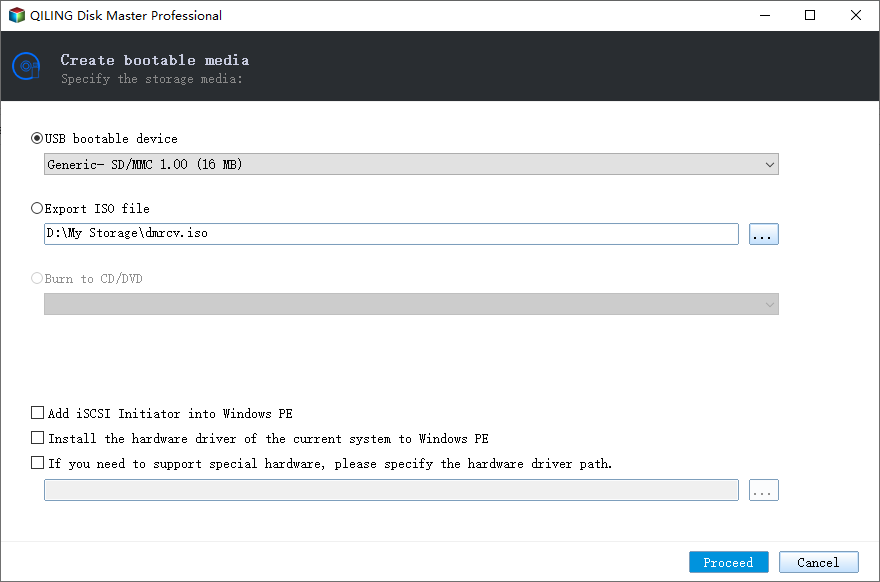
Step 4: Select the bootable storage media you wish to use and click Proceed to initiate the creation process.
Tips:
- The selected USB drive will be formatted, so be sure to back up any important files beforehand.
- Qiling Disk Master Standard supports Windows 10, 8/8.1, 7, XP, and Vista. You can upgrade to the Professional edition for full-featured functionality.
Conclusion
Creating a Windows 10 system repair USB boot disk can be a bit complicated for users with limited computer knowledge, making troubleshooting with it a challenge. A more practical approach might be to protect your system by backing up everything, which can be done using Qiling Disk Master to auto backup Windows 10 to an external hard drive. This way, even if your computer experiences a disaster, your backup images will remain safe.
Related Articles
- 3 Free Ways to Create Windows 10, 11 Recovery Disk or USB
- How to Create a System Repair Disc (on USB) in Windows 7/10
- Repair Windows 10, 11: Create Repair Boot USB Drive
- Is Clonezilla Safe? | Here Is the Answer & Its Alternative
Clonezilla is a free disk imaging and cloning program. But is Clonezilla safe? Do you want to know the answer? This article will describe whether Clonezilla is safe to use and offer you a better cloning utility called Qiling Disk Copy.


