Ways to Initialize Disk Windows 10 and Common Disk Initialization Errors
- Initialize Disk to MBR or GPT in Windows 10?
- How to initialize disk Windows 10?
- Common disk initialization errors and solutions
- Summary
Initialize Disk to MBR or GPT in Windows 10?
When adding a new disk to your computer, it may not show up in File Explorer. To make it usable, you need to initialize it, then partition and format the drive, which will erase all data. You'll also need to choose between MBR and GPT partition styles, each with its own differences and use cases.
Compared to MBR, GPT is a relatively new partition style that breaks out the partition and disk size limitation of MBR, allowing for 2TB+ hard drives and up to 128 primary partitions. While all editions of Windows can read and use GPT for data storage, only 64-bit versions (starting from Windows Vista 64-bit) can use GPT as the system disk, with 32-bit and 64-bit Windows versions being compatible with MBR for both data and system use.
How to initialize disk Windows 10?
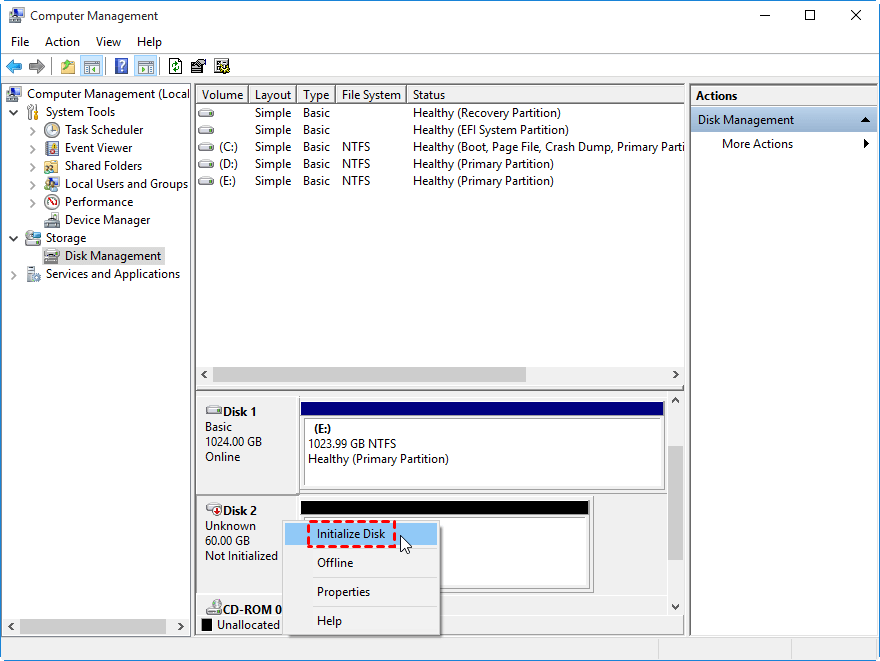
To initialize a disk in Windows 10, type "disk management" in the search box, select and hold it, then select "Run as administrator" and "Yes". In Disk Management, right-click the disk you need to initialize and select "Initialize Disk".
If a disk is listed as "Offline" in Windows 10, you can try to bring it online by right-clicking it and selecting "Online", ensuring you choose the correct disk and partition style. Alternatively, you can use the Command Prompt (CMD) or PowerShell to initialize the disk.
▌1. Initialize disk via Command line
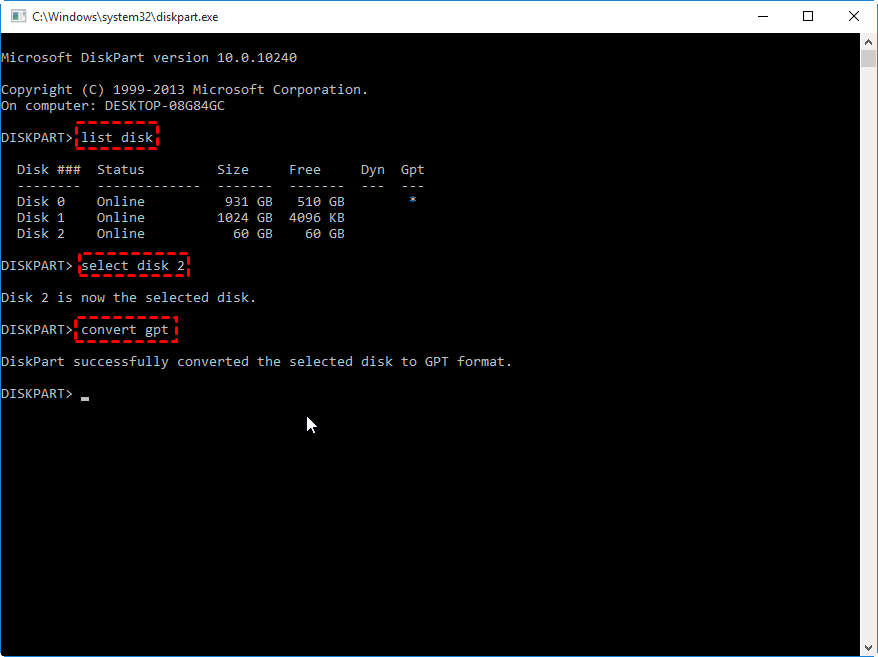
To open Command Prompt in Windows 10, press the Windows key and the R key at the same time. This will open the Run dialog box. In the Run dialog box, type "cmd" and press Enter.
▶diskpart
▶list disk
▶select disk #
▶convert gpt: If you want to initialize a disk to Master Boot Record (MBR), you can do so by inputting "convert mbr" instead.
▌2. Initialize disk using PowerShell
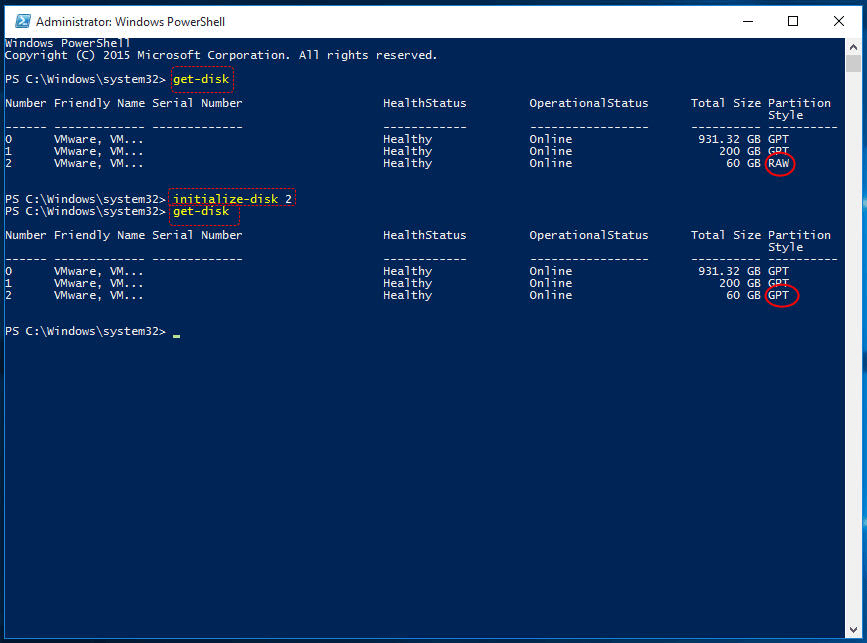
To initialize a disk in PowerShell, click the Search box, type "powershell" and click the Windows PowerShell icon, then right-click and select "Run as administrator". In the PowerShell window, type "get-disk" and press Enter to list all recognized disks, then type "initialize-disk n" (n being the number of the disk to initialize) and press Enter. This will initialize the selected disk.
Note: The command initializes the target disk as GPT by default, but to initialize it to MBR, you need to add the "PartitionStyle MBR" parameter.
After initializing the disk, the next step is to format the partition and then store data on it. This process involves preparing the disk for use by creating a file system on the partition, which will allow you to save and retrieve files.
Common disk initialization errors and solutions
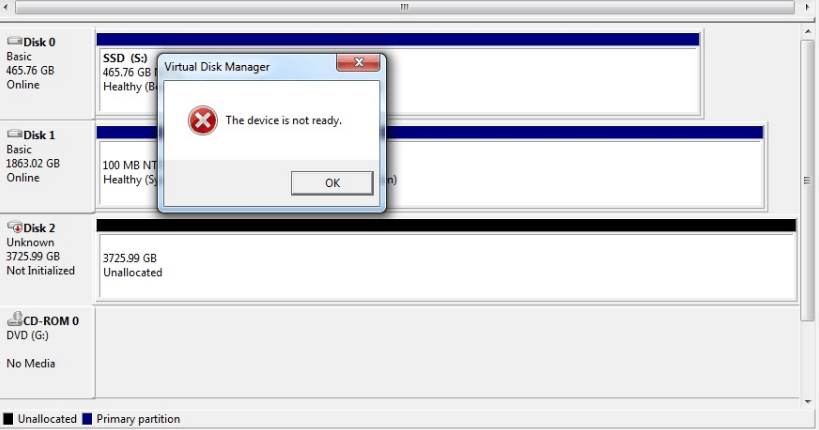
In Windows 10, 8, 7, initializing a disk can be achieved through various methods. These include using the built-in Disk Management tool, Command Prompt, or third-party software. However, users may encounter errors such as "Initialize disk device not ready," "Initialize disk the system cannot find the file specified," or "Initialize disk incorrect function." To resolve these issues, users can try using the built-in Disk Management tool, running the Command Prompt as an administrator, or using third-party software like AOMEI Partition Assistant.
▌Solution 1. Check the drive connection
To troubleshoot the issue, try reconnecting the storage device to the same USB ports, and if that resolves the problem, it indicates a damaged device or USB port. If the issue persists, try using a different USB port, and if the device is accessible, the original port is likely damaged. If the problem persists, try connecting the device to a different computer to rule out the computer as the cause. If the issue still doesn't resolve, proceed to the next solution.
▌Solution 2. Check CMOS setup
To resolve the issue, reboot your computer and press the F2, Del, or other specific key to enter the CMOS settings. From there, navigate to the BIOS Features Setup and disable the Virus Warning if it's enabled. Once you've made this change, you should be able to initialize the disk using any of the methods previously mentioned.
▌Solution 3. Uninstall and reinstall the USB controller driver
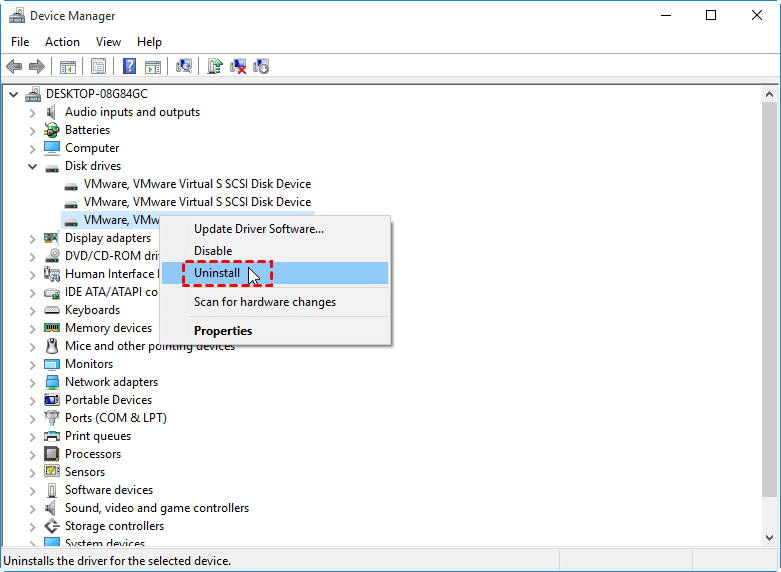
Right-To resolve the "Initialize disk device not ready", "Initialize disk the system cannot find the file specified", or "Initialize disk incorrect function" errors, follow these steps: Click on "This PC/My computer", then click on "Manage" and select "Device Manager". Expand the "Disk Driver" section and find the problematic device on the right pane. Right-click on it and choose "Uninstall". Unplug the drive, reboot your computer, and then reconnect the disk to check if the errors have been resolved.
▌Solution 4. Check drive for file system errors
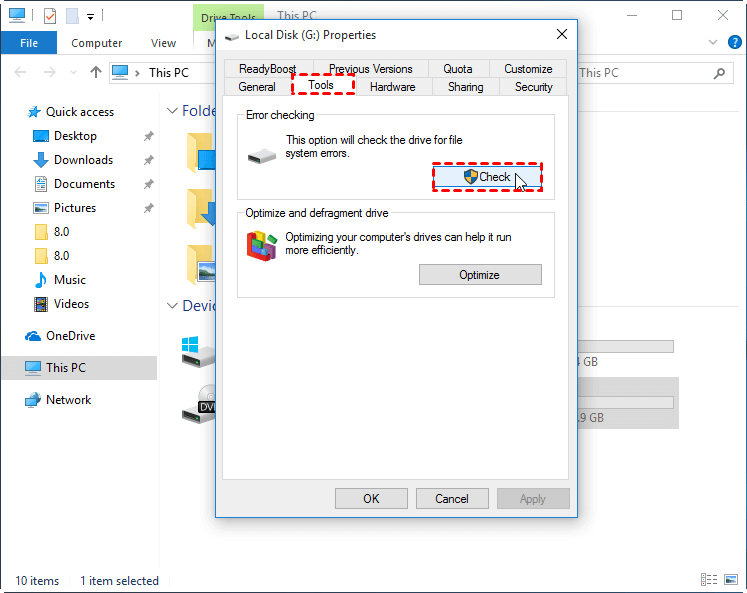
Double-To check for file system errors on a drive, click "This PC/My computer" to open File Explorer, right-click on the drive, select "Properties", click the "Tools" tab, and choose "Check" or "Check Now" under Error checking. Then, click "Scan and repair drive" and restart your computer to apply the changes.
▌Solution 5. Recover lost partition on the unallocated space
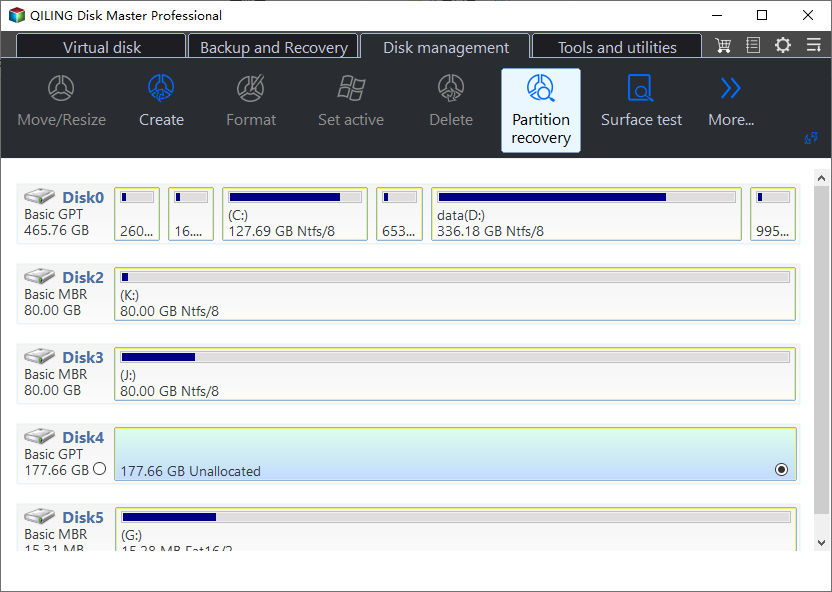
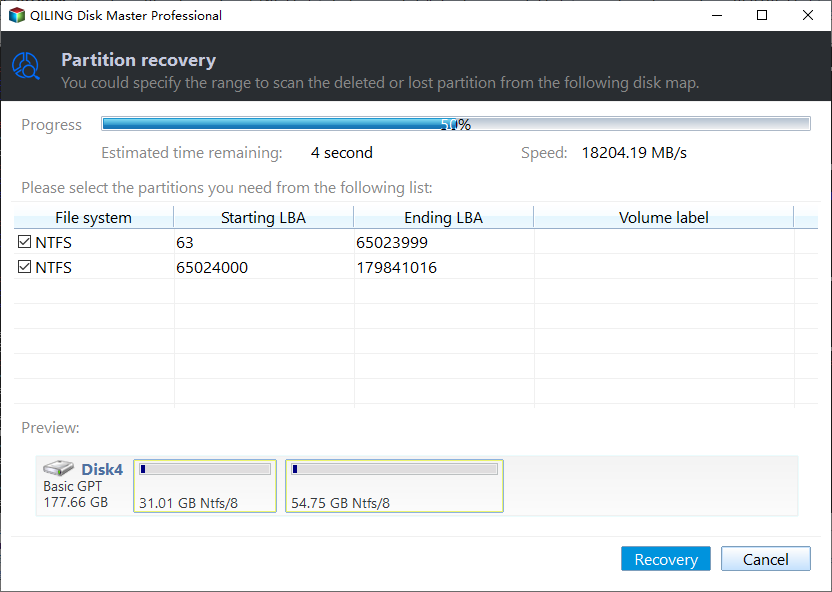
If all solutions fail and the disk is displayed as "unknown not initialized" and the partition has become "unallocated" space, you can use Qiling Disk Master Professional to recover the lost partition.
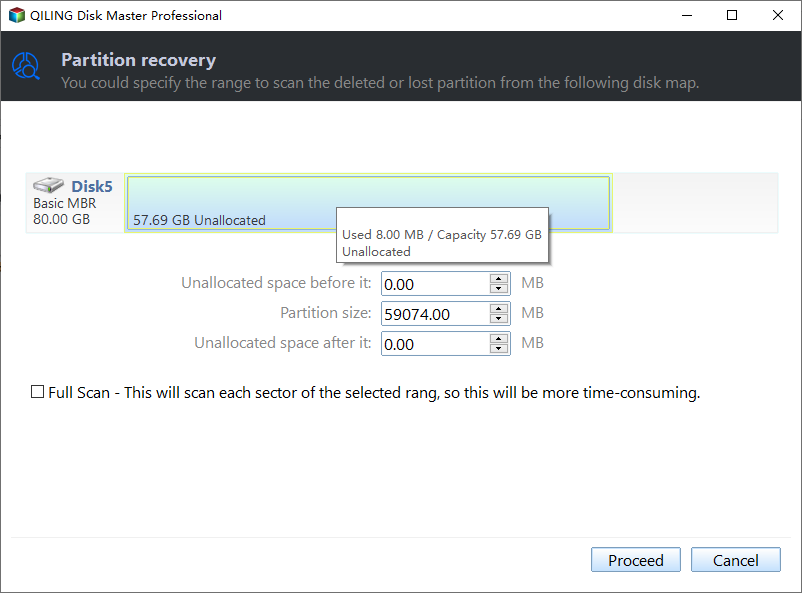
Step 1. To recover a lost partition, install and launch Qiling Disk Master Professional, then click on "Disk management" followed by "Partition Recovery", and select the disk that contains the lost partition.
Step 2. Here you can select the recommended method "Proceed" to find out the lost partition.
Step 3. Select the lost partition and click "Recovery".
If you accidentally delete an important file, you can recover lost data.
▌Solution 6. Rebuild MBR
The Master Boot Record (MBR) is a crucial part of a hard drive that contains partition information, allowing the operating system to access data. If damaged, it can cause the disk to be unrecognizable, appearing as "not initialized". To resolve this, a software can be used to rebuild the MBR.
Step 1. Launch Qiling Disk Master Professional. Right-click the target disk and select "Rebuild MBR".
Step 2. Choose the target disk according to the current operating system.
Step 3. Click on "Proceed" to commit the pending operation.
Summary
If you're trying to initialize a disk in Windows 10, you can use the built-in Disk Management, CMD, or PowerShell. However, if you encounter errors like "Initialize disk device not ready", "Initialize disk the system cannot find the file specified", or "Initialize disk incorrect function", try using the previous methods to resolve those issues.
Related Articles
- Solved: No EFI Partition Was Found
No EFI partition was found? How to recover or recreate EFI partition in Windows 11/10/8/7 ? You can find the easy and safe methods in this article. - Partition Is Deleted Accidently in Windows PC? Recover it Effortlessly
When your partition is deleted accidentally in Windows 10, 8, 7, you can use the Qiling Disk Master Professional. It can recover deleted data partition and system partition easily. - Missing EFI Partition in Windows 10 – Solved
No EFI partition or missing EFI partition in Windows 10? You can refer to this article and learn how to create EFI Partition. - Ways to Initialize Disk Windows 10 and Common Disk Initialization Errors
This article shows you how to initialize disk in Windows 10, as well as tells how to fix some common disk initialization errors.

