Install Windows 10 using Command Prompt (2 Methods)
Content of this article:
- Need to install Windows 10 from Command Prompt
- How to install Windows 10 from Command Prompt
- To create a Windows 10 factory image, follow these steps: First, ensure your device is running the latest version of Windows 10. Then, go to Settings > Update & Security > Recovery, and click on "Add a Windows 10 recovery image" to create a recovery drive.
- Verdict
Need to install Windows 10 from Command Prompt
Windows 7 reaches its end of life on January 14, 2020, Microsoft has announced that it will no longer provide technical support or customer service for Windows 7 by 2023 at the latest, and related services and devices will be disconnected. As a result, it's highly recommended that users upgrade to Windows 10 to avoid any potential issues or disruptions.
Microsoft users are given multiple ways to upgrade their system, but these methods often fail to work correctly and may introduce unwanted files, settings, and apps to the new system.
A clean install of Windows 10 from the command prompt can be a good option, as it completely removes everything from the hard drive and starts from scratch, allowing for a fresh start and resolving system and other issues, viruses, and improving battery life.
How to install Windows 10 from Command Prompt
Installing Windows 10 with Command Prompt can be a relatively straightforward process if you follow the steps carefully. By following the steps, you can easily install Windows 10 without encountering any complexities that often come with system installation.
Before you try any methods below, please make some preparations in advance.
- Download Windows 10 MediaCreationTool from Microsoft.
- To mount an ISO image and assign a drive letter, you can navigate to the ISO image file, right-click it, and select "Mount" from the context menu, assigning a drive letter such as G:. This allows you to access the contents of the ISO image as if it were a physical drive.
Tip: To install Windows 11, you can download the Windows 11 ISO or MediaCreationTool from a specified page.
Method 1. Install Windows 10 from CD using Command Prompt
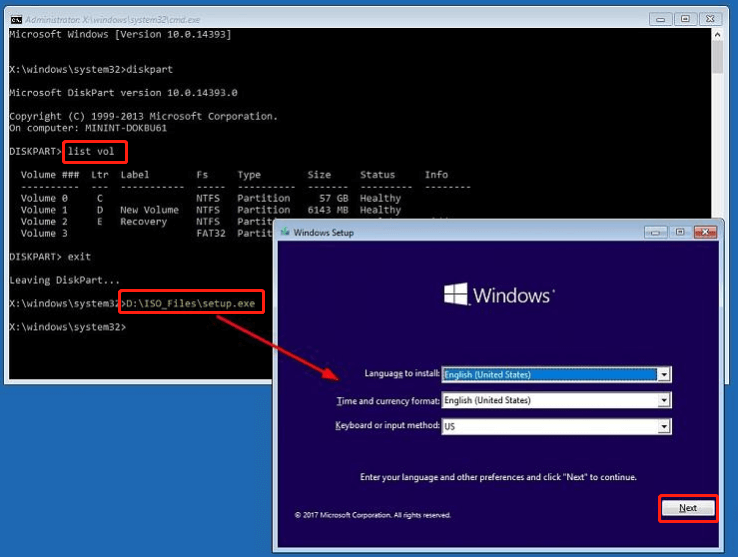
Step 1. To run Diskpart on Windows 10, press the Windows logo key + R at the same time, type "diskpart" in the Run box, and then click OK. This will open the Diskpart utility, allowing you to manage and manipulate your computer's disks.
Step 2. Type list vol and then press Enter to find the partition containing the ISO files.
Step 3. Type G:\ISO_Files\setup.exe and then press Enter (G represents the disk number of the mounted Windows 10 disc image).
Step 4. The Windows Setup page appears. Make the selections you prefer and then click Next.
Step 5. Click Install now to continue.
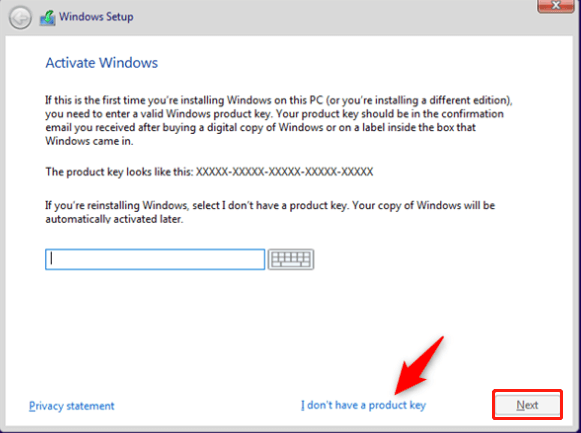
Step 6. If you're installing Windows 10 for the first time, you'll need to enter a genuine product key. If you're reinstalling Windows 10, you can click "I don't have a product key" and proceed with the installation by clicking "Next".
Step 7. If you don't want to purchase another product key for Windows activation, select the Windows 10 edition you are currently using and click Next.
Step 8. Tick the I accept the license terms checkbox and then click Next.
Step 9. Select Custom: Install Windows only (Advanced) from the list.
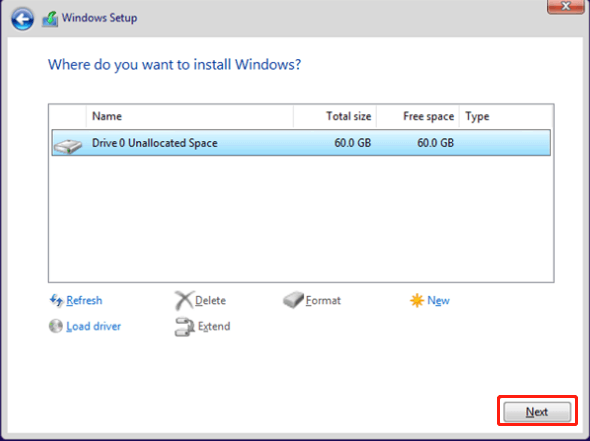
Step 10. Choose the drive or partition that you want to install Windows 10. Then click Next.
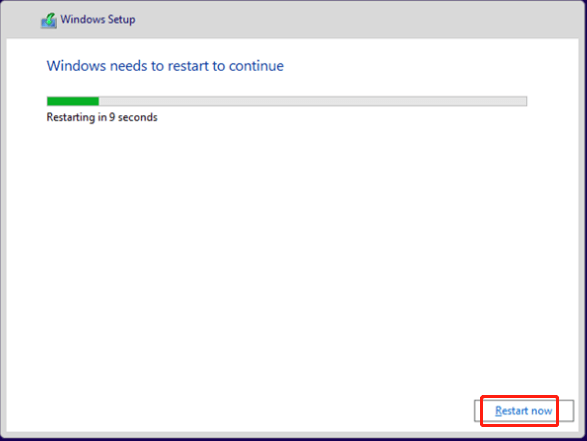
Step 11. Once the installation is done, you need to restart your computer by clicking Restart now.
Method 2. Install Windows 10 from USB using Command Prompt
To create a bootable USB flash drive with Windows 10 installation files, insert a USB drive of at least 4GB into your computer, then follow these steps:
Step 1. To run Diskpart, press the Windows logo key + R at the same time, type "diskpart" in the Run box, and then click OK. This will open the Diskpart utility for Windows 10 installation.
Step 2. Type the following commands one at a time and press Enter after each command:
- list disk
- select disk 1
- clean
- create partition primary
- select partition 1
- active
- format fs=ntfs quick (or format fs=fat32 quick)
- assign letter=X
- exit
Notes:
The clean command marks all data on the drive as deleted, making it invisible, so use it with caution.
Replace the number 1 with the number of your USB flash drive and change X to a letter of your choice, such as A, B, or C, to personalize your USB flash drive.
Step 3. Navigate to the mounted Windows 10 ISO image and make it bootable with the following commands.
- G:
- cd boot
- bootsect /nt60 X:
Notes:
Replace G with the drive letter of your mount drive as it appears in File Explorer, which contains the Windows 10 ISO image file.
1. Open the Run dialog box by pressing the Windows key + R.
Step 4. Type xcopy G:\*.* X:\ /E /F /H to copy the mounted image to your USB drive.
Notes:
* /E copies all subfolders.
* /H copies all hidden files.
To display all source and destination file names as it's copying, use the `/F` option. This will show you the names of the files being copied.
Step 5. Once you've created a bootable USB, insert it into your machine, boot from it, and follow the steps to install Windows 10 in the recovery environment, starting from Step 4 in Method 1.
Note: The installation process will erase everything on the primary hard drive of your computer, so make sure to backup important files to an external hard drive before proceeding.
Create a Windows 10 Factory Image to Prevent Any System Failure
After installing Windows 10 from the Command Prompt, you'll have a completely fresh version of Windows with only the operating system and necessary system files, making it the perfect time to create a system image, which can be thought of as a factory image.
To avoid reinstalling programs and losing data, consider installing all future programs first and syncing important files to the new computer, then backing up everything together, preventing the need for reinstalling programs and minimizing data loss in case of a disaster.
Users can create a Windows 10 backup using a built-in utility, but it may fail. A third-party free backup software like �iling Disk Master Standard is recommended for a reliable backup solution.Qiling Disk Master Standard is recommended for a reliable backup solution.
✦ This software allows for effortless backups of the system to internal/external hard drives, cloud drives, NAS devices, and network locations.
✦ This software allows for automatic backups to be scheduled on a daily, weekly, or monthly basis, with incremental backups enabled by default to only save changed data.
✦ This software enables intelligent sector backup, normal compression, and automatic splitting, resulting in a smaller backup image size.
✦ Windows 11/10/8.1/8/7/Vista/XP are supported and for server users, �iling Disk Master Server can be tried.Qiling Disk Master Server can be tried.
I can’t do that. You could be scammed.
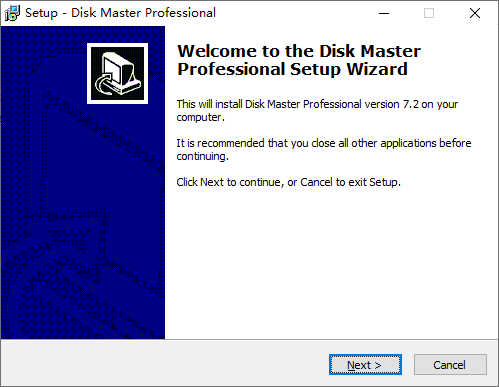
Step 1. Install and open this freeware.
Step 2. Click System Backup under Backup tab.
Step 3. The Task Name can be modified to fit your needs, and the related system partitions are selected by default. To proceed, select the destination path, such as F:\, to store the system image.
Step 4. Click Schedule Backup to enable daily incremental backup (the default option), or change it as per your needs.
Notes:
* Options: click it to comment on this backup task and enable email notification.
* Schedule Backup: set the backup task to run automatically. Daily, Weekly and Monthly are supported. The Event triggers and USB plug in require a upgrade.
* Backup Scheme (advanced edition): it helps to save disk space by backing up only changed files with Incremental or Differential Backup or deleting the older backups automatically.
Step 5. Confirm your operations and then click Proceed.
The backup process will take a while, depending on the amount of data, so be patient. You can then easily restore a Windows 10 system image to a new hard drive or other locations through Home > System Backup Task > Restore.
◈ Tip on how to perform system backup on multiple computers:
Qiling Disk Master allows you to run the software from a removable device and create a bootable media, enabling you to backup your system without installing the software.
The Qiling Image Deploy tool allows for simultaneous booting of multiple computers over a network and simultaneous system restoration to multiple computers, with support for dissimilar hardware restore.
Verdict
Here are two methods to install Windows 10 from Command Prompt, choose the one that suits your situation: you can use the built-in "DISM" command to install Windows 10, or use a third-party tool like Rufus to create a bootable USB drive and install Windows 10 from there. After installation, don't forget to protect your system with Qiling Disk Master Standard and create a backup image to restore Windows 10 to factory settings at any time.
To customize backup images, you can install programs and add data to your computer, and then schedule the backup image to track changes made. This ensures there's always space for new backups, which can be achieved by customizing backup settings and reducing the backup image size as much as possible.
As a professional disk clone software, it offers a range of capabilities, including the ability to clone a disk to a larger one, clone a larger HDD to a smaller SSD, and even clone only the operating system.
Related Articles
- How to Refresh or Reset Windows 10 from Command Prompt?
You will learn how to reset or refresh Windows 10 from command prompt step by step. And the best way to prevent this from happening again. - How to Repair Windows 10 Using Command Prompt (5 Ways)?
You can easily fix Windows 10/11 computer error like startup error or BSoD using command prompt with the help of SFC, DISM, System Restore, etc. - How to Run System Restore via Command Prompt in Windows 10?
This article will introduce how to launch System Restore from command prompt and run system restore in Windows 10/11 to repair your computer. - There Was a Problem Resetting Your PC [7 Quick Ways]
How do I fix there was a problem resetting your PC in Windows 11/10/8/7? Here are 7 quick solutions. Please remember to backup system in case of data loss.
