Easy | Migrate Windows 11/10 to M.2 SSD without Reinstalling
What is M.2 SSD?
Before diving into the process of migrating Windows 11 or Windows 10 to an M.2 SSD, it's helpful to understand what an M.2 SSD is.
The M.2 SSD, originally known as the Next-Generation Form Factor (NGFF), is a solid-state drive that conforms to a computer industry specification for internally mounted storage expansion cards of a small form factor. Like other SSDs, M.2 SSDs have shorter boot up times, lower power consumption, and less noise than traditional HDDs.

The advantages of M.2 SSD are the reasons why people copy HDD to M.2 SSD. Some Windows users still wonder if they could use M.2 SSD as a boot drive, and the answer is yes.
💙 M.2 vs. SATA SSD for boot drive, which is better?
M.2 SSDs are smaller and faster than traditional 2.5-inch SSDs, using the NVMe protocol to provide quicker performance, making them a popular choice for upgrading Windows 10/11.
💙 Would a 250GB M.2 SSD be sufficient purely for OS storage?
128GB or 250GB SSD is sufficient for Windows OS and basic applications, leaving room for future use.
How to transfer Windows 10/11 from HDD to M.2 SSD
To move Windows 10/11 from a traditional HDD to an M.2 SSD, you can either use Windows' built-in tool or a third-party disk cloning software. Before proceeding, some preparations are necessary, regardless of the method you choose.
◆ Clean up your old hard drive. To free up space on your computer, delete unwanted files, uninstall unnecessary apps, and perform a disk cleanup.
◆ Install M.2 SSD properly. To install an M.2 SSD, ensure your computer's motherboard has an available M.2 slot. Locate the M.
To write a good essay, it's essential to understand the topic, identify the main points, and create an outline. Next, I will walk you through the detailed steps of each way.
- Way 1. Transfer Windows 10/11 to M.2 SSD (Windows tool)
- Way 2. Clone Windows 10/11 to M.2 SSD (Easier)
Way 1. Transfer Windows 10/11 to M.2 SSD (Windows tool)
Here you will use built-To create a system backup and restore it on an SSD using an installation disc, follow these steps:
Step 1. Create a Windows 10/11 system image
1. To create a system image, type "backup" in the Search Box, select "Backup settings", then "Go to Backup and Restore (Windows 7)", and finally click "Create a system image".
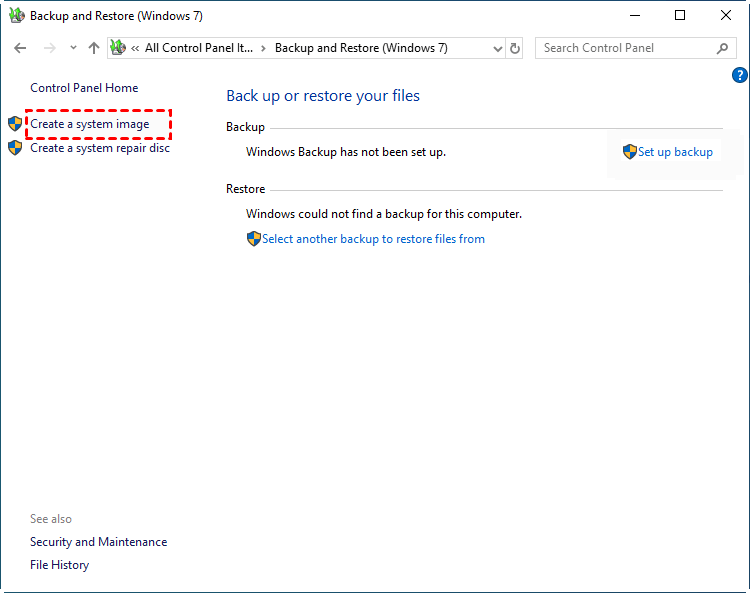
- ★ Open Backup and Restore (Windows 7) in Windows 11:
- On Windows 11, go to Settings > System > Storage > Advanced Storage options > Backup options, then scroll down to "Looking for an older backup" and select "Go to Backup and Restore (Windows 7)" to access the backup and restore feature.
2. Save your backup on an external hard drive.
3. The system drive and system reserved drive are included by default, and clicking "Next" will continue the process.
4. Confirm the settings and click Proceed.
Step 2. Create installation media
To migrate your OS to an M.2 SSD, start by creating a system image in Windows 10. This process requires an installation disc for boot, which you can obtain by downloading the Windows 10 Media Creation tool from the Microsoft software download page and creating a bootable USB with it.

Step 3. Restore system image to M.2 SSD
I couldn't find the requested text. It seems like the conversation just started. If you'd like to provide the text, I can assist you in rewriting it in one paragraph shortly.
1. Shut down the computer and connect SSD to it.
2. To reset your computer, restart it and change the boot device to the USB drive in the BIOS settings. Save the changes and then reboot from the USB drive.
3. In the Windows Setup window, click Repair your computer -> Troubleshoot -> Advanced Options -> System Image Recovery.
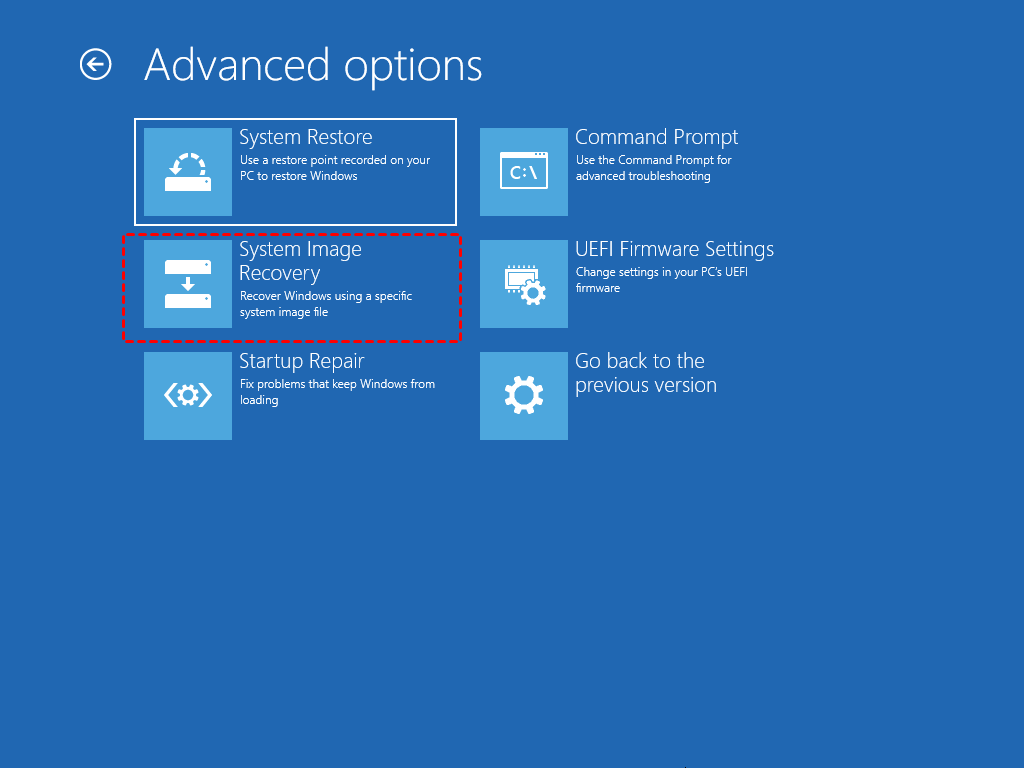
4. After that, you will see the Re-image your computer screen. Click Use the latest available system image (recommended) and then click Next to complete the restoration process by following the instructions.

To simplify the process, it's recommended to try the second method, which involves migrating Windows 11/10 to a new M.2 SSD using a cloner. This approach is user-friendly and widely used among Windows users.
Way 2. Clone Windows 10/11 to M.2 SSD (Easier)
Qiling Disk Master Professional is a powerful and safe system clone software that allows you to transfer Windows 10/11 to an M.2 or NVMe SSD without reinstalling the operating system.
- The software supports cloning UEFI GPT disks as well as MBR disks, and allows for direct cloning without needing to convert the partition style beforehand, whether cloning from MBR to GPT or vice versa.
- This software enables the cloning of Windows 11 or Windows 10 from a larger disk to a smaller SSD, as long as the target disk has sufficient free space to accommodate the used space.
- Don't worry about the partition layout since you can adjust partition size during cloning.
Preparations:
1. Connect the M.2 SSD to your computer. If cloning to another M.2 SSD with only one slot, prepare an M.2 to USB enclosure in advance.
2. Download the M.2 SSD cloning tool, but note that the trial edition only allows previewing operations, not executing them.
Video Tutorial:
Graphic Tutorial of how to move Windows to M.2 SSD:
Step 1. Launch Qiling Disk Master Professional. Click Clone and then select System Clone.

- ★ Clone entire hard drive instead of only OS:
- If you want to transfer the entire hard drive, choose Disk Clone instead. It allows you to clone HDD to SATA SSD, clone SSD to M.2 SSD, and so on.
Step 2. The system partitions will be automatically selected. Simply choose the M.2 SSD as the destination disk and click Next to proceed.

Step 3. To accelerate the reading and writing speed of your M.2 SSD, check the SSD alignment and then click proceed to migrate Windows 10 to the M.2 SSD.

💛 Tips:
- The default intelligent cloning mode copies only used sectors on the system partitions, allowing you to clone an OS from a larger HDD to a smaller SSD without boot issues. Alternatively, you can choose "Sector by sector clone" to copy every byte on the source partitions.
- If your M.2 SSD is larger, there will be an option called "Make full use of disk space" which is checked by default, allowing the system partition to extend its size.
💜 More advanced features in higher edition:
If you want to use Qiling Disk Master on different computers without reinstalling it, consider upgrading to Qiling Disk Master Technician Plus.
- This software allows you to create bootable media on a USB drive, enabling you to run the software directly from it and utilize features like System Clone on any computer.

- The tool allows you to deploy or restore a system image file from a server to multiple client computers over a network.
Tip on booting from the M.2 SSD
After cloning, go to your BIOS settings and change the boot order to boot from the M.2 SSD instead of the original drive.
1. To enter BIOS, restart your PC and press the manufacturer specified key, which is usually F2, F10, F12, or Del, depending on the device. If you're unsure, check your user manual or search online for the correct key for your specific device.
2. In the BIOS menu, go to the "Boot" tab and set the M.2 SSD as the first priority in the boot order.

3. Press "F10" to save the changes and exit.
Tip: To ensure a smooth process, it's recommended to delete the 450MB recovery partition if it exists, which will help save SSD space.
Conclusion
Migrating Windows 10 from a hard disk drive (HDD) to an M.2 solid-state drive (SSD) can be done in two ways: using Windows' built-in tool or a professional third-party cloning tool. The choice between the two depends on your specific situation, and you can select the one that best suits your needs.
For example, if you're a DIYer, the first method is pretty good. However, if you're not so familiar with computer operations, Qiling Disk Master is a perfect choice.
Besides, you can still use it to transfer Windows from SSD to M.2, clone SSD to larger SSD, clone NVMe SSD, and replace laptop HDD with SSD, etc.
Related Articles
- How to Clone Windows to NVMe SSD Step by Step
- Safely Clone M.2 SSD to Larger M.2 SSD in 4 Simple Steps
- Best Free Windows 11 Clone Software without Boot Issues
- How to Install Windows 11 from USB via CMD
Here's a tutorial to help users install Windows 11 from USB via CMD and with an easier way to install Windows 11 with a handy tool.