No Bootable Device Found in Windows 10 - Solved Now!
Quick Navigation:
- An error occurs: no bootable device found in Windows 10
- How to fix no bootable device found in Windows 10 accordingly?
- Solve no bootable device found with free partition manager
- Summary
An error occurs: no bootable device found in Windows 10
Do you get annoyed because you can't boot your computer only receiving a message "No bootable devices found"? A bootable device means any piece of hardware that contains or can read the files required for a computer to start. A hard drive, floppy disk drive, CD-ROM drive, DVD drive, and USB thumb drive are all considered bootable devices. How comes no bootable device found in Windows 10? Let's get start.
How to fix no bootable device found in Windows 10 accordingly?
If you encounter no bootable device is detected, there are two possible causes. You can find corresponding solutions here. Windows installation media is needed for solution number 2. If you don't have it, you can turn to a free tool offered in the next part.
Hard drive is not set as first boot device in BIOS
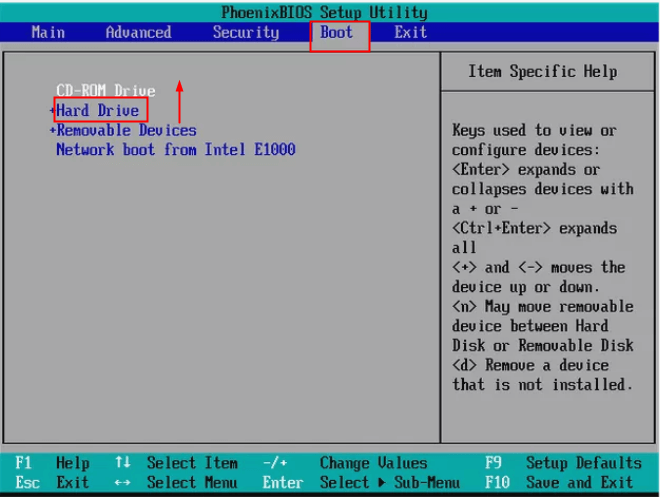
In this case, you can simply change boot order like this:
1. Restart computer and tap Del to enter BIOS interface.
2. Press the right arrow key on your keyboard until the Boot tab is opened. Move "Hard Drive" to the top of the boot order list by pressing "+" or "-".
3. Press F10 to save changes and restart computer.

Tips:
● The function key to enter BIOS interface is likely to be F1, F2, F3, Esc, or Delete. If you are not sure, consult your PC manufacturer or go through your user manual.
● Since every BIOS setup utility is different, the menu option or configuration item might be called Boot, Boot Options, Boot Order, etc. The boot order option may even be located within a general menu option like Advanced Options, Advanced BIOS Features, or Other Options.
Corrupted MBR
Corrupted MBR can also lead to no boot device available in Windows 10. In this situation, you may repair MBR in following steps:
1. Insert the Windows installation media into your computer and boot from it.
2. Select the language and region, and then click on "Repair your computer" when you see the "Install now" window.
3. Select Troubleshoot and then Command Prompt on the Advanced options screen.
4. In Command Prompt, input following command lines and press Enter after each. (If you are asked whether you want to add a new installation to boot list, type "y" and then press Enter.)
● bootrec /fixmbr
● bootrec /fixboot
● bootrec /scanos
● bootrec /rebuildbcd
5. Exit Command Prompt and restart your computer.
Solve no bootable device found with free partition manager
If MBR of your computer is corrupted, you can also rebuild MBR with the best partition manager Qiling Disk Master Standard. It is reliable and totally FREE. I'll show you how to fix no bootable device in Windows 10 via Qiling Disk Master step by step:
Step 1. Connect a USB drive to a computer in good condition. Download, install and run Qiling Disk Master. Click on "Tools" > "Make Bootable Media" on the main interface and follow the wizard to complete the process.
Tips: The bootable USB will contain installed Qiling Disk Master.
Step 2. Insert the bootable USB into the computer which has a boot problem. Boot from the USB by changing boot order in BIOS.
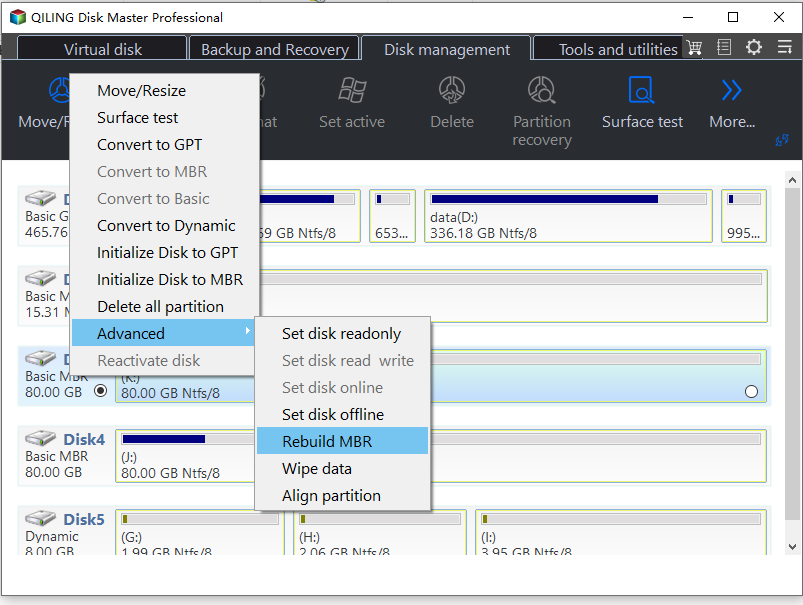
Step 3. You'll see loaded Qiling Disk Master once log in. Right-click the system disk and select "Rebuild MBR".
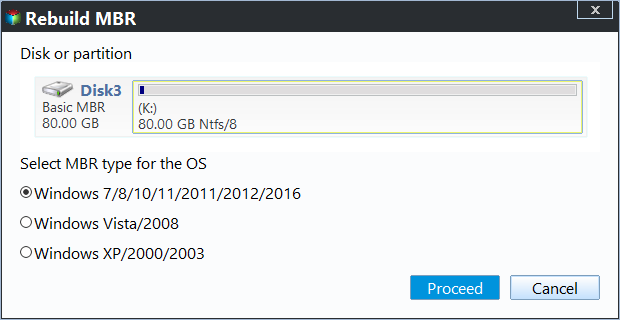
Step 4. Set the type of MBR for Window 10 in the pop-up window.
Step 5. Click "Proceed" to commit the pending operations. Restart your computer later.
Summary
Now you have the best solutions for no bootable device found in Windows 10. They apply to no boot device found in Windows 7 as well. If any data loss happens during your operation, you can use the "Recover Data" function to retrieve lost data. In addition to rebuilding MBR, you can also use Qiling Disk Master to increase memory of C drive, erase SSD before selling and so on.
Related Articles
- Solved: Boot Device Not Found HP
Sometimes, some users report that hard drive not detected or boot device not found HP laptop/desktop. This article will show you five workable ways to solve it quickly and safely. - How to Repair Operating System Not Found Error in Windows 10?
Sometimes, you might meet the "operating system not found" error in Windows 10 startup process. Here you can learn why your computer says no operating system found and how to fix this problem via several effective methods. - How to Fix "Invalid Partition Table" Error in Windows 10?
Get an "invalid partition table" message in Windows 10 when booting up the computer? Refer to this article and you will realize how to fix "invalid partition table" error on Windows 11/10/8/7 in 4 different ways.


