Schedule Automatic File Backup in Windows 10 (3 Ways)
Why create Windows 10 automatic backup?
Windows 10 is the most widely used operating system, with a massive user base. As time passes, users often accumulate valuable data on their systems, including user accounts, passwords, family photos, browser history, and important working documents. This raises concerns about data loss, prompting users to take steps to preserve their digital assets.
The best approach is to create an exact copy of your files every time you modify or add a new one, but this may not guarantee timely backups, and without them, you risk losing files or changes that are not backed up.
To keep changes on all files up-to-date, it's recommended to schedule automatic file backup in Windows 10, ensuring that all data is safely stored and easily recoverable in case of any issues. This also has other benefits, such as.
- Build a constant and effective backup image. If you back up Windows 10 to an external hard drive, you'll be able to recover all your important data quickly in case of a hard drive failure, system crash, blue screen, or virus infection.
- An effortless way to restore files, settings, OS, etc on Windows 10. Some Windows 10 users frequently restore files and settings from backup due to work or system issues, and continuous backup makes this process effortless.
Creating a scheduled automatic backup in Windows 10 is a simple and beneficial task that can protect your important files and data from potential loss. By setting up a backup schedule, you can ensure that your files are safely stored and easily recoverable in case of a system crash, hardware failure, or other disasters. This can give you peace of mind and prevent the loss of precious memories, documents, and other valuable information.
How to schedule automatic backup in Windows 10 effectively
The following will illustrate 3 ways on how to create a schedule automatic backup in Windows 10.
The built-In Windows 10, you can use the built-in tools "File History" and "Backup and Restore (Windows 7)" to schedule backups of your user files. Both tools allow you to set different backup frequencies, but "Backup and Restore (Windows 7)" also gives you the option to include a system image in your backups.
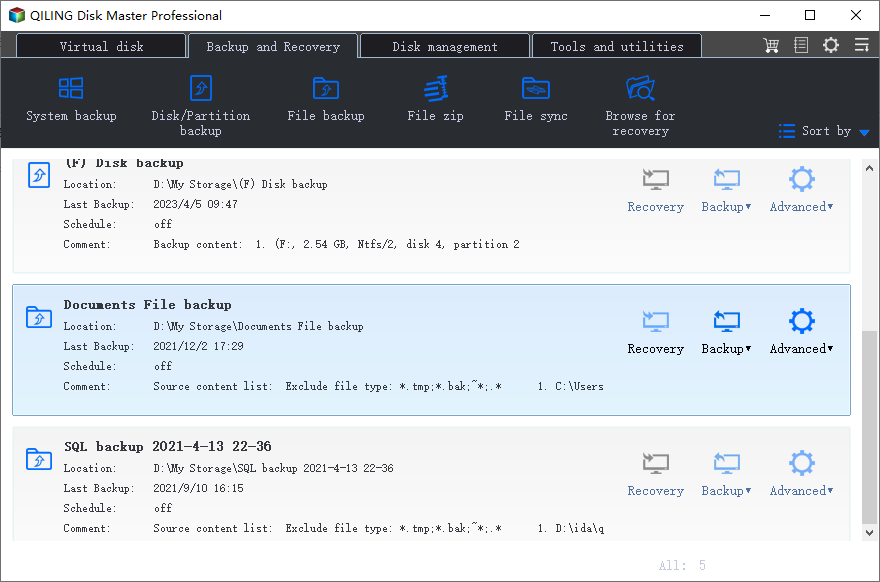
Besides, you can also use free backup software - Qiling Disk Master Standard. It makes Windows 10 auto backup files, partition(s), system, or disk, and takes care of backup image size and disk space issues.
✍ Where to store backup images?
For a Windows 10 folder backup, you can choose to save your files to an internal or external disk, a USB drive, or even a network drive.
✍ How often to create backup images?
The speed of syncing your files and folders depends on how frequently you make changes. The more often you update your files, the faster the syncing process will be.
✍ How to keep backup images?
Considering the accumulated backup images and limited disk space, it's not feasible to keep backups forever, but a shorter time frame can be maintained, ensuring there's always enough space for new backups.
Now, let's get started.
Way 1. Schedule Windows 10 automatic backup via File History
File History is the primary Windows 10 backup software that backs up all folders in the user account folder, including desktop, documents, pictures, music, downloads, OneDrive, and more. It can also be customized to include additional folders from anywhere on the computer.
Steps to set scheduled folder backup in Windows 10 with File History:
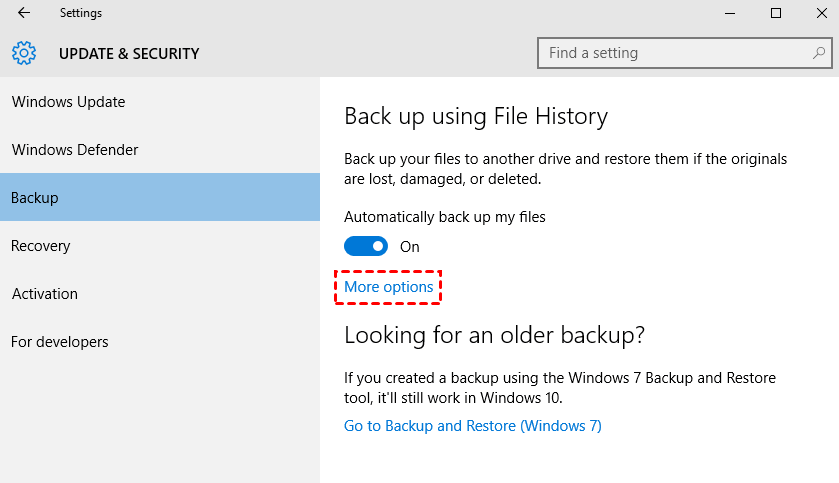
Step 1. Click Start > Click Settings option > choose Update & security > Click Backup.
Step 2. Click the "+" next to Add a drive and choose the drive or network location to store the backup files.
Step 3. Click More options to access the Backup options screen and set backup settings.
Here are 3 backup settings:
✍ Back up my files: The default backup time is every hour, with 8 other options available, ranging from every 10 minutes to daily.
✍ Keep my backups: This software will keep backup images indefinitely unless changed, potentially leading to a full backup disk and issues, so it's recommended to select a shorter backup retention period.
✍ Add a folder: It allows you to backup specific folders in Windows 10, even if they are not located in the user folder.
Step 4. Confirm you add all the files or folders you want to backup, back to the Overview section and click Back up now to schedule automatic file backup in Windows 10.
Step 5. If your backup disk is full, stop the current backup task and create a new one to avoid deleting previous backups. This will allow you to continue backing up your data without losing any existing backups. You can stop the current task by clicking on the "Stop using drive" option and then add a new task to use a different drive or storage location.
✎... How to restore the backup files
If you accidentally delete a file or folder, you can recover it using Windows 10 File History restore. There are two methods available to do this.
1. To restore personal files, go to the Control Panel, click on System and Security, then File History, and select Restore personal files. From there, browse and find the specific files you want to restore.
2. To restore a previous version of a file, right-click the file, select Properties, go to the Previous Versions tab, choose a restore point, and then restore it.
Way 2. Schedule file backup in Windows 10 with Backup and Restore (Windows 7)
Windows 10 retains the Backup and Restore feature from Windows 7, which can be accessed through the Control Panel. This tool allows you to perform two primary functions:
- backup user files on your computer.
- A system image backup captures everything on your system drive, allowing you to restore your computer to a previous working state in case of a serious issue like system crash. This backup can help you recover your system to a point where it was functioning properly, saving you from the hassle of reinstalling everything.
To create a system image backup, you can choose to include a file backup as part of the process. For example, when backing up your system, you can select to include the file backup of your files, such as documents, pictures, and other important data, in addition to creating a system image of your entire system.
Steps to set scheduled file backup with Backup and Restore (Windows 7):
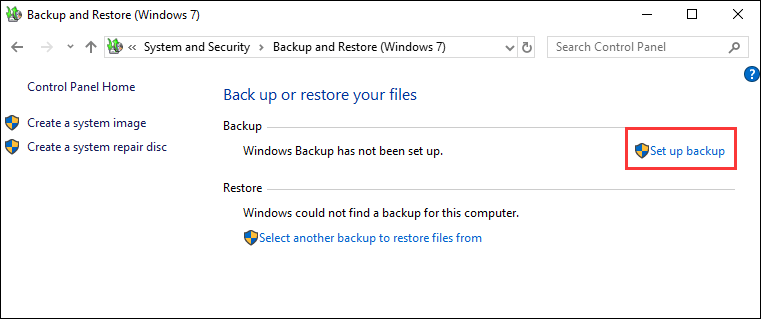
Step 1. Go to Control Panel > System and Security > Backup and Restore (Windows 7).
Step 2. Click Set up backup on the right side.
Step 3. Choose one internal or external drive to save the backup and click Next. You can also backup Windows 10 to a network drive.
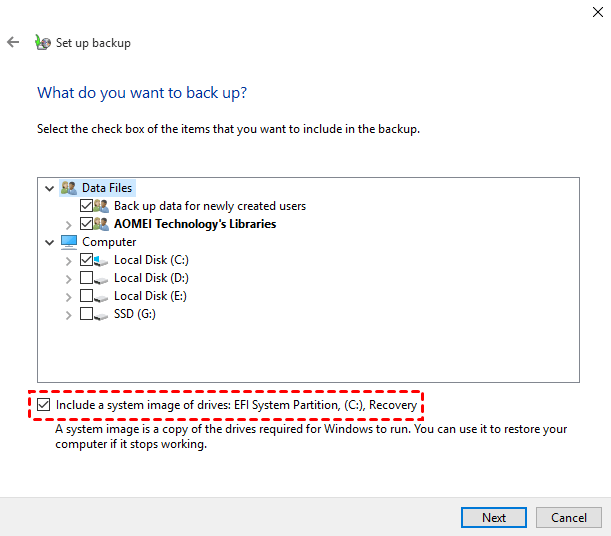
Step 4. Let Windows choose what to backup or decide by you. Click Next to continue.
✍ Let Windows choose: It will save files saved in libraries, on the desktop, and create a system image.
✍ Let me choose: It enables you to select files or folders from any location and choose whether to include a system image of drives.
Step 5. This software runs a weekly backup at 7:00 PM by default. To customize the schedule, click "Change Schedule" and then "Save settings and run the backup". After saving, the software will create an incremental backup at the next scheduled time.
✎... How to manage backup space
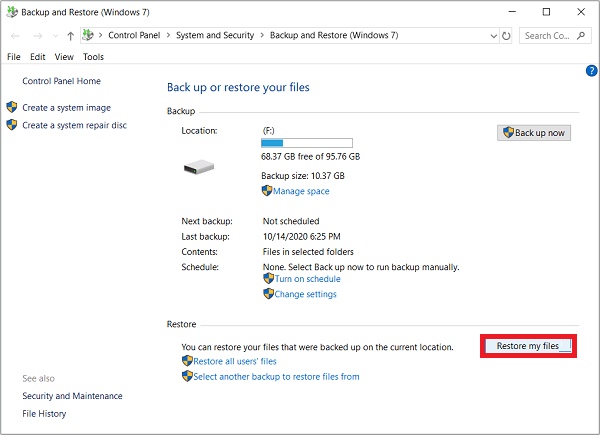
In Open Backup and Restore (Windows 7), click Manage space, and you will see both Data file backup and System image.
✍ Click on 'Data file backup' to view old backup images, then click 'Delete' to remove them and free up space for new backups.
✍ Click on System image and select Keep only the latest system image and minimize space used by backup.
You can also click Change Settings to access the Review your backup settings window and select any time you prefer. This includes options like Daily, Monthly, Monday to Saturday.
✎... How to restore files or system image
1. To restore certain files or folders, go to the Control Panel, then System and Security, then Backup and Restore (Windows 7), and click the Restore my files button.
2. To restore the system, go to Settings > Update & security > Recovery > Advanced startup > Restart now, then go to Troubleshoot > Advanced Options and click System image recovery.
Way 3. Schedule automaic backup files in Windows 10 (Easier)
It is a wise choice to use excellent professional backup software that can achieve twice the result with half the effort in doing Windows 10 scheduled backup, such as Qiling Disk Master Standard, which offers advantages including.
- All-in-one backup solution: It supports File Backup, Partition Backup, System Backup, Disk Backup, and Cloud Backup.
- Different backup frequencies: This app offers three main time tracking modes: Daily, Weekly, and Monthly. Additionally, the advanced edition provides extra features, including event triggers and the ability to plug in a USB device.
- Reduce backup image size: EaseUS Todo Backup offers features like Incremental Backup, Normal Compression, and Automatic Splitting to create smaller backup images, all with minimal setup required.
- Rich backup destination: This tool lets you back up your files to any recognized device, including internal or external disks, USB drives, network drives, NAS storage, cloud drives, and more.
To create a scheduled file backup in Windows 10 (also applicable to Windows 11, 8, 8.1, 7, XP, and Vista), follow this guide. Note that server users may want to try Qiling Disk Master Server instead. For a full guide, see the detailed instructions provided. (Note: the original text was cut off, so I couldn't provide a full rewritten paragraph.
Step 1. Launch this software, and choose Backup and File Backup subsequently.
Step 2. Select the files or folders you want to backup.
Step 3. To store the file backup image, click the second box and select a local path, network or NAS, or cloud drive as the destination.
Step To automatically backup files in Windows 10, click Schedule Backup and select a frequency such as daily, weekly, or monthly, or set up a backup to occur when a specific event happens, such as when a USB drive is plugged in.
Notes:
- Options: The task involves rewriting the text about Windows 10 backup encryption, specifically the feature available in advanced versions, in a concise manner. However, there is no original text provided to work with, making it challenging to complete the task. If you could provide the original text or clarify the requirements, I'd be happy to assist you in rewriting it in one paragraph.
- Backup Scheme: To resolve the backup disk full issue, you can use differential backup and cleanup methods to automatically delete old backup images. This is the most effective way to manage backup storage, ensuring that only the most recent and necessary files are retained. The process is fully automated, eliminating the need for manual intervention and freeing up disk space for more important data.
Step 5. To schedule automatic backups in Windows 10, click on the Start button, then select the "Settings" icon. From the Settings window, click on "Update & Security" and then select "Backup" from the left-hand menu. Click on the "Add a drive" button and select the drive you want to backup.
After creating a backup, verify its integrity by checking it in the Tools tab, where you can also explore the backup image. This ensures the backup is complete and functional, making it a reliable safeguard against data loss.
✎... How to restore files from backup
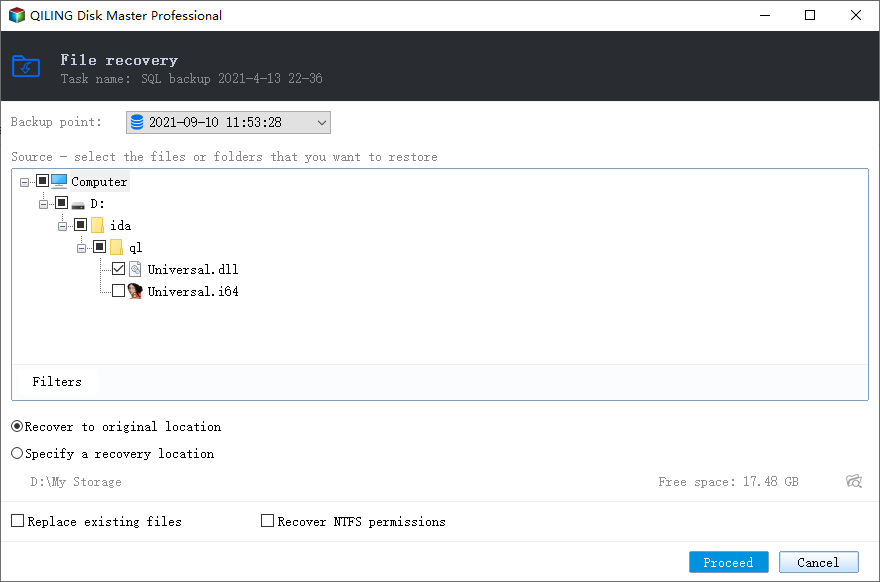
Restoring a file backup is a straightforward process, involving going to the Restore tab, selecting the backup task, choosing the files or folders to restore, specifying a location to receive the files, and clicking Start Restore.
In addition to full system restore, you can also selectively restore files with the Explore Image feature, or restore to different hardware if you've created a system or disk backup.
To schedule backup system in Windows 10, please check the following video:
Verdict
Windows provides ways to backup data, and a long-term backup is crucial. Scheduled or automatic backup for Windows 10 is essential and urgent.
I recommend using the last free backup software for a better experience while backing up. It has more helpful and practical features, such as creating a bootable USB drive to perform operations without booting Windows, and restoring Windows system images from boot. Give it a try.
Related Articles
- Easiest Way to Backup Buffalo LinkStation NAS to another NAS
This tutorial will show you how to backup Buffalo LinkStation NAS to Buffalo NAS or another NAS with reliable and professional backup solution in Windows in a few steps. - Easy Way to Copy from NAS to NAS in Windows
Copying NAS to NAS will be easy if you make use of third party software. Qiling Disk Master can help you backup NAS to another NAS simply. - How Much Free Disk Space Should I Have and How to Free up Disk?
How much free disk space should I have? Here, you can find relevant info and learn to free up disk storage in only a few steps. - How to Backup Files If Windows Doesn't Boot
If Windows doesn't boot successfully, you cannot access files on the PC. Fortunately, you can learn how to backup files if Windows doesn't boot in this article.

