System Restore Not Working in Windows 10 | 9 Fixes Are Here!
- Issue: system restore not working Windows 10
- Why is System Restore not working Windows 10?
- System restore failed in Windows 10 – how to fix it easily
- Fix 1: Confirm you enable system restore
- Fix 2: Increase the max disk space usage
- Fix 3: Uninstall or disable incompatible software
- Fix 4: Check if system restore point is available
- Fix 5: Try a different system restore point
- Fix 5: Run system restore in safe mode or Windows PE
- Fix 6: Check disk error
- Fix 7: Run system file checker
- Fix 8: Restore health using DISM
- Fix 9: Check if services running properly
- System Restore does not always help
- Backup system in Windows 10 step by step with correct way
- Another backup software to create system image in Window 10
- Final words
Issue: system restore not working Windows 10
System Restore is a feature in Windows that allows you to revert your system to a previous state, undoing changes made by Windows updates, device drivers, apps, or incorrect registry edits. It's available in Windows 10 and earlier versions.
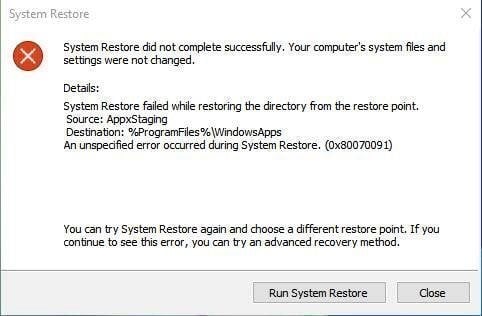
Users experience issues with Windows 10's system restore feature, including failure to create restore points, unsuccessful system restore operations with various error codes, and inability to create a shadow copy, resulting in system restore failures.
If system restore is not working in Windows 10, there are several reasons and solutions to fix it. To troubleshoot the issue, you need to identify the root cause, which could be due to corrupted system files, a malfunctioning restore point, or a problem with the System Restore service. Once you've identified the issue, you can try fixing it by running the System File Checker tool to scan and replace corrupted system files, checking the System Restore service to see if it's running properly, or creating a new restore point to overwrite the existing one.
Why is System Restore not working Windows 10?
In Windows 10, system restore may not work due to two main issues: not being able to create a system restore point or successfully performing a system restore. There are various reasons for these problems, including issues with the system restore point creation process, corrupted system files, or problems with the Windows Update service, as well as hardware-related issues such as a failing hard drive or insufficient disk space. Additionally, conflicts with installed software, malware, or driver updates can also prevent system restore from functioning properly.
Windows 10 not creating restoring points
1. System Restore is turned off by default in Windows 10, but you can enable it to create system restore points during system updates or other significant changes, such as installing new applications or modifying system settings.
2. If you've enabled system restore points in Windows 10, it's possible that the disk space usage is insufficient due to the accumulation of multiple restore points. To check, please verify the maximum usage of System Restore.
3. Software compatibility. While System Restore is compatible with most software, some programs may not work well with it, including anti-virus and anti-malware software, registry cleaners, and other system file monitoring applications. To ensure a smooth restore process, it's recommended to disable these types of software before creating restore points.
System restore failed
1. If system restore points are created while incompatible software is present, they may become damaged, leading to a failed system restore.
2. If your computer has driver issues or startup scripts that are causing it to malfunction, System Restore may not work properly.
3. To roll back Windows installation and system files, disable anti-virus and anti-malware software, or other system scanning applications before system restore.
System restore failed in Windows 10 – how to fix it easily
There are 9 ways to backup and restore a system, allowing for flexibility and customization. Users can choose one or more methods based on their needs, and as an alternative, a true backup software can be used to backup and restore the system in case of a disaster.
Fix 1: Confirm you enable system restore
System Restore may be disabled not only by default, but also if you upgrade Windows 10 from a previous version, such as Windows 7, 8, or 8.1. Before attempting any solutions, it's a good idea to check if it's been disabled.
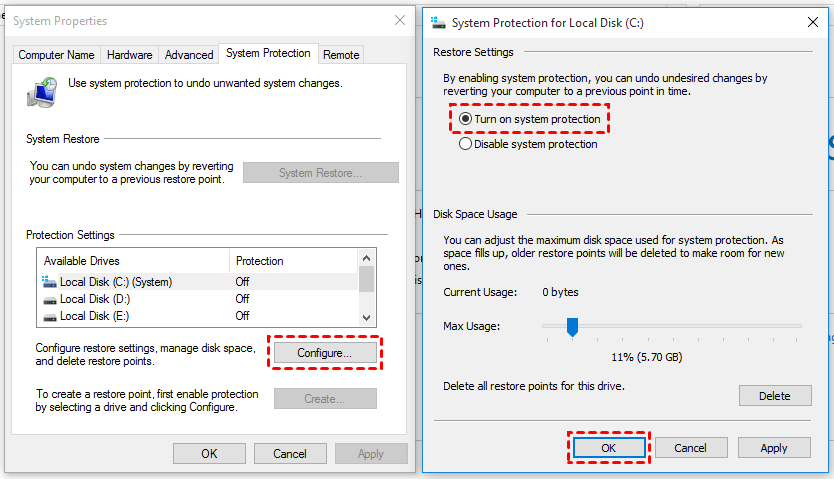
Step 1. Right-click This PC and select Properties -> System Protection.
Step 2. If the protection settings are not on, system restore is disabled and you need to manually enable it by clicking Configure and then Turn on system protection.
Fix 2: Increase the max disk space usage
Windows 10 is not creating restore points due to insufficient max usage, so it's necessary to check and increase the max disk space usage of System Restore.
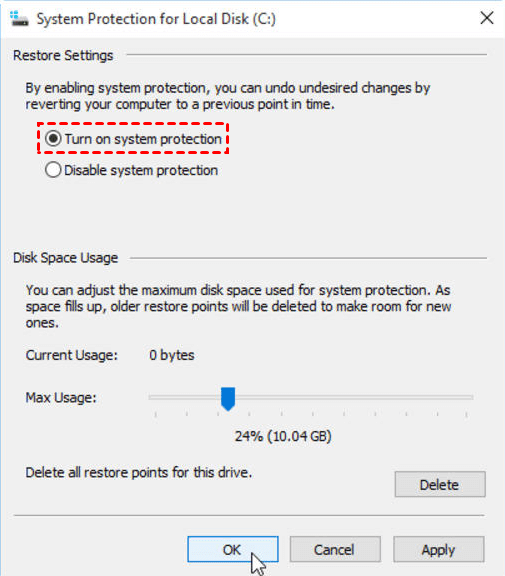
Step 1. Press Win + S and type Create a restore point. Then, choose it from the result list.
Step 2. Here you will see the System Properties window, click Configure.
Step 3. Go to the Disk Space Usage link and adjust the Max Usage bar to exceed the default 3 percent threshold, setting it to over 5 percent instead.
Fix 3: Uninstall or disable incompatible software
Incompatible software, such as Norton antivirus with its product protection feature, can interfere with System Restore, both when creating and restoring system images. To avoid any issues, it's necessary to uninstall or disable such software during these processes.
Fix 4: Check if system restore point is available
Step 1. Go to Control Panel > Recovery > Configure System Restore, then you will enter the System Properties window.
Step 2. Click System Restore.
Step 3. Then, in the initial window, click Next.
Step 4. Select a restore point and click Next.
Step 5. To resolve the issue, select a restore point from the list, and then perform system restore. If the system starts normally without any issues, it means the restore point is available, and you can cancel the system restore process.
Fix 5: Try a different system restore point
If you're experiencing an error in Windows 10, it's possible that there are no system restore points available. This could be due to enabling incompatible software while creating restore points, which may have become corrupted as a result. Alternatively, file conflicts may be preventing certain files from being replaced correctly, making it difficult to proceed. In this case, you can try using a different restore point and running the operation again.
If the above method doesn't work, you can disable the incompatible software and then manually create a system restore point.
Fix 5: Run system restore in safe mode or Windows PE
Failed drivers and startup scripts may prevent your computer from functioning properly, at this time, System Restore will not work properly in normal mode, you need to perform system restore in safe mode Windows 10 or Windows PE.
System Restore in safe mode Windows 10
Step 1. Go to Windows 10 safe mode. Here are 4 ways for you.
Way 1: From Power option
1. Press and hold the Shift key while you select Power > Restart from the Start menu.
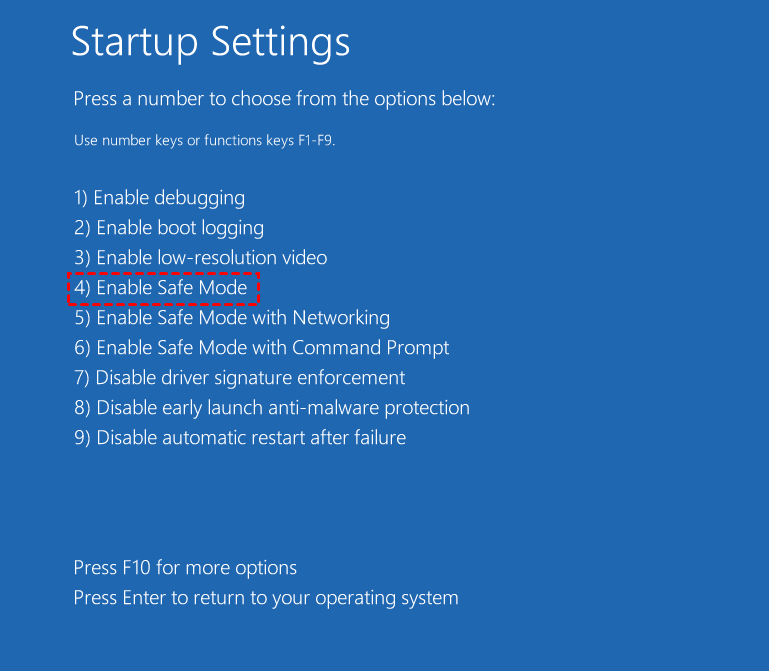
2. After that, your computer will restart to the Choose an option window, where you should select Troubleshoot, then Advanced options, followed by Startup Settings, and finally restart.
3. In the Startup Settings window, press F4 or F5 to enable safe mode or safe mode with networking, respectively.
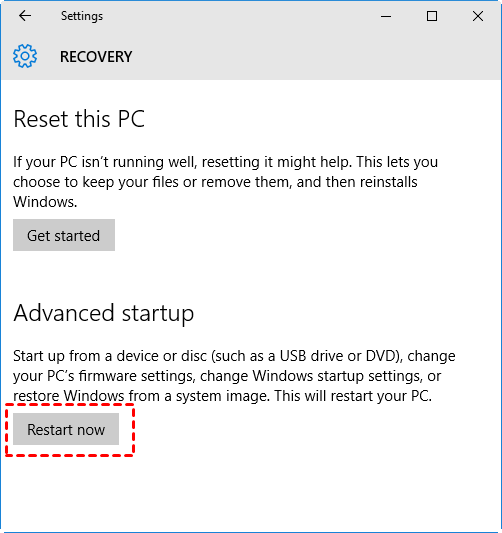
Way 2: From Advanced Startup settings.
1. To access the recovery settings on your Windows device, navigate to the Start menu, then select the "Settings" option. From the Settings window, click on the "Update & Security" option, which is usually located on the left-hand side of the window.
2. Scroll down to the Advanced startup option, click Restart now.
3. To fix the issue, restart your computer, go to the Advanced Startup Options window, select Troubleshoot, then Advanced Options, and finally Startup Settings. From there, disable the Secure Boot feature and restart your computer again.
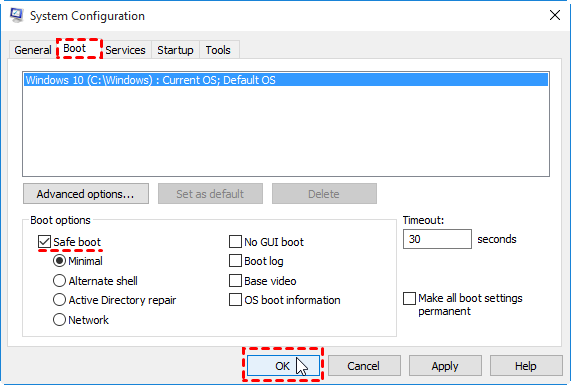
Way 3: From Safe Boot option
1. Press the Windows key + R to open the Run dialog box, type "msconfig" in the text field, and press Enter to open the System Configuration window.
2. In the System Configuration window, click the Boot tab.
3. Tick Safe Boot under the Boot Options link.
Way 4: From boot
Restart your computer and press F8 repeatedly during the boot process, then you will enter Safe Mode.
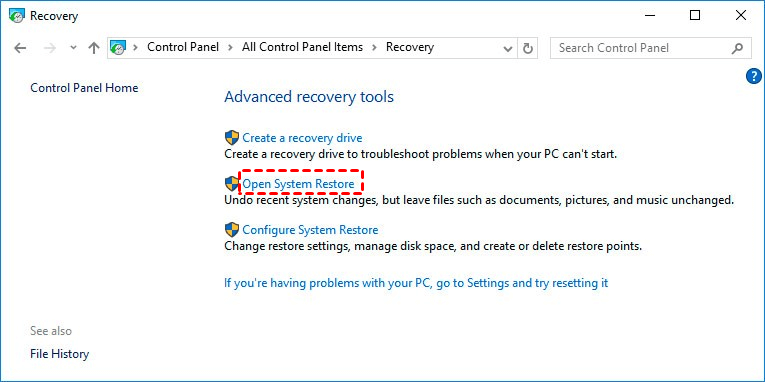
Step 2. Once your are in Safe Mode, type recovery in the search box. Then, select it.
Step 3. In the pop-up window, click Open System Restore.
Step 4. Then, you will enter System Restore, click Next and follow on-screen instructions to finish the rest of the steps.
System Restore in Windows PE
Step 1. To access the Windows Recovery Environment, restart your computer while pressing the Shift key. This will lead to the "Choose an option" window.
Step 2. In the pop-up window, click Troubleshoot > Advanced options > System Restore.
Step 3. Perform system restore as normal mode.
Fix 6: Check disk error
Sometimes, a restore point may not work due to corrupted files and folders on your drive, which can be fixed by checking the hard drive.
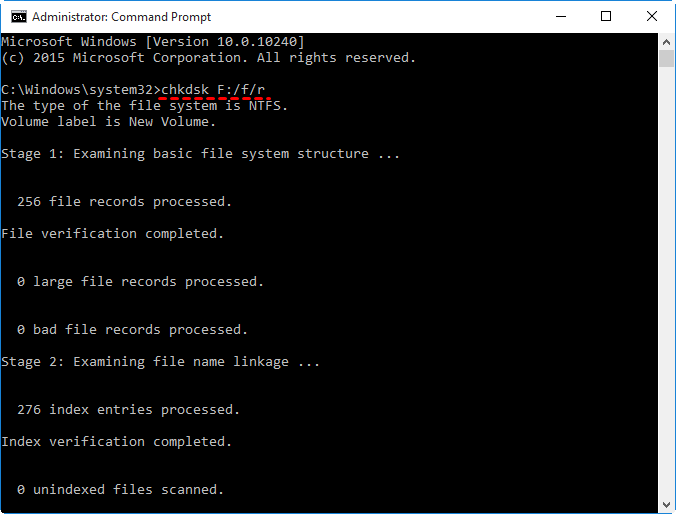
Step 1. Press Win + R and type cmd in the Run window. Then, hit OK to execute.
Step 2. Type chkdsk /f /r F: in the command prompt window and press Enter.
The system restore points are stored on the hard drive, specifically on the F: drive, which contains the system restore points. The system restore points are created by Windows when the system is shut down or restarted.
Fix 7: Run system file checker
In Windows 10, a corrupted system file may prevent system restore from working properly. To resolve this issue, running the System File Checker (SFC) tool can help fix problems it detects, potentially resolving the issue with system restore not functioning.
Step 1. Open cmd through the Run window.
Step 2. Type sfc /scannow and hit Enter.
Fix 8: Restore health using DISM
If the System File Checker (sfc) scan doesn't work, you can try using the Deployment Image Servicing and Management (DISM) tool to fix issues with system files.
Step 1. Open the commdn prompt window.
Step 2. Type the following command line and press Enter to start.
DISM /online /Cleanup-Image / ScanHealth
DISM /Online /Cleanup-Image /RestoreHealth
Step 3. Wait and restart your computer. This process might take 10 minutes.
Fix 9: Check if services running properly
System Restore may not work if specific services are not running, which are necessary for its proper functioning.
Step 1. Press Win + S and type services.msc. Press Enter to open the Services window.
Step 2. Locate the following services. Then, check if its Startup type is Automatic and the Service status is Running.
- Volume Shadow Copy
- Task Scheduler
- Microsoft Software Shadow Copy Provider Service
- System Restore Service
Step 3. Click Apply and OK to save changes and restart your computer.
System Restore does not always help
System restore is only useful for rolling back Windows installation and certain system files, or undoing changes after Windows updates or major changes, but not for full system recovery or individual file recovery.
System Restore is not a backup solution because it only saves system files and installed applications, not user-created files or boot drives, so a true backup software like Qiling Disk Master Standard is needed to achieve a complete backup.
Backup system in Windows 10 step by step with correct way
System Restore may not be effective in all situations, such as when trying to restore a Windows system image to a new hard drive. In such cases, creating a system image backup using a true backup software like Qiling Disk Master Standard is a better option. This provides an exact copy of all files, OS, preinstalled apps, and settings on the system partition.
Here are some useful features in Qiling Disk Master:
4 backup and restore solutions include System Backup, Disk Backup, Partition Backup, and File Backup.
♦ Feature-You can set backup options, including daily/weekly/monthly schedule backup, and incremental backup. Higher versions also offer more useful features, such as scheduled differential backup.
This software offers high compatibility with various operating systems and storage devices, supporting Windows 11/10/8.1/8/7/XP. It enables users to backup Windows 10 to external hard drives, USB flash drives, network drives, and cloud drives, making it a versatile solution for server users who can utilize the �iling Disk Master Server.Qiling Disk Master Server.
♦ User-friendly design and clean interface.
To backup your system, download the freeware in advance and prepare a target drive to store the system image. Then, learn how to use the software to create a backup of your system.
Step 1. Lauch this software, click Backup and System Backup subsequently. To backup files only, click File Backup.
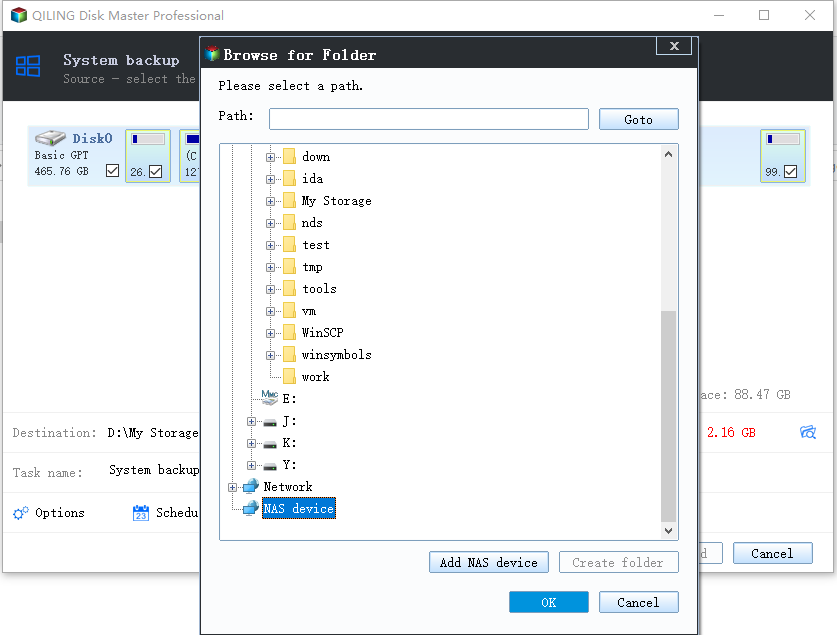
Step 2. To select the prepared drive, click the folder-shaped button and then click Next. The software will automatically choose the system partition and boot-related partitions for you.
Step 3. Click Options, Schedule, then select one or more settings you like. Finally, click Proceed.
Notes:
You will receive an email notification with the final result in a timely manner.
Daily, weekly, and monthly backups can be performed to continuously record system changes, ensuring that the most up-to-date backup is always available for disaster recovery purposes.
Incremental or differential backup saves time and disk space by only backing up files that have changed since the last backup.
The Backup Scheme feature solves the issue of disk space being full by �eleting old backups at a specific role, and it's only available on Qiling Disk Master Professional or higher.deleting old backups at a specific role, and it's only available on Qiling Disk Master Professional or higher.
Another backup software to create system image in Window 10
Qiling Disk Master is a reliable backup software that allows you to create a factory recovery image and restore your computer to its last working state or factory reset it to default settings.
The Qiling Disk Master allows you to backup your system to a partition or external drive, creating a real partition without a drive letter to store the system backup, which reduces the risk of mistakenly deleting the image file. This way, you can safely store your system backup on an external hard drive or USB flash drive.
Qiling supports adding a boot menu and specifying a fast key (F11 or A) to access the recovery environment, allowing for direct access during system startup without the need for a bootable USB or disc, and can be used on all brands of computers, including Lenovo, Dell, HP, Acer, etc.
Download the demo version to have a try! Note that the demo version can only be used for demonstration, so please upgrade to the professional version.
1. Launch one key recovery software Qiling Disk Master, click OneKey System Backup.
2. 1. Go to the Qiling Disk Master Partition backup system.
Notes:✎...
To set compression level or password for the backup image, click on Backup Options located at the bottom of the page.
If your system disk is too small to store the backup image, you can select the option to save the backup to a different location.
3. Select a partition below and this software will create a factory recovery partition behind the selected partition. Confirm all the info, click Proceed, and the process will run into reboot mode, requiring patience and not being stopped.
Final words
System Restore in Windows 10 may not be working as expected, but it's not a true backup solution. Instead, it's meant to restore system settings to a previous point in time. If it's not working, there are 9 possible fixes, but keep in mind that System Restore can't restore individual files or a damaged system. To ensure a full system backup, consider using a true backup software like Qiling Disk Master Standard.
It's an all-This backup software supports four backup and restore solutions, along with various useful features, such as system backup, file backup, email notifications, incremental and differential backup, and daily backup. Some features are only available on the higher version, Qiling Disk Master Professional, so upgrading may be necessary if you need access to these additional capabilities.
Related Articles
- Windows 10 System Restore Stuck on Initializing or Restoring Files
- Solved: Can't Create Restore Point in Windows 10 | 4 Ways
- 3 Ways to Fix The Restore Point Could Not Be Created
- How to Do a System Restore When the Computer Won't Boot?
- How to Run System Restore via Command Prompt in Windows 10
