Turn off System Restore Windows 10 | Use Better Way
Content of this article:
- Can I stop system restore in Windows 10?
- How to turn off system restore in Windows 10 (2 methods)
- System restore turned off in Windows 10 | protect system with a powerful backup software
- Conclusion
Can I stop system restore in Windows 10?
System Restore is a usefu feature built-inWindows XP, Vista, 7, 8, 10, 11 that allows you to restore your computer to an earlier date where it works fine. And it will include the installed programs and its settings, Windows Registry, necessary system files.
Normally, Windows will create system restore points with System Restore feature automatically before installing new software, updating a driver, installing Windows updates, etc. If there are no such events, the system restore point will be created by every 7 days.
Then, when your computer runs slowly or stop responding, you can restore from a system restore point. This operation will not affect your personal data, such as, documents, pictures, etc. But the recently installed apps and drivers will be uninstalled. And the longer you use it, the more space it takes up, which will slow down your computer to some extent.
In addition, it becomes useless when system crashes or disk crashes. Because it does not contain system and all the boot files that are required to boot Windows. At this time, you need a complete system backup Windows 10 created by backup and restore software. Thus, it's wise to turn off system restore in Windows 10/8/7 and schedule backup system in Windows 10.
How to turn off system restore in Windows 10
In the following, I'll introduce you 2 common used ways to stop system restore in Windows 10, namely using system proetction and group policy editor, and both of them are applicable to disable system restore in Windows 7and Windows 8. Keep reading below to learn the detailed steps.
Method 1: Turn off system restore via system protection
Whatever reason you want to stop system restore in Windows 11, 10, 8, 7, you can use the following steps. Just the interface in different system will have a little difference.
Step 1. Click the Start button >Control Panel >System >System Protection subsequently. If prompt, type your administrator password or click "Continue".
Step 2. Select the disk you want to turn off system restore and click the Configure button.
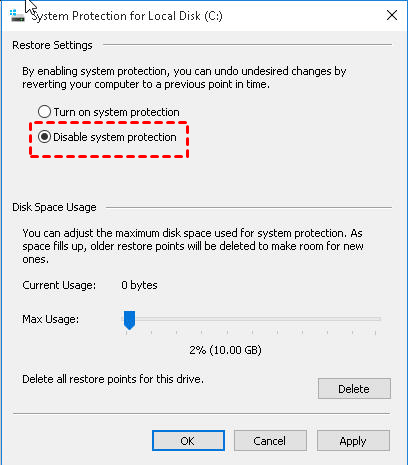
Step 3. In the System Protection for Local Disk (C:) window, tick "Disable system protection" and "OK" to save the changes. In Windows 7, you need to tick "Turn off system protection".
Method 2: Disable system restore using Group Policy
For group policy, it's only available in some operating system, such as, Windows 7 Professional, Ultimate and Enterprise, Windows 8 Professional and Enterprise, Windows 10 Professional, Enterprise and Educations.
If your computer is running one of these operating system, you could try this method. If not, you can go back to the first method.
Step 1. Press "Win + R" to open the Run window, then type "gpedit. msc" and hit "OK". After a few seconds, you will see the main page of the local group policy editor.
Step 2. Go to the following location and select "System Restore" key at the left panel.
Computer Configuration\Administrative Templates\System\System Restore
Step 3. Double-click "Turn off System Restore" and then tick "Enabled" and hit "OK".
Note: Disabling system restore in Windows 10/8/7 will delete all the existing system restore points. If that's not what you want, you can enable system restore again.
System restore turned off in Windows 10 | protect system with a powerful backup software
As mentioned earlier, system backup will be a better choice to protect system and data on your computer. To make it, you need a powerful backup software, such as, Qiling Disk Master Professional. Here are some advantages of it.
- 4 backup solutions. It supports system backup, disk backup, partition backup, file backup, and corresponding restore feature.
- High compatibility. It supports Windows 11/10/8/7/XP/Vista. And it supports all Windows recognized storage device, such as, internal or external hard drive, USB flash drive, cloud drive like OneDrive, network drive, NAS etc.
- Multiple useful features. It supports schedule backup in daily/weekly/monthly or use Event trigger and USB plug in. Also, you can backup only changed data using incremental backup or differential backup or delete old backup image with backup scheme thereby saving backup time and disk space.
Then, let's create a system backup to protect your computer. It's suggested to backup system to external hard drive or other storage device outside computer, which will not occupy disk space of your local computer as well as increase computer performance to some extent.
Step 1. Prepare an external hard drive and connect it to your computer, make sure it can be detected. Then, download Qiling Disk Master Professional and install it on your computer.
Step 2. Open Qiling Disk Master Professional. Then, Select "System Backup" under the Backup tab.
Note: To backup entire disk, click "Disk Backup" as instead. It will include all the data on the disk, not just the system partition.
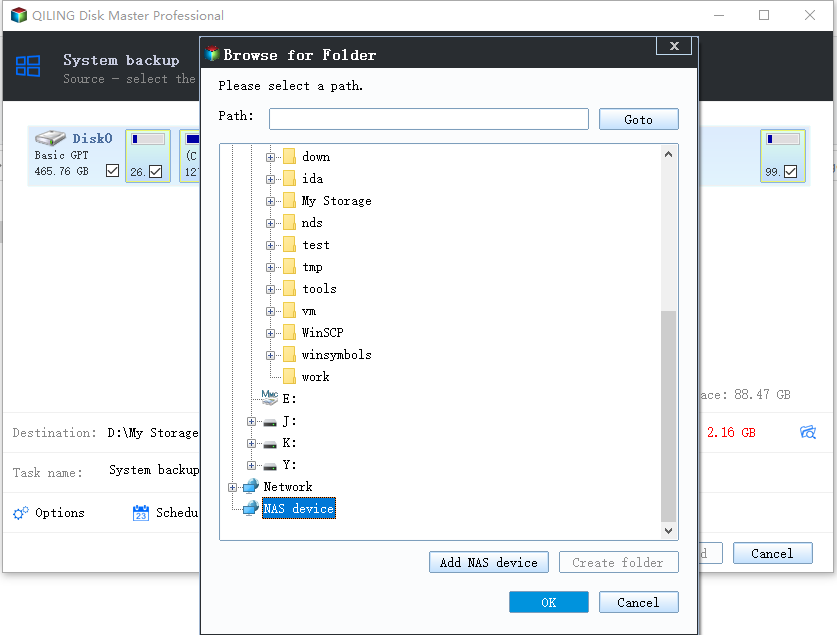
Step 3. As you can see, there are three partitions listed, all of them are system partition and boot related partitions required to start Windows. All you need to do is to select the prepared external hard drive as destination path.
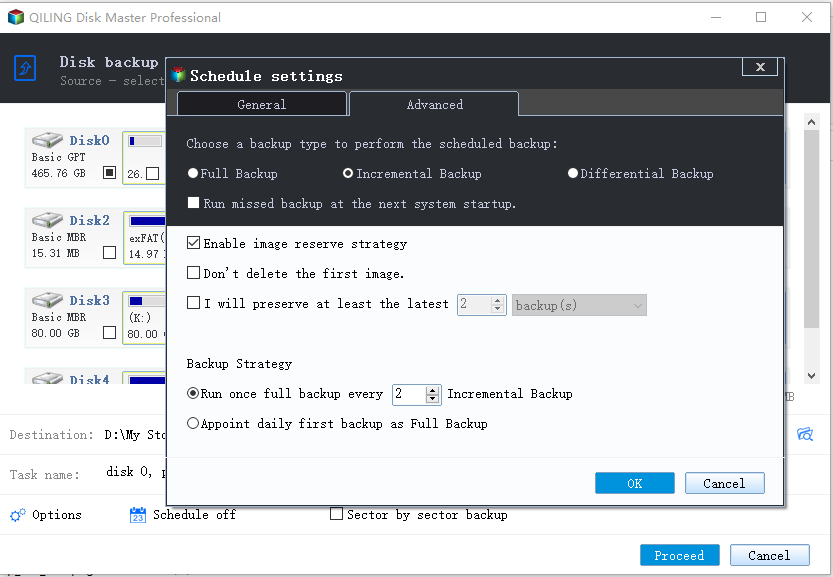
Step 4. Click "Schedule" and select one or more settings under the Schedule Settings window. Then, you can set incremental backup in the Backup Scheme.
Tips:
❤ If your target drive is USB flash drive, it's suggested to use "USB plug in" feature. It will backup system to USB drive automatically when it's plugged in.
❤ If you want to backup system during off-peak hours, please remember to tick "Wake the computer to run scheduled tasks". It will start your computer 2 minutes before the scheduled task begin.
Step 5(optional). If you don't want backups to take up too much disk space or your target disk is slightly small, you can choose to delete old backup images regularly with "Backup Scheme" feature.
In the Schedule window, click "Backup Scheme" and "Enable Backup Scheme", then choose a scheme and set the number of backups you want to retain. Finally, click "OK" to exit this window.
Note: To manually set scheme for scheduled backup task, you can use the "Edit Backup" feature in the "Home" tab. Just select the backup task and click the three horizontal lines, then you will see the "Edit Backup" feature.
Step 6. You are almost done. The last step is to click "Proceed", then it will start to backup system automatically.
Conclusion
System restore works in some situations, such as, your computer slow down or stop responding, but it will occupy much disk space for a long time use. And it does not work when the operating system or the disk crashes.
All the restor points are stored on corresponding partitions, thus it will be damaged if the partition goes wrong. And system restore point does not contain the system and all boot-related partitions required to start.
For these reasons, you can turn off system restore in Windows 10/8/7. Then, you can create a system image with Qiling Disk Master Professional to replace the restore point. For server users, you could use Qiling Disk Master Server.
It can do all the things System Restore can do for you, and be your last resort to recover your computer when it's unbootable. If you schedule backup system, all the personal data and installed programs will be included as well.
Related Articles
- How to Turn on System Restore in Windows 7
To protect your computer well, you can turn on System Restore in Windows 7. Besides, you can create an image backup to get supplementary protection for your computer. - Fixed Issue: You must enable System Protection on this drive
You may get the error "You must enable system protection on this drive" when performing system restore in Windows 10/8/7. This page tells why it emerges and how to fix the error via CMD. Better way to protect Windows is provided as well. - How to Enable/Disable Volume Shadow Copy for Windows 10/8/7
You will learn how to enable/restore/disable volume shadow copy in Windows 10/8/7 as well as all-round way to backup files and folders. Get details now! - Solved: Can't Create Restore Point in Windows 10
If you can't create restore point in Windows 10, refer to this article to realize how to fix this problem and find out a better way to protect your computer. - System Restore Did Not Complete Successfully - Fixed for Windows 10/8/7
Are you confronted with the issue "System Restore did not complete successfully" with different error codes? Read this article thoroughly to get corresponding reasons and solutions.


