How to Upgrade Windows 7/8.1 to Windows 10 Without Losing Files
Why upgrade to Windows 10 from XP, Vista or Windows 7/8/8.1?
Windows 10 was officially released on July 29th, 2015. With the constant efforts of Microsoft, Windows 10 has been optimized greatly. You may be willing to upgrade to Windows 10 for following reasons:
- Fast startup
- Improved Start menu with a tile-based appendage
- A hands-free technology—Cortana
- A better default browser—Microsoft Edge with improved compatibility and speed, as well as a few helpful new capabilities
- Strengthened security…
What’s more, Windows 7 users may have already been informed of the end of support for Windows 7 after January 14, 2020. To enjoy continuous support or services from Microsoft, you’d better move to Windows 10 from Windows 7.
Talking about Windows upgrade, many people wonder, “If I upgrade to Windows 10, will I lose my files?” Ease your mind and learn how to upgrade to Windows 10 without losing data in the next part.
How to upgrade to Windows 10 without losing files simply
Before you proceed to upgrade to Windows 10, you should first have a license to install Windows 10. Then, check the minimum hardware requirements for installing Windows 10. It is recommended to go to the PC manufacturer’s website for any additional info about updated drivers and hardware compatibility.
● Processor: 1 GHz or faster processor or System on a Chip (SoC)
● RAM: 1 GB for 32-bit or 2 GB for 64-bit
● Hard disk space: 16 GB for 32-bit OS or 32 GB for 64-bit OS
● Graphics Card: DirectX 9 or later with WDDM 1.0 driver
● Display: 800×600
★ Video tutorial
★ Graphic tutorial of upgrading Windows 7/8.1 to Windows 10 without losing data
1. Download the media creation tool from Microsoft. Click the Download tool now button to save the installer on your computer.
2. Right-click the MediaCreationTool.exe and select Run as administrator.
3. On the License terms page, select Accept.
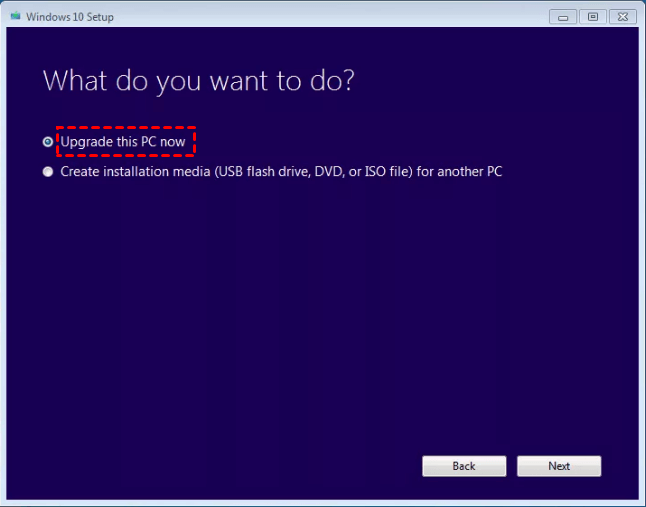
4. On the What do you want to do? page, select Upgrade this PC now, and then select Next.
5. After downloading and installing, the tool will walk you through how to set up Windows 10 on your PC. Enter your Windows 10 product key when prompted.
✎ Note: If you are reinstalling Windows 10, you don’t need to enter a product key. Your copy of Windows 10 will automatically activate later using your digital license.
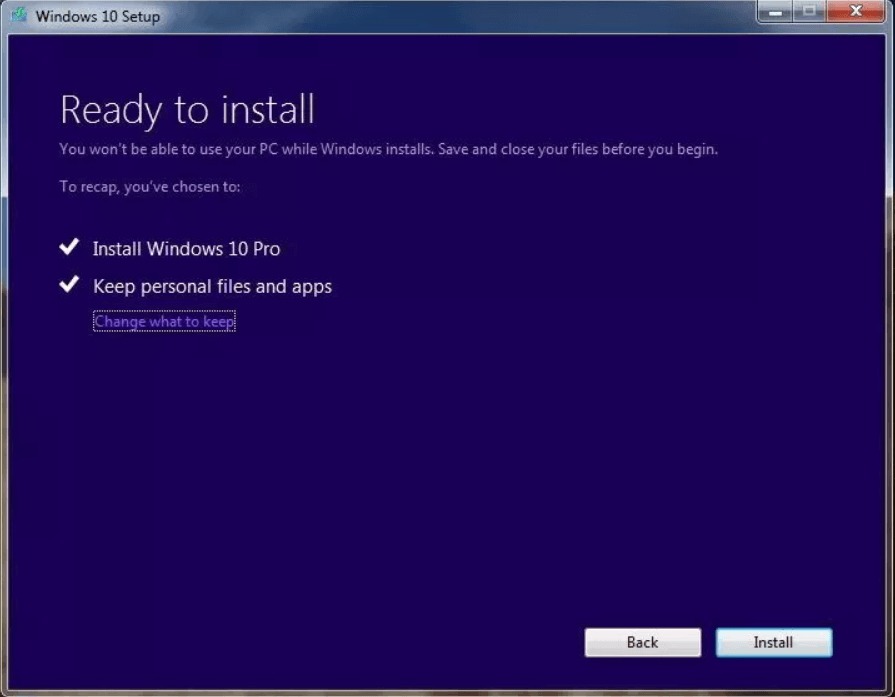
6. When Windows 10 is ready to install, you’ll see a recap of what you’ve chosen (Windows 10 Pro or Home, etc.), and what will be kept through the upgrade. Keep personal files and apps is selected by default, and you can change the option by clicking Change what to keep.
7. Save and close any open apps and files you may be running, and when you’re ready, select Install.
8. It might take some time to install Windows 10, and your PC will restart a few times. Make sure you don’t turn off your PC.
After the installation completes, you’ll need to go through the easy out-of-box-experience to finish setting up Windows 10, and then you’ll once again see your familiar desktop and every new feature included with Windows 10.
✍ Tip: To upgrade XP or Vista to Windows 10, you need to do a clean installation with Windows 10 installation media. To avoid data loss, you should backup files in advance.
Extra tips for avoiding data loss after upgrading to Windows 10/11
Although upgrading from Windows 7/8.1 to Windows 10 will not result in data loss, it is always a good idea to backup your crucial data just in case the upgrade does not run properly. This is also true for Windows 11 upgrading - if you want to upgrade Windows 10 to Windows 11 securely, system backup is a must-do step. Then, which backup tool should you choose?
The best free backup software - Qiling Disk Master Standard can be an ideal choice. It is embedded with all-around backup solutions as shown below:
|
📂 Backup Type |
It offers System/Disk/Partition/File/Cloud Backup to meet your different needs. |
|
⏰ Automatic Backup |
To ensure your backups are kept up to date, you can schedule backups so they will happen automatically. |
|
📈 Incremental Backup |
By default, it uses the incremental backup method to perform your scheduled backup, saving both backup time and backup space. |
|
🧿 WinPE Backup & Restore |
To run backup and restore operations without booting Windows, you are allowed to create bootable media or recovery environment (paid) as per your need. |
|
💻 Supported OS |
All Windows PC operating systems like Windows 11/10/8.1/8/7/Vista/XP are supported. If you are running Windows Server systems like Server 2022/2019, Qiling Disk Master Server is available. |
Just download this freeware to have a try. After clicking “Backup” on the left-hand panel, you’ll see all the backup types available. With the intuitive interface, all you need to do to perform backups are a few clicks!
With the backup, you don't need to worry about data loss in system partitions. You can use the system image to restore computer to an earlier date if you have problems with your new system or you are not satisfied with its performance.
Summary
You have learned a full guide to upgrade to Windows 10 without losing files. To prevent data loss caused by unexpected upgrade errors, you can turn to Qiling Disk Master. It provides you with powerful data protection. You can also use Qiling Disk Master for SSD data migration. Go for this tool right now!
Related Articles
- How to Reinstall Windows 10 without Losing Data (3 Ways)
Sometimes, you may need to reinstall Windows 10/11 to solve system issues. This guide will show you how to reinstall Windows 10/11 without losing data step by step. - How to Safely Upgrade Windows 10 32 Bit to 64 Bit
Be sure your computer meets the upgrade requirements and you have a copy of your important data. Then you can upgrade Windows 10 from 32 bit to 64 bit without losing data. - How to Reset or Refresh Windows 10 without Losing Programs
This article tells you how to refresh Windows 10 without losing programs and data. It seems a good idea to reinstall Windows 10 when serious system problem occurs. Read on to learn more. - Backup Installed Programs in Windows 11 to Avoid Reinstallation
Need to backup installed programs in Windows 11 to avoid tedious reinstallation in case of computer failure? Don't hesitate to get the stepwise guide now!


